The Microsoft Certified Professional or MCP Program is the certification program offered by Microsoft that enables IT Professionals and Developers to validate their technical expertise.
Exam
Replay with Practice Test includes one exam voucher, one retake, and a Microsoft Official Practice Test. Exam Replay exam vouchers expire twelve (12) months from the date of purchase

Exam Replay with Practice Test is an exam voucher that includes one retake of the same exam and a separate voucher for a Microsoft Official Practice Test.
Microsoft offering for students/developers the price will be USD $90 + 18% GST= $106 (INR. 7678 approx.). You will receive online access to practice tests for 30 days of activation using the emailed activation code.

Microsoft Official Practice Tests are ONLY available for select exams.
Verify there is a practice test associated with the exam you are interested in before purchasing.
You can refer to
Microsoft website for offer details and frequently asked questions.
Enable GingerCannot connect to Ginger Check your internet connection
or reload the browserDisable in this text fieldEditEdit in GingerEdit in GingerEnable GingerCannot connect to Ginger Check your internet connection
or reload the browserDisable in this text fieldEditEdit in GingerEdit in Ginger
I have encountered lost Internet connection, network connectivity issue when using Microsoft Office, Office 365, Outlook, Teams, Internet Explorer 11 (IE11), and some version of Microsoft Edge and device, UWP app and Store app, when also using VPN (Virtual Private Network) in Windows 10, chance is my system affected by a bug introduced in Windows 10 by the February 27 update KB4535996

I have tried for update OS, but keep saying update is failed and tried with many ways but there is no solutions. Finally, I have updated Windows 10 1903 update into machine after that issue is get resolved and internet started working on in the all apps .

Solution - Windows 10 Update Assistant
Microsoft released Windows 10 1903 cumulative update KB4515384 on September 10. The monthly cumulative update has resulted in a number of issues, including a Search and Start menu problem, audio issues, and connectivity bugs too. I have updated Windows 10 1903 update into machine after that issue is resolved
Download Microsoft windows 10 Assistant in the below URL and it will take more time for update all the required changes, after that internet issue will get away from your system
https://www.microsoft.com/en-us/software-download/windows10
Hope this solutions is helped you for fix the issue.
Introduction
Azure App service is an HTTP based service for hosting web applications, Rest APIs and mobile back ends, you can develop in your known language using .Net, .Net core, Java, Ruby, Node.JS, PHP and Python. Asp.net core applications run and scale with both Windows and Linux based environments. In this article you will learn more about how to create web apps using asp.net core and publish applications into Azure.
Prerequisites
- Download and install the latest Visual Studio 2019.
- Create new Account / Login Azure.
Create Asp.net Core App
You can start to create an asp.net core app using visual studio. Open Visual Studio and Select to create a new project template as “Asp.net core web application”. you can select your know language, in this demo, we are selecting as “C#” language.

Configure new Project
Second step, Provide the project name, location, solution name and click on create

Application Template
Microsoft provides different types of templates for creating apps. We have to create a web application for a demo, so you need to select “Web Application” and Click on “Create”.

Once created the application, solution will be generated with required file as below

Run the Application in Local
Visual Studio used a default template so you have a working web app right now by entering a project name and selecting a few options. This is a simple auto generated project, Tap F5 to run the app in debug mode or Ctl-F5 in non-debug mode.
Visual Studio starts IIS Express and runs the app. the address bar shows localhost and port number. The localhost always points to local computer.
The default template as like below with banner image and sample content.

Publish Web App
publish your web app, you must first create and configure a new App Service that you can publish your app to Azure and also follow the below steps .
Step 1: Right Click on Project or Solutions
Step 2: Select “Publish” options on the right click menu.
Step3: The below windows will pop up for the first time. You can select “Azure” as a publishing platform.

You can select the Azure App service and operating system which you want to deploy your web app in the below window and click on next.

Select either create an account or Sign in to sign in to your Azure subscription. If you're already signed in, select the account you want.

To the right of App Service instances, click on +.

Select subscription, Resource group and hosting plan in the following screen
- Subscription – Select the subscription that is listed or select a new one from the drop-down list.
- Resource group - select New. In New resource group name, enter the resource group name and select OK.
- Hosting Plan – Select the hosting plan and click on create

Once the wizard completes, successfully completed build and publish web application into Azure, you can refer and try published URL in browser

You can navigate to published url and verify your published website available in Azure and online

You can also navigate to Azure portal and select on All resource and check App service and AppService plan is hosted under your resource. You can verify and manage app service plans in azure portal.

Summary
In this article, you have learned about creating Web Application using Dotnet core and published applications into Azure. if you have any questions/feedback/ issues, please write them in the comment box.
Enable GingerCannot connect to Ginger Check your internet connection
or reload the browserDisable in this text fieldEditEdit in GingerEdit in Ginger
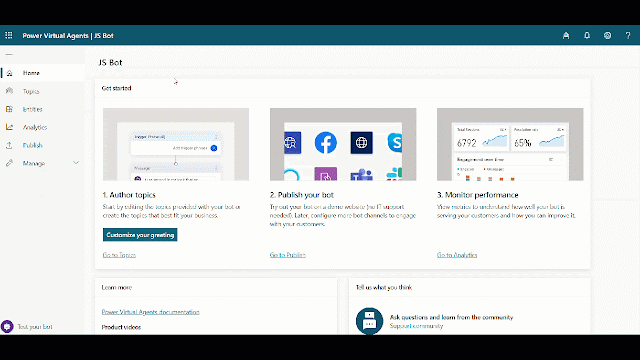
Power Virtual Agents are an easily created powerful bot and no-code graphical interface without the need for data scientists or developers. It eliminates the gap between the subject matter experts and the development teams building the bots and it minimizes the IT effort required to deploy and maintain a custom conversational solution. In
my previous article you learned how to set up and quick overview about power virtual agents.
In this article you will learn more about how you can customize the bot conversation messages. User conversation message called as “Topic” in Power virtual agents. A topic has trigger phrases - these are phrases, keywords, or questions that a user is likely to type that is related to a specific issue - and conversation nodes - these are what you use to define how a bot should respond and what it should do and you can maintain up to 1000 topics in a Bot.
User and System Topic
Once again remind you, before reading this article, You can follow
my previous article to learn more about setup and create the first Power Virtual agent Bot application.
When you have successfully create bot applications, you are able to see a number of topics will be created automatically and also you can see how the bot conversation works in practice by testing it in the Test bot pane. For example, a user might type “I want a Business Laptop" into your bot. The AI will recommend the Business Laptop and request you to confirm adding to the cart. Bot will suggest you provide “Yes” or “No”.

There are two topics the category system will generate. You can refer and learn the topic, how you need to implement it for your business use case.
User Topics Category you will find Four pre-populated User Topics that are titled as lessons. These lesson topics can be used to help understand, simple to complex ways of using nodes to create bot conversations.
System Topics is reusable topics like greeting, Say goodbye like that. These are pre-populated topics that you are likely to need during a bot conversation.
Create New Topic
You can create your own topic and maintain up to 1000 topics in a Bot.
Step 1: Go to the Topics tab on the side navigation pane to open the topics page.
Step 2: on the Topic page, Select the New Topic option on the top navigation pane.
 Step 3:
 Provide a topic name, description, and one or more trigger phrases for the topic by clicking on Add button.

Go to Authoring Canvas
Click on Save Topic options on the right corner on the Topics page. Once click on Save topic, you will get the error and asking you to set Authoring Canvas

Power Virtual Agents open the topic in the authoring canvas and displays the topic's trigger phrases. The authoring canvas is where you define the conversation path between a customer and the bot, message Edit text box having styling feature, add and change the text font style and hyperlink

Build and Save Topic
Once you have done the changes, Click on Topic Checker. Topic checker will show you if there are any errors or warnings in the topic. If there's no error, Click on Save options.

Test Bot Application
You're now ready to test your bot. You will test your bot using the built-in Power virtual agent bot Emulator. You can provide user input, which we created a topic say “Can you suggest a Microsoft AI Learning Blog” and Bot will reply to the triggered message.

Summary

You have successfully created topics and run the application in the power virtual agent. I hope you have enjoyed learning about the Power virtual agent bot. If you have any questions/feedback/issues, please write them in the comment box.
Enable GingerCannot connect to Ginger Check your internet connection
or reload the browserDisable in this text fieldEditEdit in GingerEdit in GingerEnable GingerCannot connect to Ginger Check your internet connection
or reload the browserDisable in this text fieldEditEdit in GingerEdit in GingerEnable GingerCannot connect to Ginger Check your internet connection
or reload the browserDisable in this text fieldEditEdit in GingerEdit in Ginger
Microsoft
introduced a new approach to help learners stay current, those who have an Microsoft active certificate and are expiring within six month can renew their certification annually at no cost, no renewal exam and only you have to do a Microsoft learn assessment to refresh your skill.

The renewal assessment is available only on Microsoft Learn once you’re eligible approximately six months before your certification expires and you will receive an email notification from Microsoft for when the renewal assessment is available in your exam.
Your certification profile should enable you to take the renewal assessment on Microsoft learn when you are within eligibility window and also keep same account for both your certification profile can be connected to Microsoft learn

How to Extend Certificate Expire date
You will be able to renew your role-based and specialty certifications by passing a free renewal assessment on Microsoft Learn. You can follow the below steps for renew your Microsoft certification exam
Step 1: Check is it any available exam for ready for renew in Microsoft certification
DashboardStep 2: Ensure your certification profile is connected to Microsoft Learn, if you are using same user credentials, it may connected automatically otherwise connect with Microsoft support team using
MS forumStep 3: You will get email alert, if any assessment that will be available on Microsoft learn.
Step 4: You may retake the assessment as many times as you need to take it to pass, and you must pass before your certification expires.
Step 5: When you pass the online assessment, your certification will be extended by the one additional year from the current expiration date.
keep continue Lean . ..To learn more you can visit the
official announcement here.
Enable GingerCannot connect to Ginger Check your internet connection
or reload the browserDisable in this text fieldEditEdit in GingerEdit in GingerEnable GingerCannot connect to Ginger Check your internet connection
or reload the browserDisable in this text fieldEditEdit in GingerEdit in Ginger
IntroductionThe Passwords and Security Codes (OTP) are a modern necessity required for security and privacy but initially iOS does not support auto read feature.
iOS 12 eases the tedious aspects of account setup and sign-in by automatically suggesting and using strong, unique passwords and by bringing one-time password to the QuickType bar so users can fill them with one tap. Here we’ll learn how to implement autofill OTP in your app using Xamarin Forms .
Message Format Rules
Security code is only work with System keyboard. So, avoid using custom keyboard.
Make sure OTP message phrase has “code” or “passcode” and message is copy.
Create New Xamarin Forms Application
In order to implement Autofill OTP message, let’s start creating a new Xamarin.Forms project using Visual Studio 2019 or VS mac. When accessing
Visual Studio 2019 mac for the first time, you will come across a new interface for opening a creating the projects.
Open Visual Studio Mac >>Create New Project or select open recent application.
The available templates will appear on a mac like below.
Select Xamarin.Forms application with different mobile platforms.
Custom Control
One time code type available only specific to iOS device, not in Android, so create a Xamarin.Forms custom Entry control in the .NET Standard library project, enabling developers to override the default native rendering with their own platform-specific customization.
using System;
using Xamarin.Forms;
namespace ReadOTPIOS
{
public class AutoFillControl : Entry
{
public AutoFillControl()
{
}
}
}UI Design
The AutoFillControl control can be referenced in XAML in the .NET Standard library project by declaring a namespace for its location and using the namespace prefix on the control element. The following code example shows how the AutoFillControl control can be consumed by a XAML page:
<?xml version="1.0" encoding="utf-8"?>
<ContentPage xmlns="http://xamarin.com/schemas/2014/forms"
xmlns:x="http://schemas.microsoft.com/winfx/2009/xaml"
xmlns:local="clr-namespace:ReadOTPIOS" x:Class="ReadOTPIOS.MainPage"
>
<StackLayout Orientation="Horizontal">
<Label
FontSize="Large"
HorizontalOptions="Center" Text="Welcome to iOS 12 Read and Autofill OTP from SMS using Xamarin Forms" />
<local:AutoFillControl
FontSize="Large"
HorizontalOptions="Center"
Keyboard="Numeric"
Placeholder="XXXXXX" />
</StackLayout>
</ContentPage>IOS Renderer
The following code example shows the custom renderer for the iOS platform. The call to the base class's OnElementChanged method instantiates an iOS UITextField control, with a reference to the control being assigned to the renderer's Control property.
To enable password autofill on a UITextField we need to set the UItextContentTypeproperty as a OneTimeCode.
using ReadOTPIOS;
using ReadOTPIOS.iOS;
using UIKit;
[assembly: ExportRenderer(typeof(AutoFillControl), typeof(AutoFillRenderer))]
namespace ReadOTPIOS.iOS
{
public class AutoFillRenderer: EntryRenderer
{
protected override void OnElementChanged(ElementChangedEventArgs<Entry> e)
{
base.OnElementChanged(e);
if (e.NewElement != null)
{
Control.TextContentType = UITextContentType.OneTimeCode;
}
}
}
}
The application source code available in
Github. IOS simulator won’t allow to send messages, so let you try and deploy applications to IOS device and send a message to device for testing.
 Summary
This article has demonstrated how to create a Read and
Autofill OTP from SMS using Xamarin Forms Entry control. I hope this article will help you. Please leave your feedback/query using the comments box, and if you like this article, please share it with your friends.
or reload the browserDisable in this text fieldEditEdit in GingerEdit in GingerEnable GingerCannot connect to Ginger Check your internet connection
or reload the browserDisable in this text fieldEditEdit in GingerEdit in Ginger
IntroductionAzure AD is cloud-based identity and access management service, which helps employees to sign in and access company resources such as Microsoft 365, the Azure portal, and thousands of other SaaS applications. AZURE AD will provide different below feature
- Employee admin can enable Azure AD to require multi-factor authentication when accessing important organizational resources. you can use Azure AD to automate user provisioning between your existing Windows Server AD and your cloud apps, including Microsoft 365.
- Company has any enterprise application which provide related company information, timesheet app, employee inventory management app like that company can develop any application which allow only company users to access using Azure AD as a standards-based approach for adding single sign-on (SSO) and allowing it to work with a user's pre-existing credentials and no need add any other registration or login screen for your application.
 with Custom domain")
Create new tenant
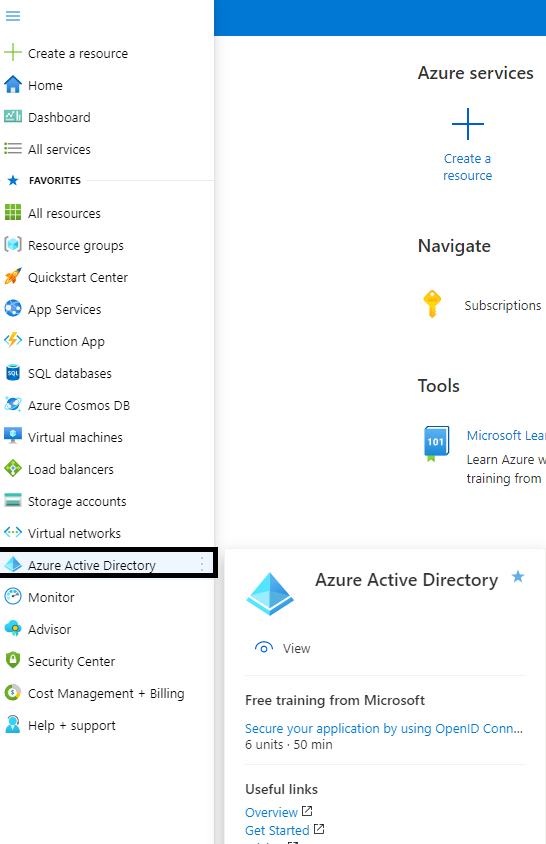
- Login to personal / organization Azure portal https://portal.azure.com
- Create new Resource menu having “Azure Active Directory” as like below and click on Azure Active Directory
On Create a tenant page, click on “
create active directory”
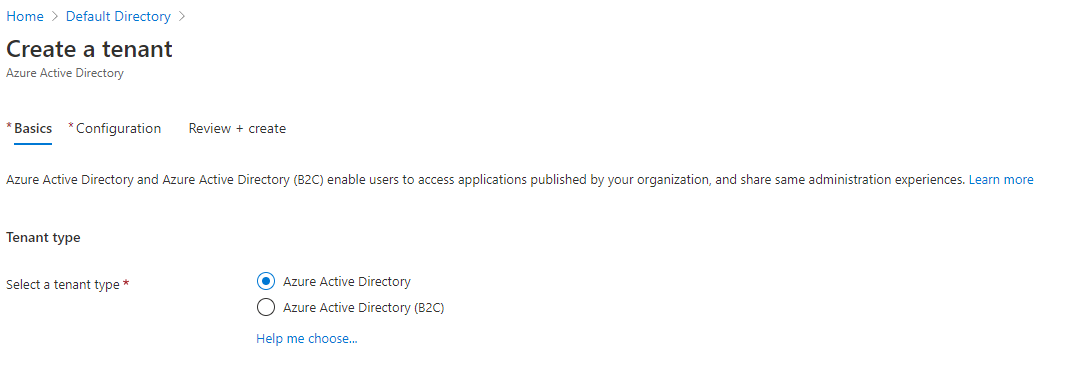
On the create a tenant confirmation as information below
- Organization name - you can provide here as your organization name
- Initial domain name – provide here as your initial domain name
- Country/ Region – provide your county name.
 with Custom domain")
You will get new screen for review and confirmation tenant creation, after validation you will get initial domain as like this <your domain name>.onmicrosoft.com, example MSDEVJS.onmicrosoft.com
 with Custom domain")
Tenant creation is in progress and it will take a few minutes for get confirmation
 with Custom domain")
Your new tenant is created with the domain MSDEVJS.onmicrosoft.com.
Setup Custom Domain Name
You have successfully created new Azure AD tenant with default Microsoft sub domain, you can’t change Microsoft default sub domain, but you add you company custom domain, it will help you to create email and access Microsoft app with your domain name.
Step 1: Select option as a Custom Domain
Step 2: Click on Add custom domain in menu options
 with Custom domain")
In Custom domain name, enter your organization's new name, in this example, devenvexe.com. Select Add domain
 with Custom domain")
You must add universal domain extension like .in, .com, etc . devenvexe.com page appears showing your DNS information. Save this information. You need provide a
TXT or MX record to configure DNS.
 with Custom domain")
After you add your custom domain name to Azure AD, you must return to your domain registrar provider and add the Azure AD DNS information from your copied TXT file. Creating this TXT record for your domain verifies ownership of your domain name.
Go back to your domain registrar and we have register domain in big rock and create a new TXT record for your domain based on your copied DNS information. Set the time to live (TTL) to 3600 seconds (60 minutes), and then add the record.
 with Custom domain")
After you add your custom domain name, make sure it is valid in Azure AD. The domain registrar to Azure AD can be taking a few days, depending on your domain registrar.
Summary
In this article, you learned about, Create a new tenant with Custom domain in Azure Active Directory. If you have any questions/ feedback/ issues, please write in the comment box.
Enable GingerCannot connect to Ginger Check your internet connection
or reload the browserDisable in this text fieldEditEdit in GingerEdit in Ginger
IntroductionMicrosoft Azure services are available in 53 regions around the world, with plans announced for 7 additional regions and 140+ available country. Select Azure region is more important to setup the cloud environment, this gives you the flexibility to bring applications closer to your users no matter where they are. It also provides better scalability, redundancy, and preserves data residency for your services. Azure region A region is a geographical area on the planet containing at least one, but potentially multiple datacenters that are nearby and networked together with a low-latency network. Azure intelligently assigns and controls the resources within each region to ensure workloads are appropriately balanced.
When you deploy a resource in Azure, you will often need to choose the region where you want your resource deployed. Region A set of datacenters deployed within a latency-defined perimeter and connected through a dedicated regional low-latency network.Geographies in AzureAzure divides the world into geographies that are defined by geopolitical boundaries or country borders. An Azure geography is a discrete market typically containing two or more regions that preserve data residency and compliance boundaries.
This division has several benefits.
- Geographies allow customers with specific data residency and compliance needs to keep their data and applications close.
- Geographies ensure that data residency, sovereignty, compliance, and resiliency requirements are honored within geographical boundaries.
- Geographies are fault-tolerant to withstand complete region failure through their connection to dedicated high-capacity networking infrastructure.
Availability ZonesAvailability Zones are physically separate datacenters within an Azure region.Each Availability Zone is made up of one or more datacenters equipped with independent power, cooling, and networking. It is set up to be an isolation boundary. If one zone goes down, the other continues working. Availability Zones are connected through high-speed, private fiber-optic networks. Region PairsEach Azure region is always paired with another region within the same geography (such as US, Europe, or Asia) at least 300 miles away. This approach allows for the replication of resources (such as virtual machine storage) across a geography that helps reduce the likelihood of interruptions due to events such as natural disasters, civil unrest, power outages, or physical network outages affecting both regions at once. If a region in a pair was affected by a natural disaster, for instance, services would automatically fail over to the other region in its region pair.Examples of region pairs in Azure are West US paired with East US, and SouthEast Asia paired with East Asia.
Enable GingerCannot connect to Ginger Check your internet connection
or reload the browserDisable in this text fieldEditEdit in GingerEdit in GingerEnable GingerCannot connect to Ginger Check your internet connection
or reload the browserDisable in this text fieldEditEdit in GingerEdit in Ginger
Power Virtual Agents
is an easy to create, powerful bot with a no-code graphical interface. This means there isn't necessarily a need for
data scientists or developers. It eliminates the gap between the subject matter experts and the development teams building the bots and it minimizes the IT effort required to deploy and maintain a custom conversational solution.
Every Business has their own website with a FAQ page, so you can use support questions from your existing web pages when you are creating a Power virtual
agent bot, it will help you to create your support Bot within 5 min. You don’t want to copy and paste or manually re-creating same content. You can use AI agents assisted authority to automatically extract and create a relevant suggested topic from your FAQ pages. Microsoft made this sequence of work as a very simple easy steps, you can follow the steps below and create your own FAQ business chat Bot.
Setup Power Virtual Agents
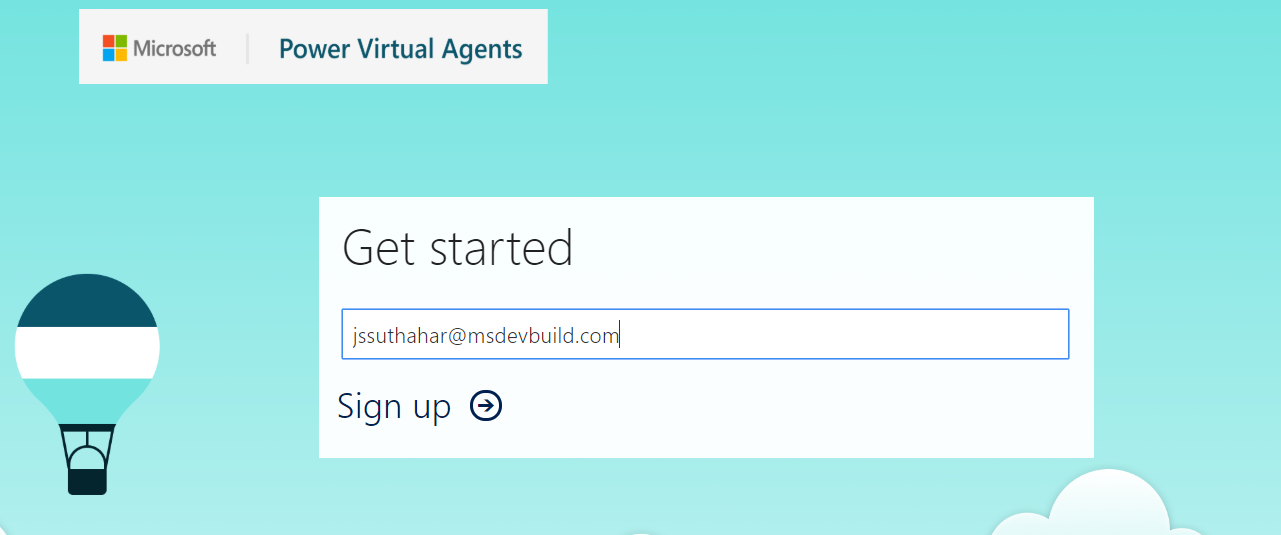
Power Virtual Agents
is a software-as-a-service (SaaS). It allows you to easily sign up, create your bot, and embed it into your website and integrate it to the different channels with just a few clicks. There’s no infrastructure to maintain or complex systems to deploy. Provide your
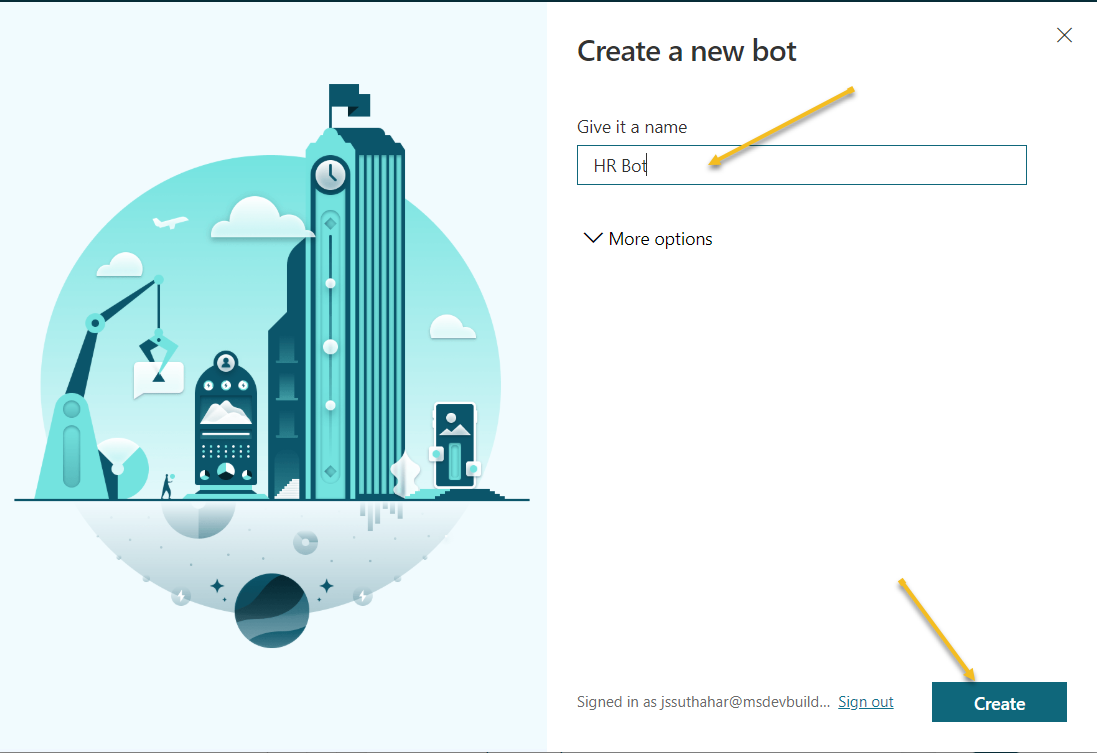
work school account email id and click on Sign up /Sign in.
After
click on
Sign up/ sign in, you will get the following screen asking you to set your Bot name. Provide the relevant your business bot name.
You need to make sure there are three main steps need to do while doing import FAQ and add the topic to your bot application.
- Import Suggested Topics from FAQ webpage
- Add a topic.
- Enable the topics
Import FAQ content
You can follow below steps for import topic messages from your FAQ web page
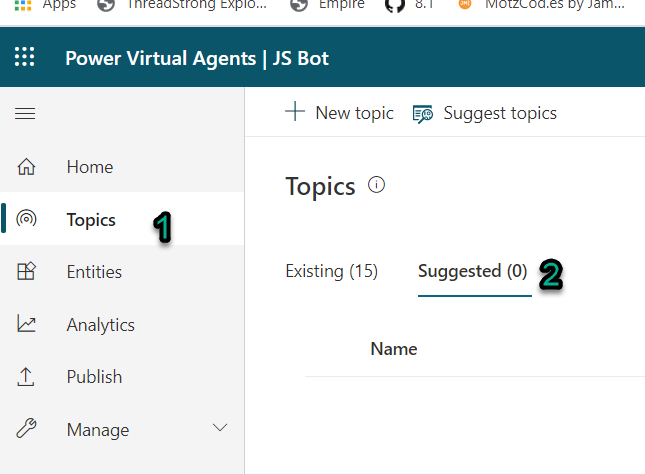
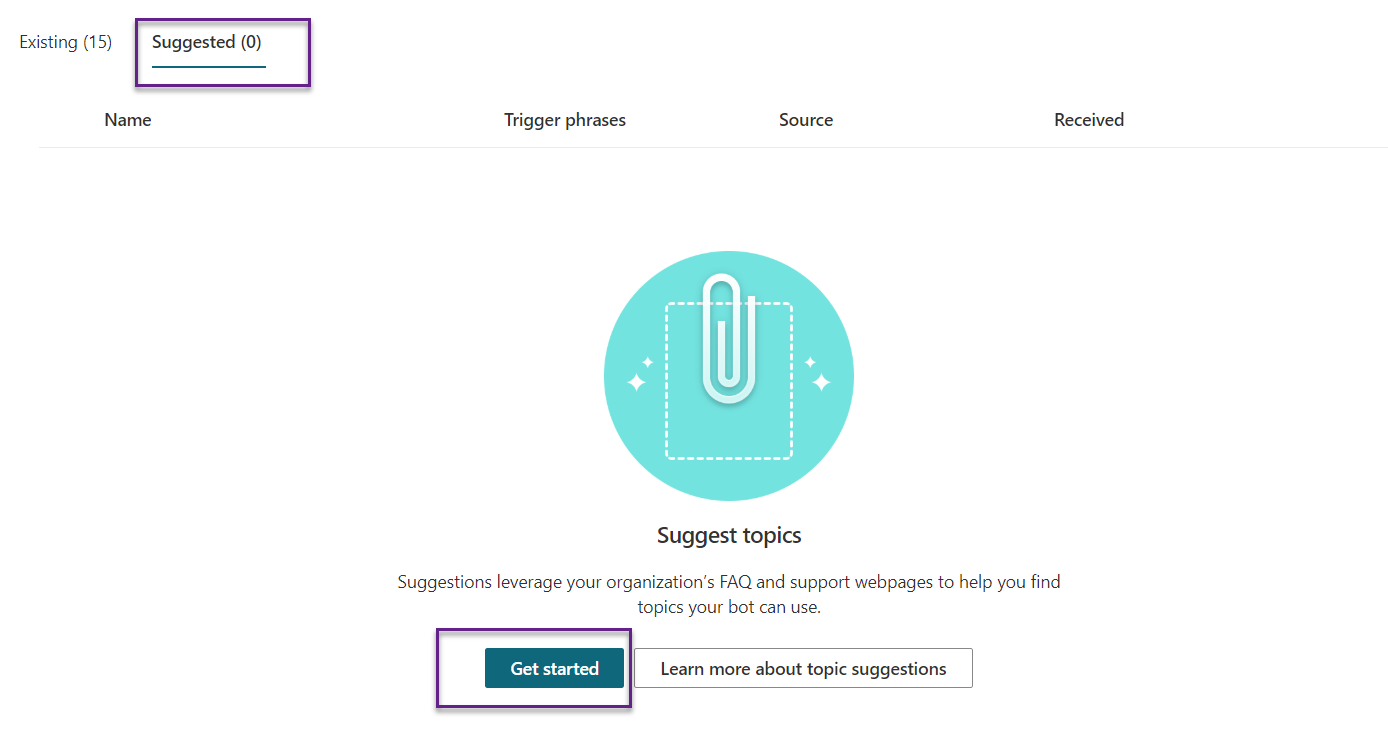
Step 1: Go to the Topics tab on the side navigation pane to open the topics page.
Step 2: on the Topic page, Select the Suggested Topics option on the top navigation pane/ suggested tab button.
Extract FAQ Topics
You are not imported any suggestions topic before, the list of suggested topics will be blank. A link to Get started or Learn more appears instead.
- The following screen will appear after clicking on “Get Started”.
- You can add multiple webpages at the same time, but Microsoft recommends that you include only a few at a time to keep the list of suggestions manageable.
- You can make sure your webpage should be secure with SSL (https://)
- If you added a page by mistake, you could select the Delete option before click on start.
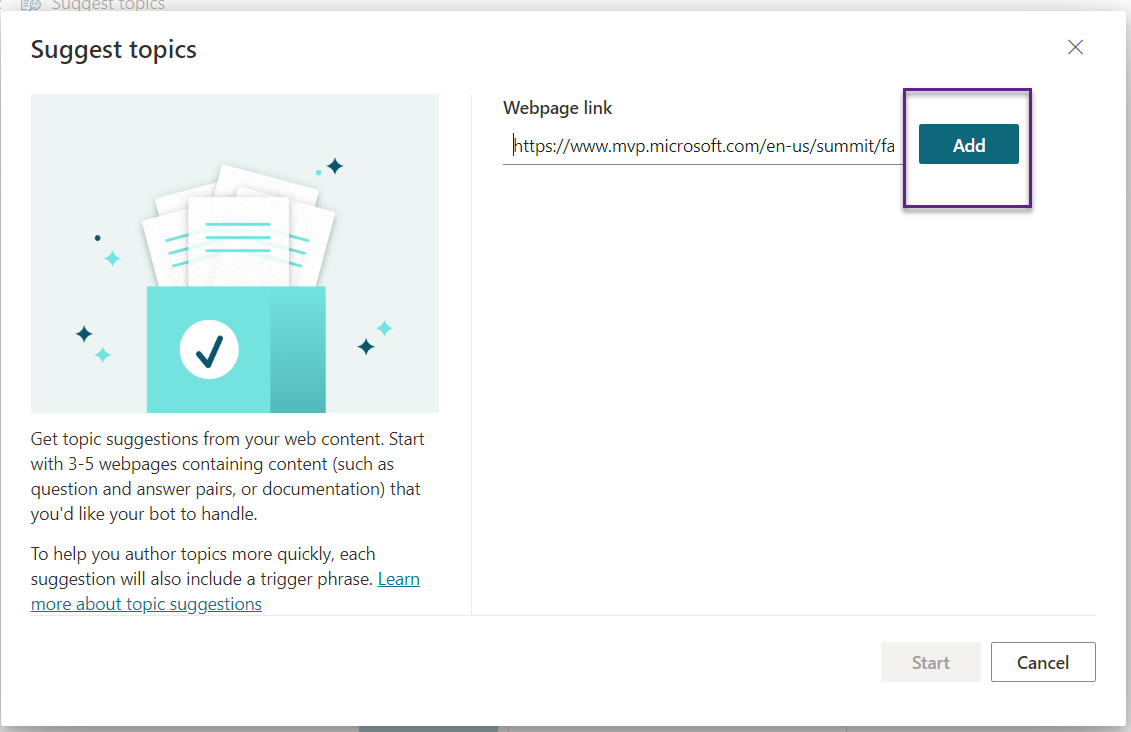
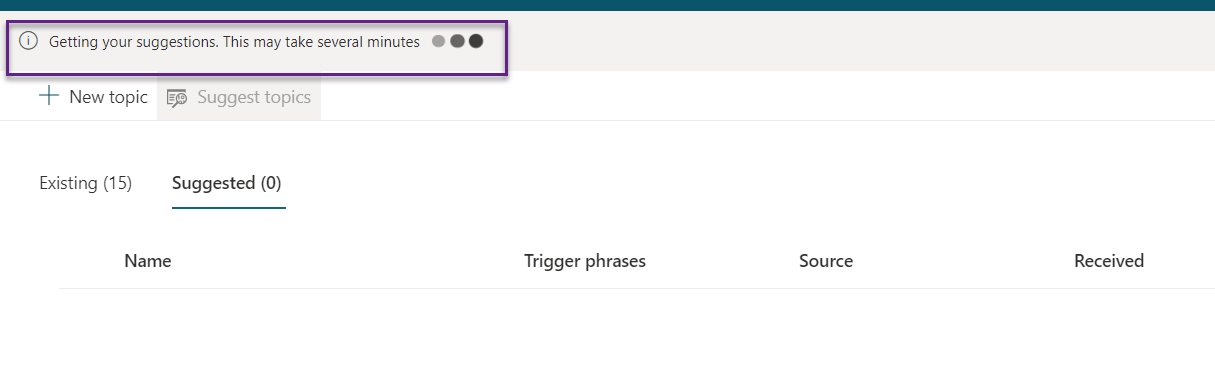
When you're done adding pages, select Start. The process can take several minutes, depending on the complexity and number of
webpages you added. The message "
Getting your suggestions. This may take several minutes" appears at the top of the screen while the extraction is in progress.
After you've successfully extracted content, a number of suggestions will appear. Here, we have added
MVP Summit FAQ URL, it’s extracted all the FAQ around
48 FAQ extracted and displaying in the suggested topic, you can now review these suggestions to see what you need
add to your bot
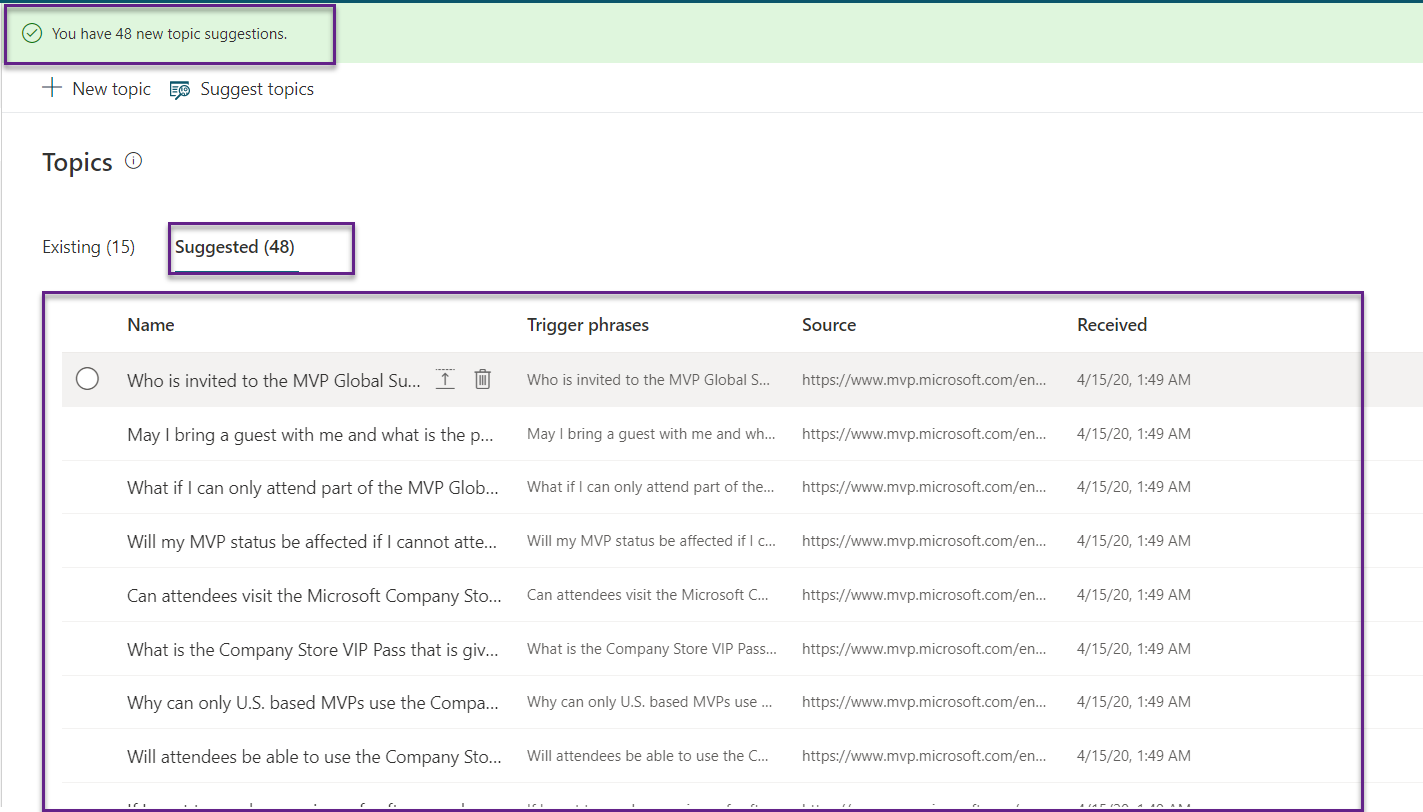
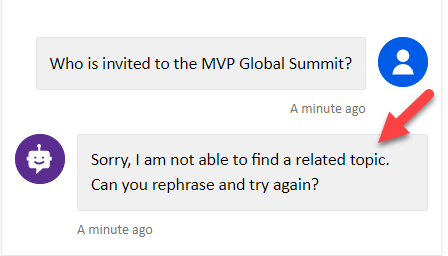
After adding, you need to do two more steps to complete the
process but if you try to test the application, after the suggested topic, you
wont get those topic questions from the suggestion,
Bot will reply the message “ Sorry I am not able to find a related topic“
.
Add a Topics
The import process has been completed, the topic suggestions appear on the Suggested tab. You can just add suggestions without
reviewing but best approach was review them individually like below to decide which ones you want to include in your bot.
Step 1: Select the Name of
Suggestions from Suggestion tab.
Step 2: You can also add or delete multiple topic suggestions at a time. If you select multiple rows from the suggestions tab, you'll see options to
Add to topic or Delete.
Step 3: Let Start review the suggestion and every topic end of the conversion will display Survey topic questions like “
Did that answered the question” and the user can reply message “
Yes “ or “No” based on that conversation will continue, if you don’t want to display the conversation survey, you can remove anytime
.
Step 4: You can
edit Trigger phases, which users ask questions and edit answered messages, which bot will reply to the user.
Step 5: You can press on “
Add to the Topic”, after your review suggestion topic
Step 6: Suggestion topic is not relevant or duplicate, you can press
delete suggestion for
remove the topic.
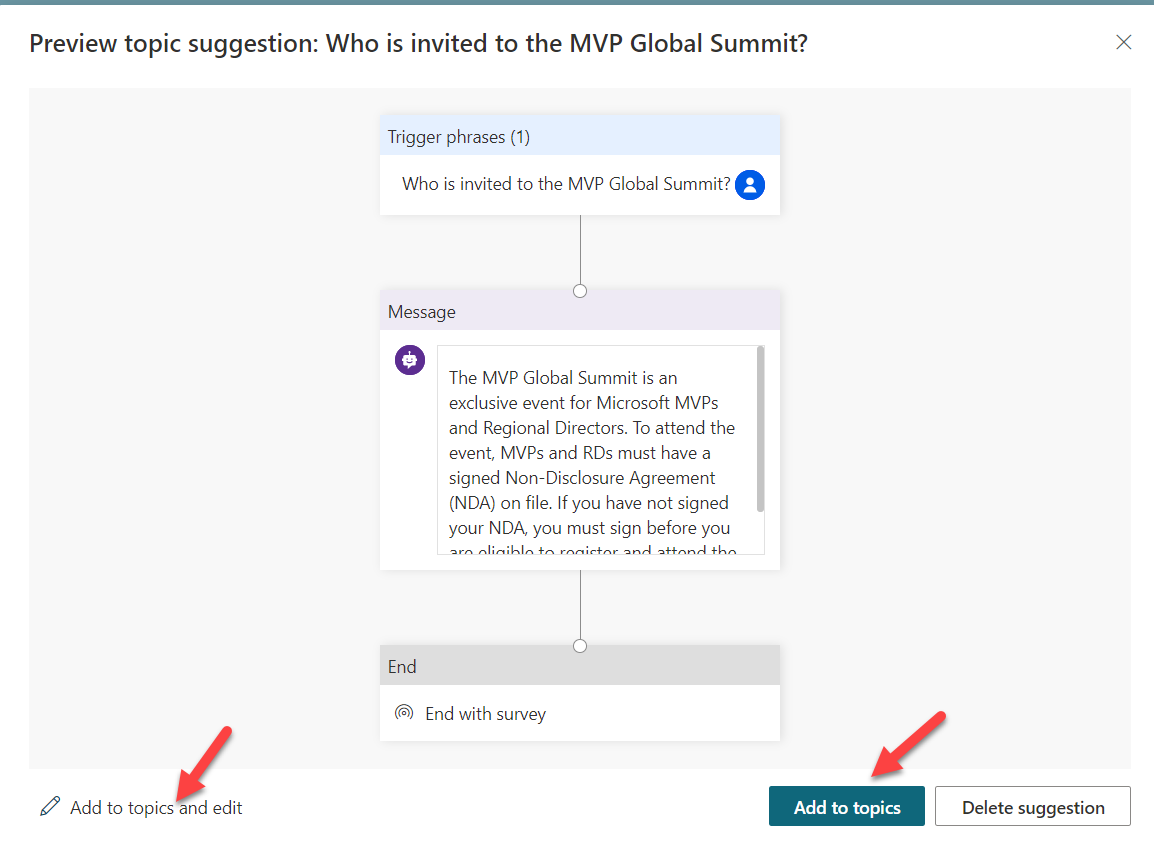
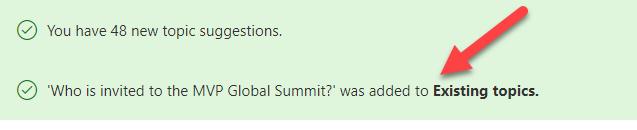
Once you click on Add to topic, you will get a confirmation message saying, your FAQ topic was added to existing topics.
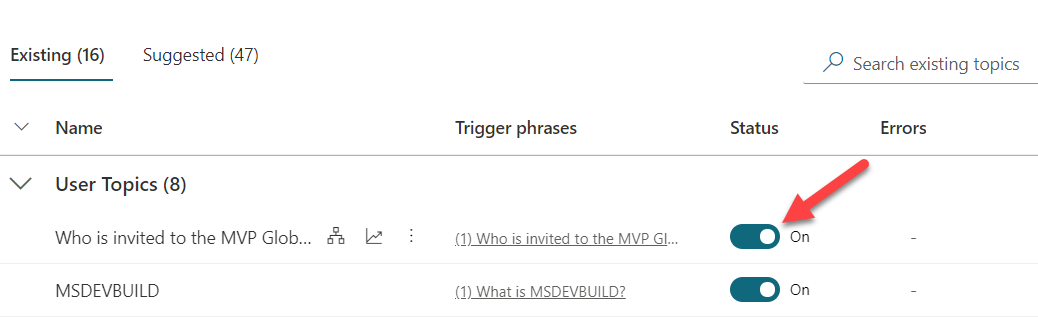
Enable the topics
Suggested topics are added to the Existing tab with their status set to
Off. This way, topics won't be prematurely added to your bot, so you can follow the below steps to enable the topic.
Step 1: Select Topics on the side navigation pane.
Step 2: Go to the Existing tab.
Step 3: For each topic you want to enable,
turn on the toggle under Status.
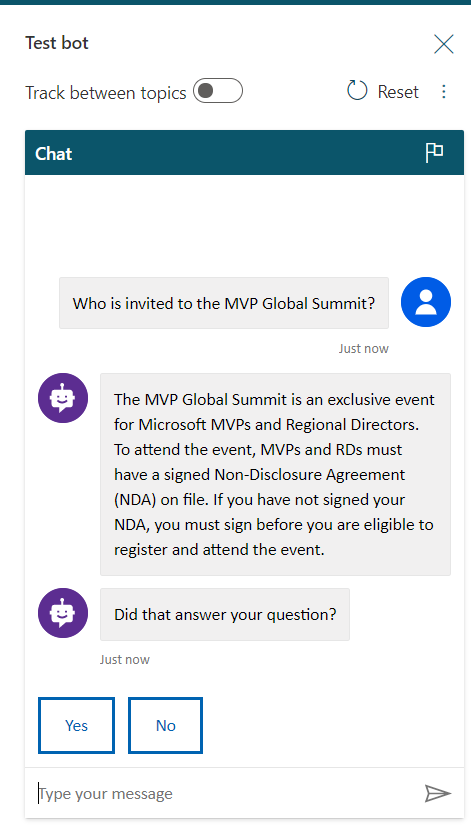
Test Your Bot Application
You're now ready to test your bot. You will test your bot using the built-in Power virtual agent bot Emulator. Start giving the user Input, which you reviewed and enabled topic and refer below image, how to Trigger phase and message sync with user reply.
Summary
You have successfully done the import FAQ page in the power virtual agent. I hope you have enjoyed learning about
Power virtual agent bot.
you can also read my previous power virtual agent articles.
- Build a Microsoft Bot Application With Power Virtual Agents
- Customize the Bot Conversation Message With Power Virtual Agent
If you have any questions/feedback/issues, please write them in the comment box.
Featured Post
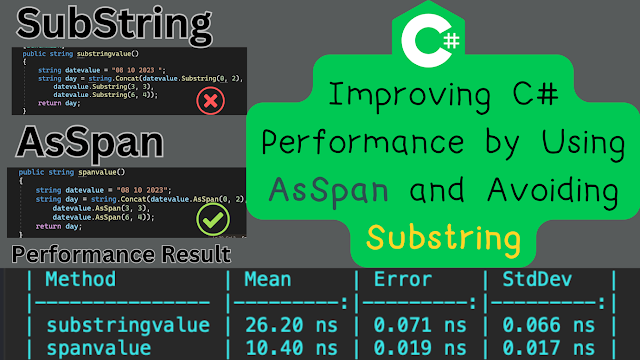
During development and everyday use, Substring is often the go-to choice for string manipulation. However, there are cases where Substring c...