This article provides an understanding of VerticalStacklayout and HorzontalStackLayout using .NET Multi-platform APP UI (MAUI), which is a cross-platform framework for creating native mobile and desktop apps with C# and XAML
A StackLayout organizes child views in a vertically oriented or horizontally one-dimensional stack, but the Microsoft team introduced VerticalStacklayout and HorzontalStackLayout same as stack layout with improved a lot more performance and avoided unnecessary layout calculations being performed. this article will show a quick demo of VerticalStacklayout and HorzontalStackLayout.
Environment Setup
I have shared a details explanation of the MAUI Development environment setup and getting started with the first MAUI application in my previous article. Microsoft MAUI team continuously releases changes, so make sure you have updated the latest visual studio 2022 preview version.
Create a new MAUI Application
You can open visual studio 2022 from your windows machine. You must follow the below 3 steps to create a new MAUI application
Step 1: Select Create a new project
Step 2: Search the MAUI project template or choose Project Type > MAUI from the dropdown.
Step 3: Provide the configuration Details as a project name, Location, and Solutions name.
The generated templates contain one project with Android, IOS, Windows, Mac and Tizen.
HorizontalStackLayout
The Xamarin forms already have StackLayout organizes child views in a one-dimensional stack, either horizontally or vertically. The HorizontalStackLayout organizes child views in a one-dimensional horizontal stack and is a more performant alternative to a StackLayout.
In this example, we have a design registration screen with 3 important sections label control, an entry box, and an error label.
Add the HorizontalStacklayout instead of Stacklayout with orientation.
Many of them asked questions like, How to align a label and entry box horizontally same line label at the start and Entry at the end? You could set VerticalOptions of that two control to Start/Centre, then the control would align horizontally .
Label, Entry, and Error label add same as Xamarin Forms Design
Once you did the design, the output looks like below
VerticalStacklayout
The VerticalStackLayout organizes child views in a one-dimensional vertical stack and is a more performant alternative to a StackLayout with a vertical. Position and size of views is based on the HeightRequest, WidthRequest, HorizontalOptions and Vertical Options. The following example we used VerticalStackLayout for designs the screen. VerticalStackLayout used for displaying your control one by one.
The LayoutOptions is set via the HorizontalOptions or VerticalOptions properties on any View. They can be set to any of the following options: Start, Center, End, Fill, StartAndExpand, CenterAndExpand, EndAndExpand, FillAndExpand and you can add the following code as per below
The layout looks like the below with 3 controls
Nested VerticalStackLayout/HorizontalStackLayout
A VerticalStackLayou and HorizontalStackLayout can be used as a parent layout that contains nested child of both objects, and other child layouts.
You can see the below example XAML for nested layout, the more the nested layouts will impact your performance., if you are trying to add multiple levels, you can try choosing the correct layout control.
In this example, the parent VerticalStackLayout contains nested HorizontalStackLayout objects and adds the control set.
Summary
In this article, you have seen the demo .NET MAUI VerticalStackLayout and HorizontalStackLayout Layout and how different from stack layout using Visual Studio 2022, Thanks for reading, will share more Dotnet MAUI related articles in the upcoming days.
.Net MAUI is a cross-platform framework for creating native mobile and desktop app with c# and Xaml. In my previous article, we did warn welcome to Dotnet MAUI and shared information about the History of Xamarin.
MAUI as everybody already knows is a name for a new upgrade solution as a Multi-platform APP UI framework for building native cross-platform apps with .Net for android, iOS, macOS, and Windows. I am going to show how to create, build and debug the First MAUI application using Visual Studio 2022.
MAUI and other third-party framework teams started working on support for upgrading the app and old NuGet package to MAUI. MAUI will also provide you support for building the apps in different modern patterns and frameworks MVVM, MVU and RxUI.
.NET MAUI IDE
Microsoft provided 3 fantastic IDE Tools to create and develop apps with .NET MAUI and the happy news is MAUI is an open source.
Visual Studio
Visual Studio for Mac
Visual Studio Code
Visual Studio 2022
On Windows or Mac machines you can use Visual Studio Code or Visual Studio/ VS for Mac for development. You will need the visual studio 2022 17.1.0 preview version. Microsoft released Visual studio 2022 version 17.0 in Nov month, but MUAI is still in preview so you can start to install visual studio 2022 17.1.0 preview version to create your first MUAI application.
After installation success, Open the Visual Studio IDE
In this sample demo application, I am going to show Android, iOS, and Windows app using MAUI, so Get started with “Create New Project”
On the new Project template, select project type as an” MAUI” and you will all the MAUI preview template, if you are not finding the MAUI template means, you have not installed the latest preview version so make sure you have installed the latest preview version 17.1 ++.
In the Configure your new project window, name your project, choose your project location where you need to save, and click the Create button
MAUI Solutions Structure
After clicking on Create, MAUI solutions default template loaded with all the related MAUI NuGet packages. There is a single project with different platform folders and resources.
MainPage.XAML
The main page, whichever design, will support all other platforms as well, and also Main Page XAML build action modified in MAUI app.
Main Page.Xaml build action modified with MAUIXAML, make sure Xaml Build action is correct.
Right click on the XAML page >>Properties>>BuildAction of XAML Page to MauiXaml.
.NET Generic Host
The Worker Service templates, create a .NET Generic Host, HostBuilder. The Generic Host can be used with other types of .NET applications, such as Console apps.
Maui Program class enables apps to be initialized from a single location, and provides the ability to configure fonts, services, and third-party libraries.
iOS, Android, windows, and all the platform entry point calls a CreateMauiApp method of the static MauiProgram class that creates and returns a MauiApp, while lunch the application
Application Class
The App class derives from the Application class
Resources
The resources are a good improvement in MAUI. The AppIcon, image and font folder will be available under the MAUI project and it is just a single SVG, Looks like Maui will just automatically take care of generating all the different icon sizes for different devices.
Run IOS App
Building MAUI iOS applications requires access to Apple's build tools, which only run on a Mac. Because of this, Visual Studio 2022 must connect to a network-accessible Mac to build iOS applications.
You must install the Xcode 13.1++ version on the Mac machine before connecting Visual Studio 2022 to the Windows machine.
Windows Configuration
Connect same wifi network
Download and install Visual Studio 2022 with MAUI
Mac Configuration
Connect same wifi network
Install Xcode 13.1 ++
On Network preference > switch on Remote login
Pair to Mac machine from windows
Program.cs
Program class file is the main entry file on IOS app and executes the main method of the application, here you can define your custom app delegate file and other configuration files
Appdelegate.cs
Each platform will call MauiProgram static class for initialize. On iOS will call as below
You can select iOS simulator and device and click Run icon for executing the application
The out as like below
Run Android App
The android application, MainApplication.cs will execute first, it will call the MauiProgram static class initially as like below
You can select android simulator or device as below, press F5 to run the application
The output like below
Run Windows App
The Windows application executes App.xaml.cs file first, it will call the MauiProgram static class initially as like below
Select the device and run the Application
Demo Video
I have shared a recorded demo video with two versions, English and Tamil. It will help you to understand more about creating, building, and debuging the First MAUI application.
English Demo Video
Tamil Demo Video
Hope this article is very useful for you, If you have any questions/ feedback/ issues, please write in the comment box
Introduction
The Passwords and Security Codes (OTP) are a modern necessity required for security and privacy but initially iOS does not support auto read feature. iOS 12 eases the tedious aspects of account setup and sign-in by automatically suggesting and using strong, unique passwords and by bringing one-time password to the QuickType bar so users can fill them with one tap. Here we’ll learn how to implement autofill OTP in your app using Xamarin Forms .
Message Format Rules
Security code is only work with System keyboard. So, avoid using custom keyboard. Make sure OTP message phrase has “code” or “passcode” and message is copy.
Create New Xamarin Forms Application
In order to implement Autofill OTP message, let’s start creating a new Xamarin.Forms project using Visual Studio 2019 or VS mac. When accessing Visual Studio 2019 mac for the first time, you will come across a new interface for opening a creating the projects.
Open Visual Studio Mac >>Create New Project or select open recent application.
The available templates will appear on a mac like below. Select Xamarin.Forms application with different mobile platforms.
Custom Control
One time code type available only specific to iOS device, not in Android, so create a Xamarin.Forms custom Entry control in the .NET Standard library project, enabling developers to override the default native rendering with their own platform-specific customization.
using System;
using Xamarin.Forms;
namespace ReadOTPIOS
{
public class AutoFillControl : Entry
{
public AutoFillControl()
{
}
}
}
UI Design
The AutoFillControl control can be referenced in XAML in the .NET Standard library project by declaring a namespace for its location and using the namespace prefix on the control element. The following code example shows how the AutoFillControl control can be consumed by a XAML page:
Text="Welcome to iOS 12 Read and Autofill OTP from SMS using Xamarin Forms" />
<local:AutoFillControl
FontSize="Large"
HorizontalOptions="Center"
Keyboard="Numeric"
Placeholder="XXXXXX" />
</StackLayout>
</ContentPage>
IOS Renderer
The following code example shows the custom renderer for the iOS platform. The call to the base class's OnElementChanged method instantiates an iOS UITextField control, with a reference to the control being assigned to the renderer's Control property.
To enable password autofill on a UITextField we need to set the UItextContentTypeproperty as a OneTimeCode.
The application source code available in Github. IOS simulator won’t allow to send messages, so let you try and deploy applications to IOS device and send a message to device for testing.
Summary
This article has demonstrated how to create a Read and Autofill OTP from SMS using Xamarin Forms Entry control. I hope this article will help you. Please leave your feedback/query using the comments box, and if you like this article, please share it with your friends.
Enable GingerCannot connect to Ginger Check your internet connection or reload the browserDisable in this text fieldEditEdit in GingerEdit in Ginger×Enable GingerCannot connect to Ginger Check your internet connection or reload the browserDisable in this text fieldEditEdit in GingerEdit in Ginger×
The Bot Application runs in an application, like Skype, web chat, Facebook, Message, etc. Users can interact with bots by sending them messages, commands, and inline requests. You control your bots using HTTPS requests to the bot API.
The better visibility, the higher will be the chance of customers making a purchase. Unlike other bots which are available on business web pages which provide visibility only to the customers visiting their site, a Facebook bot is very easy to find. It is visible to around 1.3 billion users of Facebook. A Facebook bot interacts very well with customers. It can receive and send messages, images and provide clickable buttons like Buy Now. In this article, I am going to show how we can connect Facebook Messenger's channel and integrate Bot Application to the Messenger app.
In this Article, I am going to show how we can connect Facebook messengers’ channel and integrate Bot Application to the messengers App.
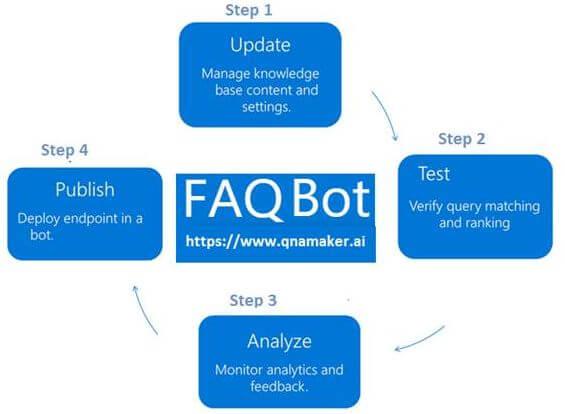
Create FAQ Bot Application
You can refer my previews article to create and build a Xamarin FAQ Bot using the Azure Bot Service and deploy it into Azure. I am not using any coding for developing the Bot Application, you can follow the steps provided in the article to create and deploy FAQ Bot.
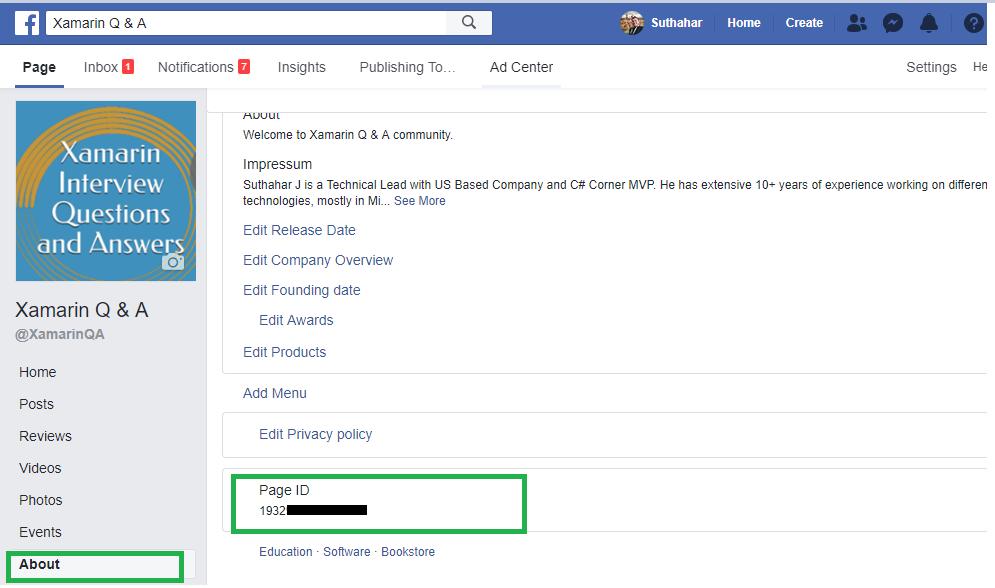
Setup Facebook Page
We can implement Bot Application to the Facebook page. You can create Facebook page or select existing page and navigate to “About page” for fining and copy the Page ID.
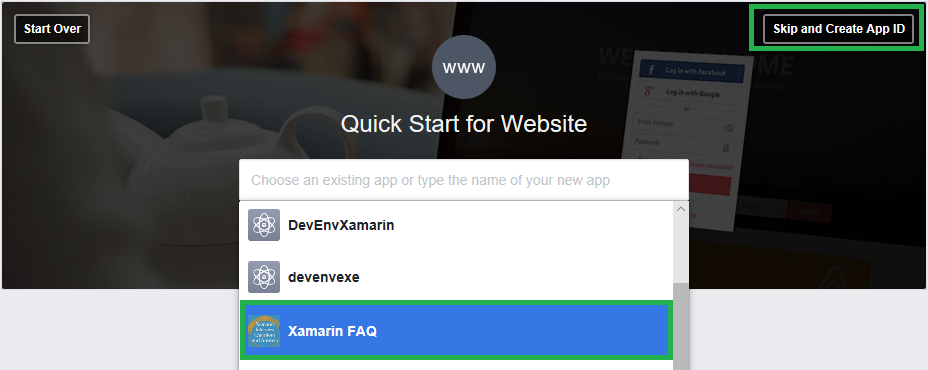
Login to Facebook APP
Create a new Facebook App (https://bit.ly/1D0BHpg) on the Page and generate an App ID , App Secret and Page Access Token for integrating Bot to the page messenger. You can click on “Skip and Create APP Id” from following screen.
Create New App ID
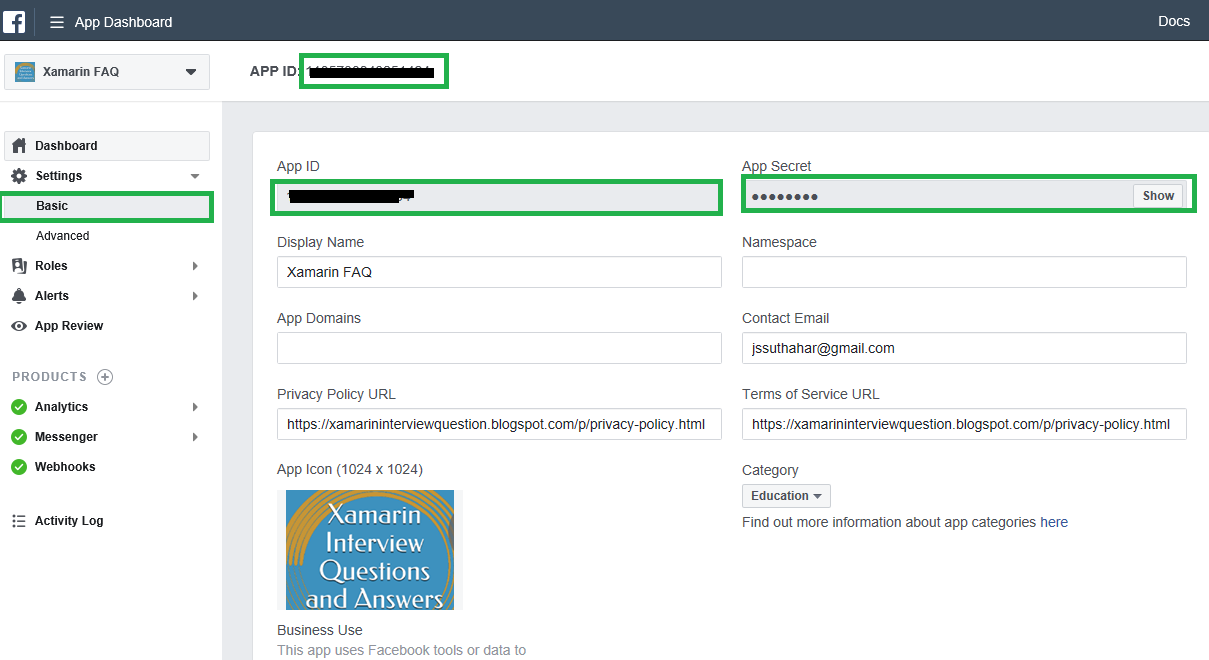
Provide display Name and Contact Email for integrating Bot application and Click on Create.
After Create button, it will navigate to the App dashboard screen. The side navigation menu having Settings > Basic and copy the APPID and APP Secret. Provide the Privacy URL, Terms of Service URL, App icon and Select Category.
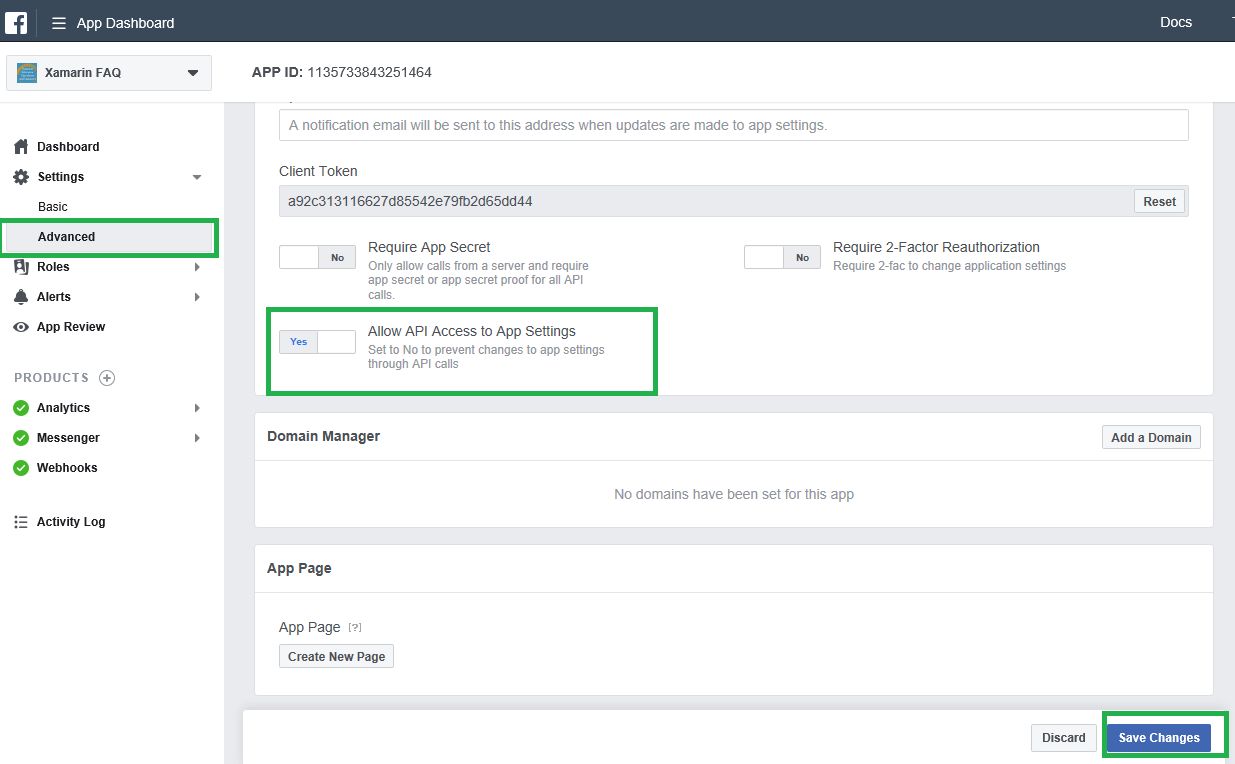
I have shown the following screen to Select Setting > Advanced and Set the "Allow API Access to App Settings slider to "Yes" and click on Save Changes.
Setup Message
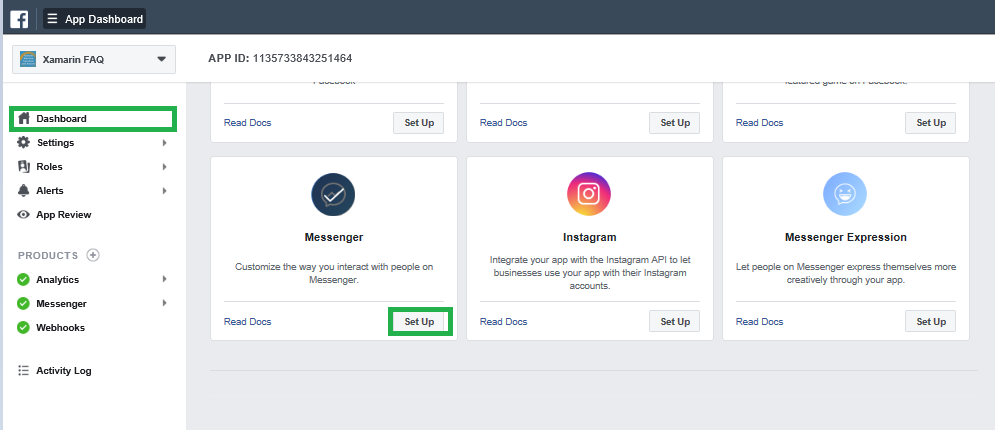
Select Dashboard and Click on Setup button from messenger group
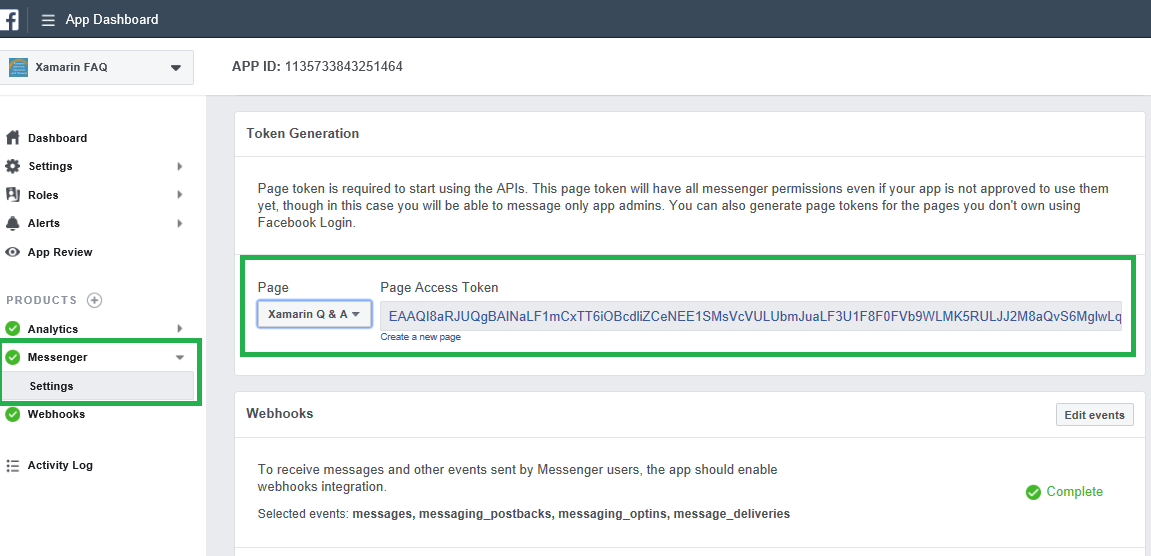
Create Page Access Token
Select Setting from the messenger side navigation menu to generate token, you can select the Page and generate access token and copy the page access token.
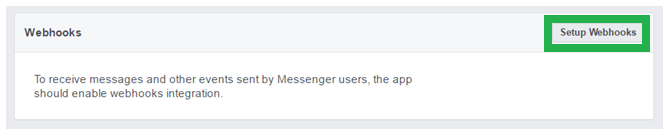
Setup Webhooks
Click Set up Webhooks to forward messaging events from Facebook Messenger to the bot.
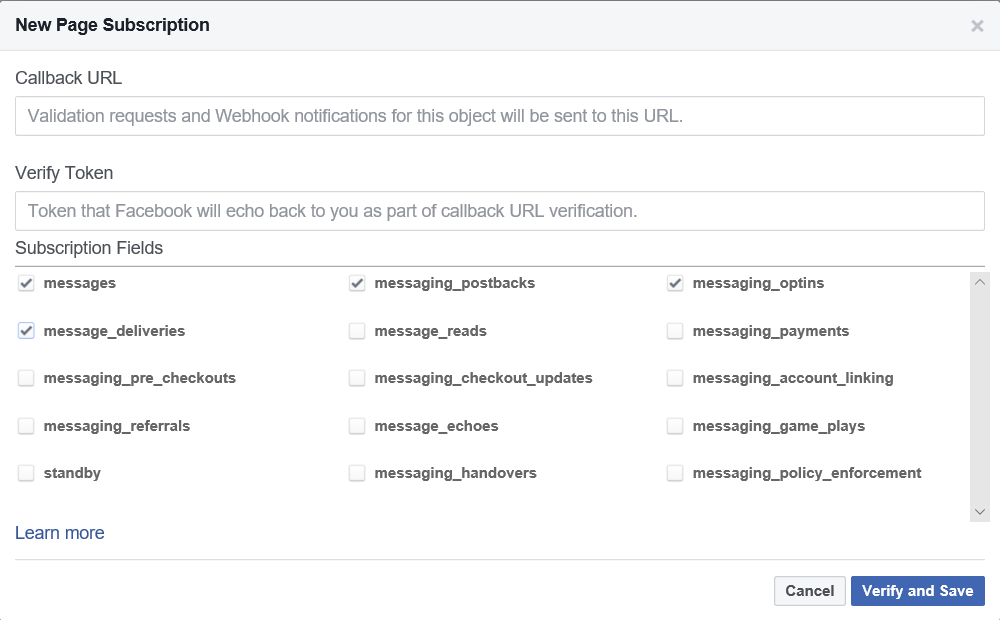
Provide following callback URL and Verify token to the webhooks setup page and select the message, message_postbacks, messaging_optins and message_deliveries subscription fields. The following Steps 2, will show how to generate Callback URL and verify token from Azure portal.
You can click on “Verify and Save “and select the Facebook page to Subscribe the webhook to the Facebook page.
Connect Facebook Channel
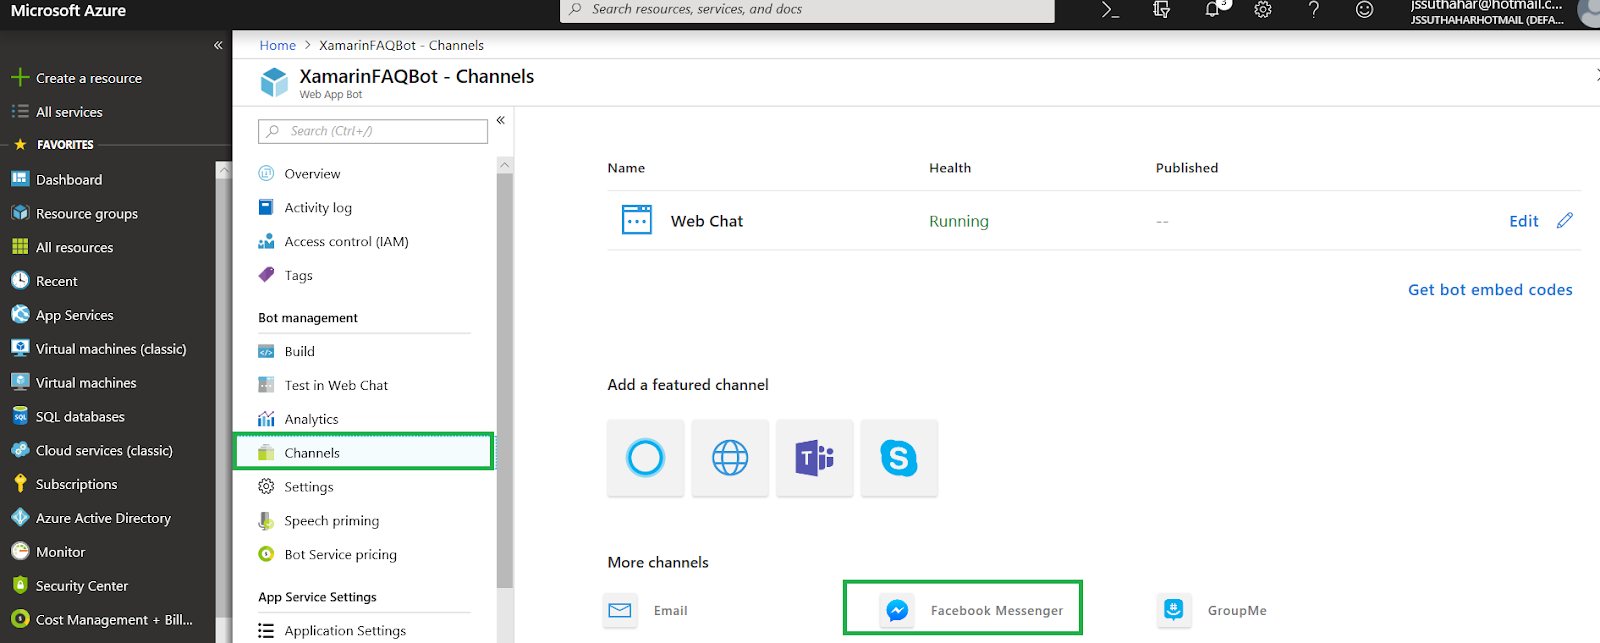
Step 1: Login to Azure portal > Select the “All Resources” > Select Channels > Select Facebook Messengers, let we start configure “Facebook Messengers “Channel and follow below steps, the end of this article you can able to deploy Bot into the Facebook messenger
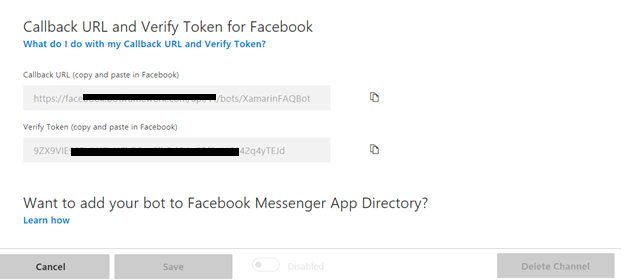
Step 2:The Azure Facebook configuration channel will generate following Callback URL and verify token, You can copy those information and Past to the Facebook webhook setup screen. (Return to the Facebook messenger setup screen).
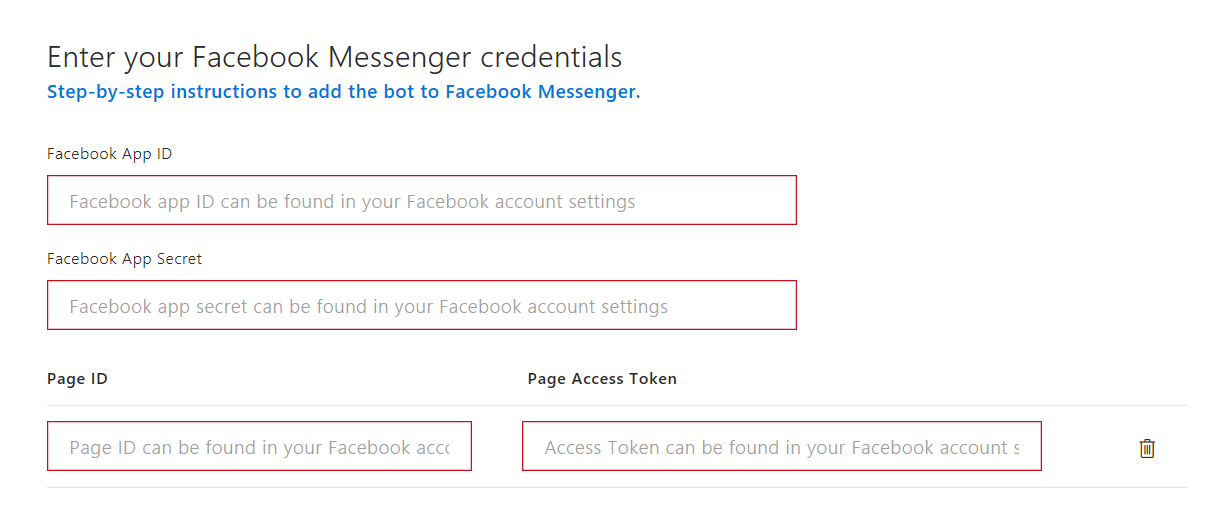
Step 3: You can paste the Facebook App ID, Facebook App Secret, Page ID,and Page Access Token values copied from Facebook Messenger previously. You can use the same bot on multiple facebook pages by adding additional page ids and access tokens.
Submit to Facebook Review
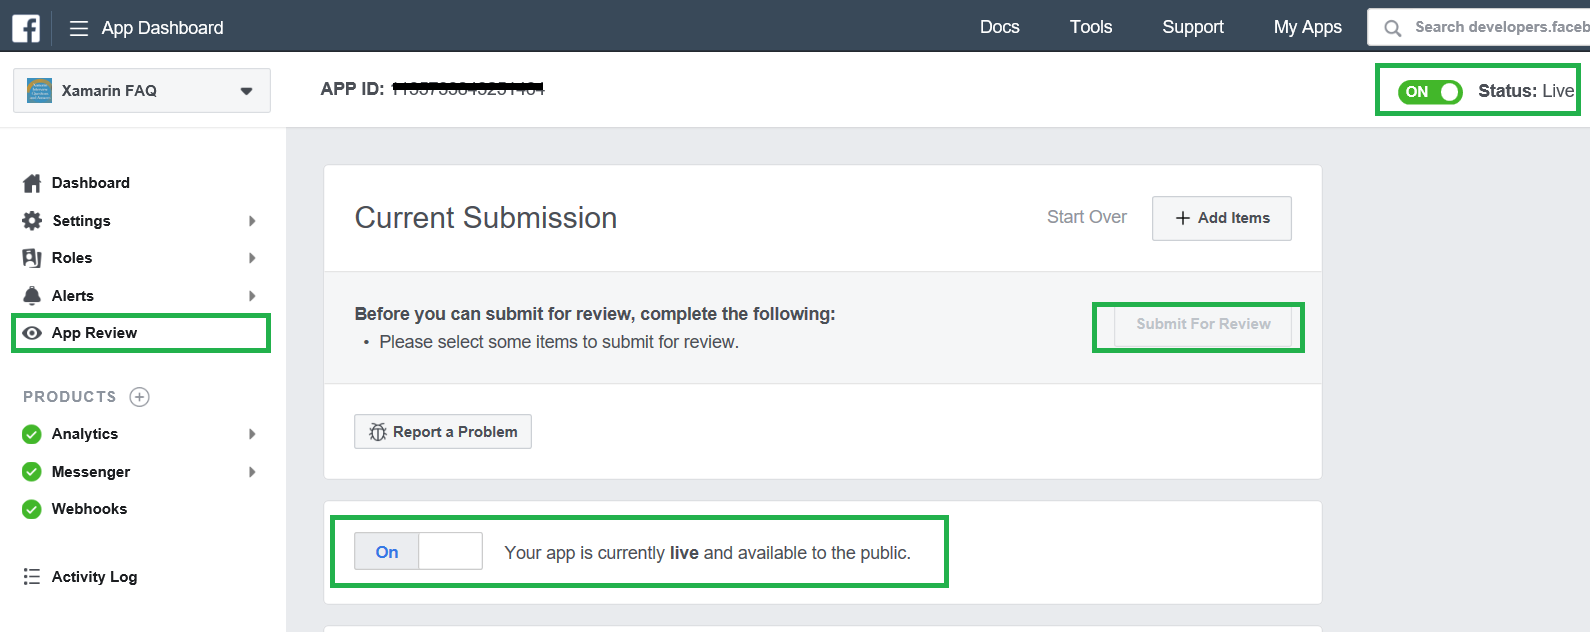
Select App preview and Click and Submit for review after submit will take some time for the facebook team testing to the messenger bot and you can mark your app live available to the public , then you can test messenger from the Facebook page .
Facebook Team reviews and Testing
You can verify Facebook team testing progress, navigate to your Facebook page and Click on Inbox and verify, if anything problem to the messenger bot, the Team will update the bug list from App review screen.
Xamarin FAQ Messengers testing
You can select your Facebook page and test your bot application. I have trained 7000+ more questions to the Facebook messenger bot from Xamarin Q & A Page, If you want to look the xamarin FAQ demo. Navigate to Xamarin Q & A Facebook page and ask your xamairn related question.
Summary
In this article, you have learned how to integrate bot application right into your Facebook Page via Azure Microsoft AI. If you have any questions/feedback/issues, please write in the comment box.
Microsoft Cognitive Services offers awesome APIs and services for developers to create more intelligent applications. You can add interesting features, like people's emotions and video detection, face, speech, and vision recognition and speech and language understanding into your application. The Emotion API takes a facial expression in an image stream as an input and returns confidence levels across a set of emotions for each face in the image like anger, contempt, disgust, fear, happiness, neutral, sadness, and surprise, in a facial expression
Where to implement
There is no single unifying definition or theory of emotion. Nevertheless, several characteristics of an emotional reaction are frequently mentioned. Nowadays feedback is more important for product promotion and review the article, store, etc. manual entry of emotion maybe wrong so we can automate the feedback and review.
In this blog, we can learn about how to implement Emotion Recognition in Xamarin.Forms with Microsoft Cognitive Services. Getting Started with the Emotion API
The Emotion API can detect anger, contempt, disgust, fear, happiness, neutral, sadness, and surprise, in a facial expression. As well as returning an emotion result for a facial expression, the Emotion API also returns a bounding box for detected faces using the Face API. If a user has already called the Face API, they can submit the face rectangle as an optional input. Note that an API key must be obtained to use the Emotion API. You can follow below steps for obtained at free API key on Microsoft.com
Step 1: Click here for Generate Subscriber Key and Click on Create
Step 2: You can agree the terms and Microsoft privacy statement > select the country and click on Next
Step 3: Login with Microsoft /LinkedIn /Facebook /Github for create your API
Step 4: You login and subscribe you should see the keys and the below information on available your subscriptions
We will use emotion API key in the following Xamarin application. before that we can test the API key
Test on Your Emotion Key
You can navigate emotion API online console application and provide the subscription key and image url . If your provide valid key and input the image, you will get it JSon data as output or relevant error
Create New Xamarin Forms Application
You can refer my previous article for setup and create new Xamarin forms application.
If you already installed VS on your machine, Open Visual Studio > Create New Xamarin Forms application like below
Solution will create with all the platform and PCL project
In this solution, we are going to create demo application for Article review automate based on the emotion.
Camera in Xamarin. Forms
We can use Media.Plugin Nuget package for Capture image or select image gallery from all the mobile platform (iOS,Android,Windows)
Right Click on Solution > Type “xam.plugin” in the search box > Select all the project (PCL, iOS, Android and UWP) > Click on Install
Emotion Nuget Package
This client library is a thin C# client wrapper for the Microsoft Emotion API.The easiest way to use this client library is to get microsoft.projectoxford.emotion package from nuget .
Right Click on Solution > Type “Microsoft Emotion” in the search box > Select all the project (PCL, iOS, Android and UWP) > Click on Install
UI Design
After successfully install above two nuget package. Let start UI design from PCL project In Dotnet Standard Project > Open MainPage.Xaml page and design following xaml code
public partial class MainPage : ContentPage { EmotionServiceClient emotionClient; MediaFile photo; public MainPage() { InitializeComponent(); emotion.IsVisible = false; emotionClient = new EmotionServiceClient("7f495be5faf643adbeead444d5b79a13"); } For capture image, write the following code public async Task CaptureImage() { await CrossMedia.Current.Initialize(); emotion.IsVisible = false;
// Take photo if (CrossMedia.Current.IsCameraAvailable || CrossMedia.Current.IsTakePhotoSupported) { photo = await CrossMedia.Current.TakePhotoAsync(new StoreCameraMediaOptions { SaveToAlbum = false }); } else { await DisplayAlert("No Camera", "Camera unavailable.", "OK"); } } For Recognize emotion, write the following code public async Task Recognizeemotion() { try { if (photo != null) { using (var photoStream = photo.GetStream()) { Emotion[] emotionResult = await emotionClient.RecognizeAsync(photoStream); if (emotionResult.Any()) { // Emotions detected are happiness, sadness, surprise, anger, fear, contempt, disgust, or neutral. emotionResultLabel.Text = emotionResult.FirstOrDefault().Scores.ToRankedList().FirstOrDefault().Key; emotion.IsVisible = true; } photo.Dispose(); } } } catch (Exception ex) { Debug.WriteLine(ex.Message); } }
While click on Feedback button, call the above two methods
Select the iOS /Android /Windows and install into the device and click on ‘Share your Feedback ‘button
The device should be camera so after click on the button, capture your face for Recognize emotion.
Summary
In this article, you learned about how to generate emotion API key and implement Emotion Recognition in Xamarin.Forms with Microsoft Cognitive Services.If you have any questions/ feedback/ issues, please write in the comment box.
Enable GingerCannot connect to Ginger Check your internet connection or reload the browserDisable in this text fieldEditEdit in GingerEdit in Ginger×