Microsoft Cognitive services is set of cloud based intelligence APIs for building richer and smarter application development. Cognitive API will use for Search meta data from Photos and video and emotions, sentiment analysis and authenticating speakers via voice verification.

Cognitive Computer Vision API: Intelligent Image Object Detection Bot

The Computer Vision API will help developers to identify the objects with access to advanced algorithms for processing images and returning image meta data information. In this article, you will learn about Computer Vision API and how to implement Compute Vision API into Bot application.


You can follow below steps for implement object detection in Bot Application 
 

Computer Vision API Key Creation

Computer Vision ApI returns information about visual content found in an image. You can follow below steps for create Vision API key.

Navigate to https://azure.microsoft.com/en-us/try/cognitive-services/

Cognitive Computer Vision API: Intelligent Image Object Detection Bot

Click on “Get API Key “or Login with Azure login.

Login with Microsoft Account and Get API key

Cognitive Computer Vision API: Intelligent Image Object Detection Bot

Copy API key and store securely, we will use this API key into our application

Step 2: Create New Bot Application

Let's create a new bot application using Visual Studio 2017. Open Visual Studio > Select File > Create New Project (Ctrl + Shift +N) > Select Bot application.

Cognitive Computer Vision API: Intelligent Image Object Detection Bot

The Bot application template gets created with all the components and all required NuGet references installed in the solutions.

Cognitive Computer Vision API: Intelligent Image Object Detection Bot

In this solution, we are going edit Messagecontroller and add Service class.

Install Microsoft.ProjectOxford.Vision Nuget Package

The Microsoft project oxford vision nuget package will help for access cognitive service so Install “Microsoft.ProjectOxford.Vision” Library from the solution

Cognitive Computer Vision API: Intelligent Image Object Detection Bot

Create Vision Service: Create new helper class to the project called VisionService that wraps around the functionality from the VisionServiceClient from Cognitive Services and only returns what we currently need.

using System;
using System.Collections.Generic;
using System.IO;
using System.Linq;
using System.Threading.Tasks;
using System.Web;
using Microsoft.ProjectOxford.Vision;
using Microsoft.ProjectOxford.Vision.Contract;
namespace BotObjectDetection.Service
{
public class VisionService : ICaptionService
{
/// <summary>
/// Microsoft Computer Vision API key.
/// </summary>
private static readonly string ApiKey = "<API Key>";
/// <summary>
/// The set of visual features we want from the Vision API.
/// </summary>

private static readonly VisualFeature[] VisualFeatures = { VisualFeature.Description };

public async Task<string> GetCaptionAsync(string url)
{
var client = new VisionServiceClient(ApiKey);
var result = await client.AnalyzeImageAsync(url, VisualFeatures);
return ProcessAnalysisResult(result);
}
public async Task<string> GetCaptionAsync(Stream stream)
{
var client = new VisionServiceClient(ApiKey);
var result = await client.AnalyzeImageAsync(stream, VisualFeatures);
return ProcessAnalysisResult(result);
}
/// <summary>
/// Processes the analysis result.
/// </summary>
/// <param name="result">The result.</param>
/// <returns>The caption if found, error message otherwise.</returns>

private static string ProcessAnalysisResult(AnalysisResult result)
{
string message = result?.Description?.Captions.FirstOrDefault()?.Text;
return string.IsNullOrEmpty(message) ?
"Couldn't find a caption for this one" :
"I think it's " + message;
}
}
}


In the above helper class, replace vision API key and call the Analyze image client method for identify image meta data

Messages Controller

MessagesController is created by default and it is the main entry point of the application. it will call our helper service class which will handle the interaction with the Microsoft APIs. You can update “Post” method like below

using System;
using System.Diagnostics;
using System.IO;
using System.Linq;
using System.Net;
using System.Net.Http;
using System.Net.Http.Headers;
using System.Text.RegularExpressions;
using System.Threading.Tasks;
using System.Web.Http;
using BotObjectDetection.Service;
using Microsoft.Bot.Builder.Dialogs;
using Microsoft.Bot.Connector;

namespace BotObjectDetection
{
[BotAuthentication]
public class MessagesController : ApiController
{
private readonly ICaptionService captionService = new VisionService();
/// <summary>
/// POST: api/Messages
/// Receive a message from a user and reply to it
/// </summary>

public async Task<HttpResponseMessage> Post([FromBody]Activity activity)
{
if (activity.Type == ActivityTypes.Message)
{
//await Conversation.SendAsync(activity, () => new Dialogs.RootDialog());
var connector = new ConnectorClient(new Uri(activity.ServiceUrl));
string message;
try
{
message = await this.GetCaptionAsync(activity, connector);
}
catch (Exception)
{
message = "I am object Detection Bot , You can Upload or share Image Url ";
}
Activity reply = activity.CreateReply(message);
await connector.Conversations.ReplyToActivityAsync(reply);
}
else
{
HandleSystemMessage(activity);
}
var response = Request.CreateResponse(HttpStatusCode.OK);
return response;
}

private Activity HandleSystemMessage(Activity message)
{
if (message.Type == ActivityTypes.DeleteUserData)
{
// Implement user deletion here
// If we handle user deletion, return a real message
}
else if (message.Type == ActivityTypes.ConversationUpdate)
{
// Handle conversation state changes, like members being added and removed
// Use Activity.MembersAdded and Activity.MembersRemoved and Activity.Action for info
// Not available in all channels
}
else if (message.Type == ActivityTypes.ContactRelationUpdate)
{
// Handle add/remove from contact lists
// Activity.From + Activity.Action represent what happened
}
else if (message.Type == ActivityTypes.Typing)
{
// Handle knowing tha the user is typing
}
else if (message.Type == ActivityTypes.Ping)
{
}
return null;
}
private async Task<string> GetCaptionAsync(Activity activity, ConnectorClient connector)
{
var imageAttachment = activity.Attachments?.FirstOrDefault(a => a.ContentType.Contains("image"));
if (imageAttachment != null)
{
using (var stream = await GetImageStream(connector, imageAttachment))
{
return await this.captionService.GetCaptionAsync(stream);
}
}
string url;
if (TryParseAnchorTag(activity.Text, out url))
{
return await this.captionService.GetCaptionAsync(url);
}
if (Uri.IsWellFormedUriString(activity.Text, UriKind.Absolute))
{
return await this.captionService.GetCaptionAsync(activity.Text);
}
// If we reach here then the activity is neither an image attachment nor an image URL.
throw new ArgumentException("The activity doesn't contain a valid image attachment or an image URL.");
}

private static async Task<Stream> GetImageStream(ConnectorClient connector, Attachment imageAttachment)
{
using (var httpClient = new HttpClient())
{
var uri = new Uri(imageAttachment.ContentUrl);
return await httpClient.GetStreamAsync(uri);
}
}

private static bool TryParseAnchorTag(string text, out string url)
{
var regex = new Regex("^<a href=\"(?<href>[^\"]*)\">[^<]*</a>$", RegexOptions.IgnoreCase);
url = regex.Matches(text).OfType<Match>().Select(m => m.Groups["href"].Value).FirstOrDefault();
return url != null;
}
}
}


Run Bot Application 

The emulator is a desktop application that lets us test and debug our bot on localhost. Now, you can click on "Run the application" in Visual studio and execute in the browser

Cognitive Computer Vision API: Intelligent Image Object Detection Bot

Test Application on Bot Emulator


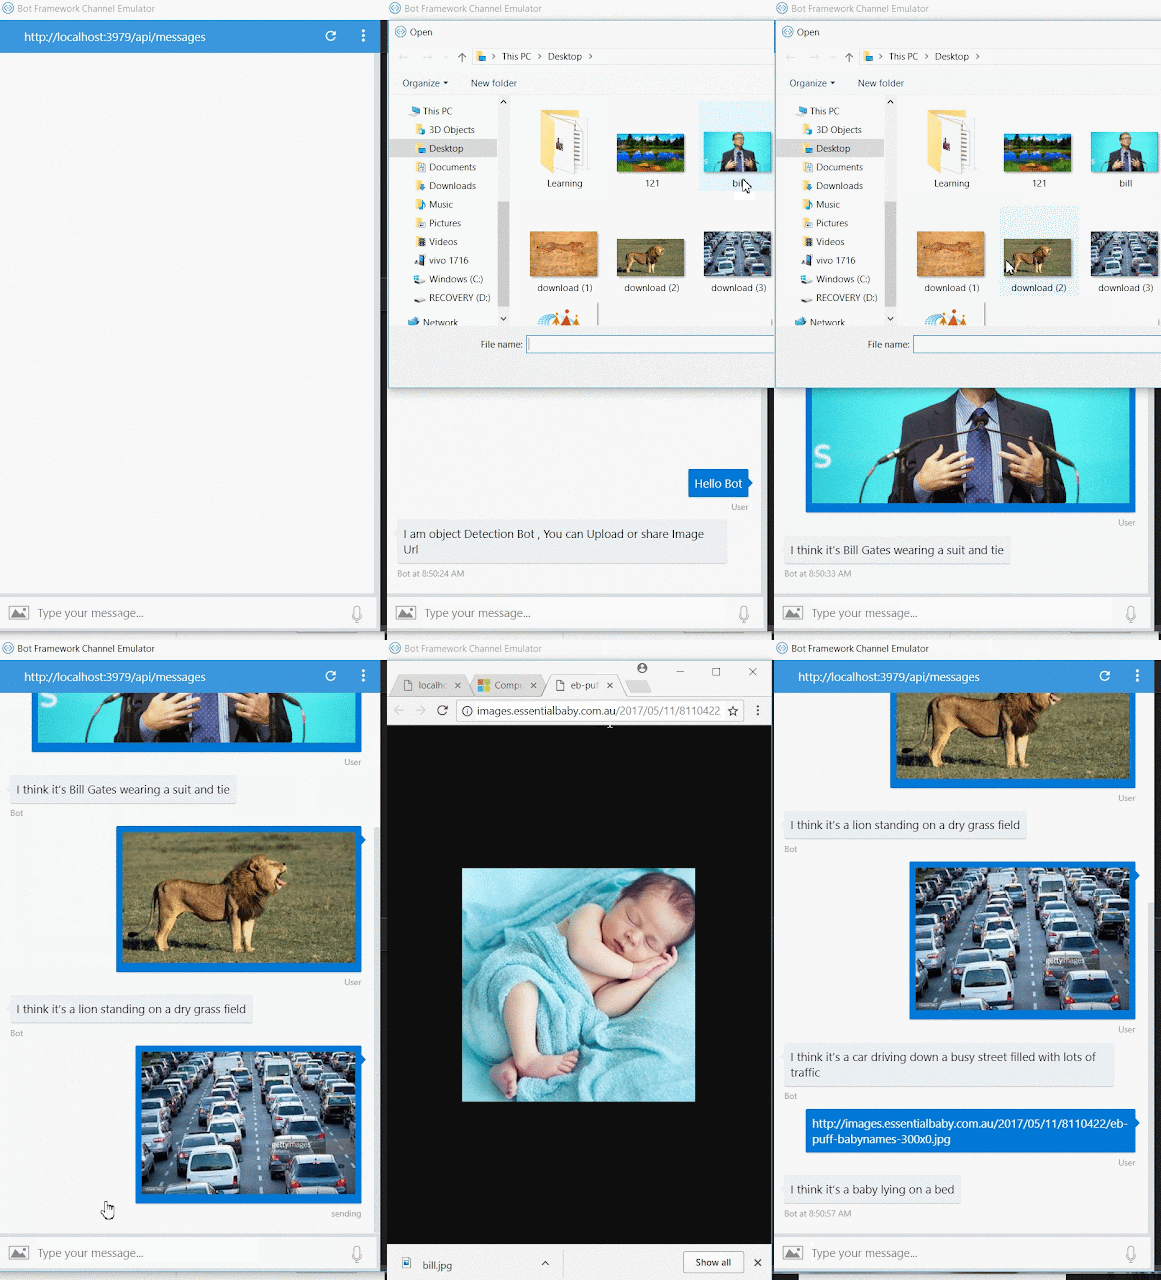
You can follow the below steps to test your bot application.

Open Bot Emulator.

Copy the above localhost url and paste it in emulator e.g. - http://localHost:3979

You can append the /api/messages in the above url; e.g. - http://localHost:3979/api/messages.

You won't need to specify Microsoft App ID and Microsoft App Password for localhost testing, so click on "Connect".

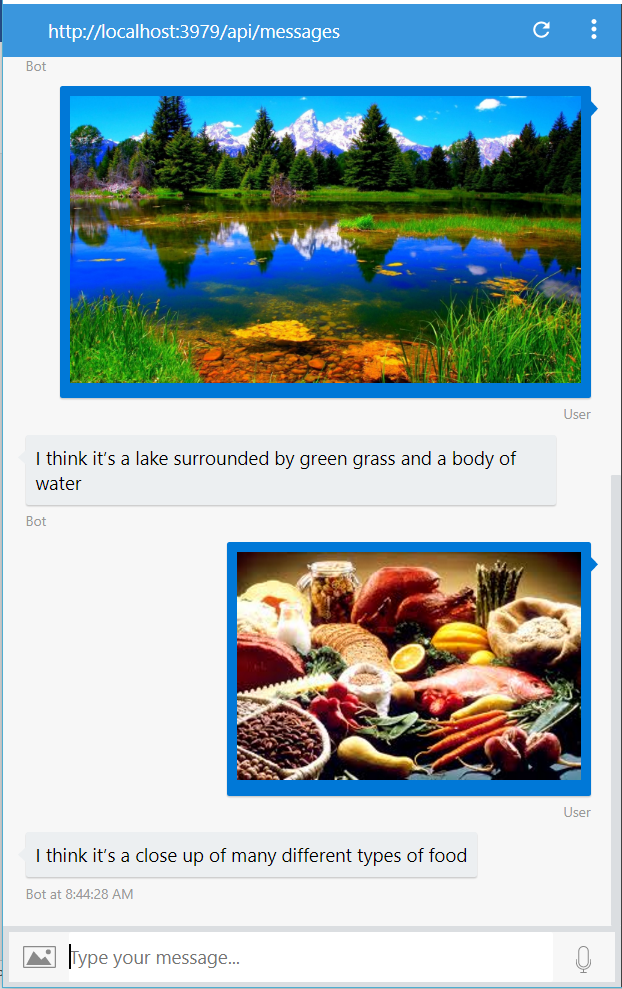
Cognitive Computer Vision API: Intelligent Image Object Detection Bot

Related Article: I have explained about Bot framework Installation, deployment and implementation in the below article

Summary


In this article, you learned how to create an Intelligent Image Object Detection Bot using Microsoft Cognitive Computer Vision API. If you have any questions/feedback/ issues, please write in the comment box.
Introduction :

Bot Framework enables you to build bots that support different types of interactions with users. You can design conversations in your bot to be free. Your bot can also have more guided interactions where it provides the users with choices or actions. The conversation can use simple text strings or more complex rich cards that contain text, images, and action buttons. And, you can add natural language interactions, which let your users interact with your bots in a natural and expressive way.

We are going to create and build Xamarin FAQ Bot using Azure Bot Service and deploy into Webchat .in this article, we are not going to write any coding for implement Xamarin FAQ Bot but be ready with what are the question and answer to train the Bot. I have already created 7000+ more Xamarin Q A as word document, we will use same document for upload and train knowledge base.


Create a QnA Service:

Step 1: 

Navigate to https://qnamaker.ai/ and Sign in using Microsoft Account.

Step 2: 

Click on “Create a knowledge base” from main menu

Step 3:

You can skip “Create a QnA service” step, let we publish QnA service after create knowledge base.


Step 4: 

Provide QnA Knowledge base basic information


Step 5:

 You can extract question and answer pairs from an online FAQ, manuals Entry and upload files with .tsv,.pdf,.doc,.docx,.xls format. If you are trying to enter manual entry skip this step.
Add chit-chat to your bot, to make your bot more conversational and engaging, with low effort. You can easily add chit-chat data sets for 3 pre-defined personalities when creating your KB, and change them at any timer. Chit-chat is supported for 3 predefined personalities

  • The Professional
  • The Friend
  • The Comic

Step 5:

 Click on “Create your KB”


Step 6: 

Wait for a few seconds for load all the knowledge base Q & A to the Online Editor.

Step 7: 

QnA service has loaded our FAQs Editor with two-column knowledge base, without any extra tweaking needed from you. Now you can edit and modify old Q&A and also Select Add new QnA pair to input other greetings and responses.


Step 8: 

The main menu having different option, Edit, Publish, Save, train, test and Settings. While click on Edit the above knowledge base edit screen will open, you can search and filter the question and Edit. After Edit always click on “Save and train” menu option for Save.


Step 9: 

Click on “Publish”. once you publish the knowledge base endpoint available for use in your bot or App

Step 10: 


The Knowledge base will generate following, you can make note. Need to update below details in Azure Hosting.
  • Knowledge base Key
  • Host Address
  • EndPointKey

Create and Publish QnA Bot in Azure:

Step 1: 

Navigate and Login to https://portal.azure.com/.

Step 2: 

Select + Create a resource > Select “AI Machine Learning” > Click on “Web App Bot”


Step 3: 

Let us start create Web App Bot, Provide the Bot Name, resource, location and also follow the step 4, Step 5 for select Bot template and prizing and click on Create.

Step 4: 

You can use the v3 templates, select SDK version of SDK v3 and SDK language of C# or Node.js. Select the Question and Answer template for the Bot template field, then save the template settings by selecting Select.


Step 5: 

You can choose a pricing tier for Bot Search service


Step 6: 

Review your settings, then select Create. This creates and deploys the bot service with XamarinQA to Azure .


Step 7: 

Open Xamarin BotQA App Service from All Resource > Application Settings and edit the QnAKnowledgebaseId, QnAAuthKey, and the QnAEndpointHostName fields to contain the values of your QnA Maker knowledge base. Like below


Test and Implement Web Chat App:

In the Azure portal, click on Test in Web Chat to test the bot and Click on Channel > Deploy bot Application to Web Chat and Implement into your Website or Application. 


Summary

In this article, you learned Create, train, and publish your QnA Maker knowledge base. I have created 7000+ Xamarin Q A knowledge base and deployed into my blog (www.devenvexe.com) and Xamarin Q A Facebook Page, you can try out for demo and If you have any questions/feedback/ issues, please write in the comment box.


Introduction:

Microsoft Cognitive services is set of cloud based intelligence APIs for building richer and smarter application development. Cognitive API will use for Search meta data from Photos and video and emotions, sentiment analysis and authenticating speakers via voice verification.


The Computer Vision API will help developers to identify the objects with access to advanced algorithms for processing images and returning image meta data information. In this article, you will learn about Computer Vision API and how to implement Compute Vision API into Bot application.

You can follow below steps for implement object detection in Bot Application

Computer Vision API Key Creation:

Computer Vision ApI returns information about visual content found in an image. You can follow below steps for create Vision API key.
Navigate to https://azure.microsoft.com/en-us/try/cognitive-services/

Click on “Get API Key “or Login with Azure login.
Login with Microsoft Account and Get API key 


Copy API key and store securely, we will use this API key into our application

Step 2: 

Create New Bot Application:

Let's create a new bot application using Visual Studio 2017. Open Visual Studio > Select File > Create New Project (Ctrl + Shift +N) > Select Bot application.


The Bot application template gets created with all the components and all required NuGet references installed in the solutions.


In this solution, we are going edit Messagecontroller and add Service class.
Install Microsoft.ProjectOxford.Vision Nuget Package:
The Microsoft project oxford vision nuget package will help for access cognitive service so Install “Microsoft.ProjectOxford.Vision” Library from the solution


Create Vision Service:

Create new helper class to the project called VisionService that wraps around the functionality from the VisionServiceClient from Cognitive Services and only returns what we currently need. 

using System;
using System.Collections.Generic;
using System.IO;
using System.Linq;
using System.Threading.Tasks;
using System.Web;
using Microsoft.ProjectOxford.Vision;
using Microsoft.ProjectOxford.Vision.Contract;
namespace BotObjectDetection.Service
{
public class VisionService : ICaptionService
{
/// <summary>
/// Microsoft Computer Vision API key.
/// </summary>
private static readonly string ApiKey = "<API Key>";
/// <summary>
/// The set of visual features we want from the Vision API.
/// </summary>
private static readonly VisualFeature[] VisualFeatures = { VisualFeature.Description };
public async Task<string> GetCaptionAsync(string url)
{
var client = new VisionServiceClient(ApiKey);
var result = await client.AnalyzeImageAsync(url, VisualFeatures);
return ProcessAnalysisResult(result);
}
public async Task<string> GetCaptionAsync(Stream stream)
{
var client = new VisionServiceClient(ApiKey);
var result = await client.AnalyzeImageAsync(stream, VisualFeatures);
return ProcessAnalysisResult(result);
}
/// <summary>
/// Processes the analysis result.
/// </summary>
/// <param name="result">The result.</param>
/// <returns>The caption if found, error message otherwise.</returns>
private static string ProcessAnalysisResult(AnalysisResult result)
{
string message = result?.Description?.Captions.FirstOrDefault()?.Text;
return string.IsNullOrEmpty(message) ?
"Couldn't find a caption for this one" :
"I think it's " + message;
}
}
}
In the above helper class, replace vision API key and call the Analyze image client method for identify image meta data

Messages Controller:

MessagesController is created by default and it is the main entry point of the application. it will call our helper service class which will handle the interaction with the Microsoft APIs. You can update “Post” method like below 

using System;
using System.Diagnostics;
using System.IO;
using System.Linq;
using System.Net;
using System.Net.Http;
using System.Net.Http.Headers;
using System.Text.RegularExpressions;
using System.Threading.Tasks;
using System.Web.Http;
using BotObjectDetection.Service;
using Microsoft.Bot.Builder.Dialogs;
using Microsoft.Bot.Connector;
namespace BotObjectDetection
{
[BotAuthentication]
public class MessagesController : ApiController
{
private readonly ICaptionService captionService = new VisionService();
/// <summary>
/// POST: api/Messages
/// Receive a message from a user and reply to it
/// </summary>
public async Task<HttpResponseMessage> Post([FromBody]Activity activity)
{
if (activity.Type == ActivityTypes.Message)
{
//await Conversation.SendAsync(activity, () => new Dialogs.RootDialog());
var connector = new ConnectorClient(new Uri(activity.ServiceUrl));
string message;
try
{
message = await this.GetCaptionAsync(activity, connector);
}
catch (Exception)
{
message = "I am object Detection Bot , You can Upload or share Image Url ";
}

Activity reply = activity.CreateReply(message);
await connector.Conversations.ReplyToActivityAsync(reply);
}
else
{
HandleSystemMessage(activity);
}
var response = Request.CreateResponse(HttpStatusCode.OK);
return response;
}

private Activity HandleSystemMessage(Activity message)
{
if (message.Type == ActivityTypes.DeleteUserData)
{
// Implement user deletion here
// If we handle user deletion, return a real message
}
else if (message.Type == ActivityTypes.ConversationUpdate)
{
// Handle conversation state changes, like members being added and removed
// Use Activity.MembersAdded and Activity.MembersRemoved and Activity.Action for info
// Not available in all channels
}
else if (message.Type == ActivityTypes.ContactRelationUpdate)
{
// Handle add/remove from contact lists
// Activity.From + Activity.Action represent what happened
}
else if (message.Type == ActivityTypes.Typing)
{
// Handle knowing tha the user is typing
}
else if (message.Type == ActivityTypes.Ping)
{
}
return null;
}
private async Task<string> GetCaptionAsync(Activity activity, ConnectorClient connector)
{
var imageAttachment = activity.Attachments?.FirstOrDefault(a => a.ContentType.Contains("image"));
if (imageAttachment != null)
{
using (var stream = await GetImageStream(connector, imageAttachment))
{
return await this.captionService.GetCaptionAsync(stream);
}
}
string url;
if (TryParseAnchorTag(activity.Text, out url))
{
return await this.captionService.GetCaptionAsync(url);
}

if (Uri.IsWellFormedUriString(activity.Text, UriKind.Absolute))
{
return await this.captionService.GetCaptionAsync(activity.Text);
}
// If we reach here then the activity is neither an image attachment nor an image URL.
throw new ArgumentException("The activity doesn't contain a valid image attachment or an image URL.");
}
private static async Task<Stream> GetImageStream(ConnectorClient connector, Attachment imageAttachment)
{
using (var httpClient = new HttpClient())
{
var uri = new Uri(imageAttachment.ContentUrl);
return await httpClient.GetStreamAsync(uri);
}
}
private static bool TryParseAnchorTag(string text, out string url)
{
var regex = new Regex("^<a href=\"(?<href>[^\"]*)\">[^<]*</a>$", RegexOptions.IgnoreCase);
url = regex.Matches(text).OfType<Match>().Select(m => m.Groups["href"].Value).FirstOrDefault();
return url != null;
}
}
}

Run Bot Application

The emulator is a desktop application that lets us test and debug our bot on localhost. Now, you can click on "Run the application" in Visual studio and execute in the browser


  • Test Application on Bot Emulator
  • You can follow the below steps to test your bot application.
  • Open Bot Emulator.
  • Copy the above localhost url and paste it in emulator e.g. - http://localHost:3979
  • You can append the /api/messages in the above url; e.g. - http://localHost:3979/api/messages.
  • You won't need to specify Microsoft App ID and Microsoft App Password for localhost testing, so click on "Connect".

Related Article:

I have explained about Bot framework Installation, deployment and implementation in the below article

Summary

In this article, you learned how to create an Intelligent Image Object Detection Bot using Microsoft Cognitive Computer Vision API. If you have any questions/feedback/ issues, please write in the comment box.

Introduction :

Bot Framework enables you to build bots that support different types of interactions with users. You can design conversations in your bot to be free. Your bot can also have more guided interactions where it provides the users with choices or actions. The conversation can use simple text strings or more complex rich cards that contain text, images, and action buttons. And, you can add natural language interactions, which let your users interact with your bots in a natural and expressive way.

The Bot Builder SDK for .NET is an easy-to-use framework for developing bots using Visual Studio in Windows but for Visual Studio for Mac, it is not available in the official release. I have modified the Bot Framework template to work on Visual Studio for Mac and started using all the Bot Framework features on my Mac machine.

In this article, I am showing how to create, build, and test a Bot application using a Mac machine.


Prerequisites

  • Download and install Visual Studio for Mac
  • Clone and download the Bot Framework Project Template for Mac.
  • Download and install the Bot Framework Emulator for Mac.
  • Configure and Register Project Template

Step 1

Clone and download the Bot Framework template for Mac from the following URL - https://goo.gl/9ivoov

Step 2

Open the *.Csproj file or Visual Studio solution.

Step 3

Select and right-click on “Project” from Visual Studio Mac > “Restore NuGet packages”.

Step 4

Right-click on Project, select the Project Options, select XSP Web server and expand the Run option. Update the port number to 3978 like in the below screen.


Step 5

Build the solution. If it has successfully completed the Build, the project template gets added into the "Custom Folders" from Visual Studio Preference.


Create a Bot Application

Let's start with creating a new bot application in Visual Studio for Mac. Open Visual Studio 2017, create a new project with C#. Select the Bot applications template as below.


Provide the project Name, solution name, and location as below.


The bot application gets created with all the components and all required NuGet references installed.


Update the code

The default application adds a simple code snippet and we have no need to change anything. If you want to test your custom message, you can change it like below.

You can find the messagereceiveAsync method from Dialogs/RootDialog.cs file. In this method, the activity.Text container will return the user text input so that you can reply to a message based on the input text.

private async Task MessageReceivedAsync(IDialogContext context, IAwaitable < object > result) {
var activity = await result as Activity;
// calculate something for us to return
int length = (activity.Text ? ? string.Empty).Length;
// return our reply to the user
//test
if (activity.Text.Contains("technology")) {
await context.PostAsync("Refer C# corner website for tecnology http://www.c-sharpcorner.com/");
} else if (activity.Text.Contains("morning")) {
await context.PostAsync("Hello !! Good Morning , Have a nice Day");
}
//test
else if (activity.Text.Contains("night")) {
await context.PostAsync(" Good night and Sweetest Dreams with Bot Application ");
} else if (activity.Text.Contains("date")) {
await context.PostAsync(DateTime.Now.ToString());
} else {
await context.PostAsync($ "You sent {activity.Text} which was {length} characters");
}
Wait(MessageReceivedAsync);
}

Run Bot Application

Emulator is a desktop application that lets you test and debug your bot on localhost or remotely. Now, you can click on "Run the application" in any browser.


Install Bot Emulator

If you have not installed the Bot Emulator on Mac, you need to download and install the emulator for testing the bot application. You can download the Bot Emulator from - https://goo.gl/kZkoJT


Follow the below steps to test your bot application on Mac.

  • Open Bot Emulator.
  • Click "New Bot Configuration".
  • Copy the above localhost URL and paste it into the emulator. For example - http://127.0.0.1:3978
  • You can append the /api/message in the above URL; e.g. - http://127.0.0.1:3978/api/messages.
  • You won't need to specify the MSA ID and MSA password for localhost testing. So, click on "Save and Connect".


You can send a message to the bot application. The bot will reply as per your guide/code.


Summary

In this article, you learned how to create a bot application using Visual Studio for Mac. If you have any question, feedback, or issues, please write in the comment box.

Introduction

The Bot Framework enables you to build bots that support different types of interactions with users. You can design conversations in your bot to be freeform. Your bot can also have more guided interactions where it provides the user choices or actions. The conversation can use simple text strings or more complex rich cards that contain text, images, and action buttons. And you can add natural language interactions, which let your users interact with your bots in a natural and expressive way.


In this article, You will get understand deploy a bot application to Azure using visual studio 2019, you can register app in Azure portal and test in Bot Framework Emulator and Webchat Channel.

Setting up the development environment

In order to follow along with this article, you will need the following apps and accounts:
  • Microsoft Account (MSA) – Use your existing account, or click here to create a new account.
  • Visual Studio 2019 IDE – Available for free download here
  • Azure Account – Use your MSA Account to sign-in to the Azure Portal
  • Download the Bot Framework V4 Emulator for your platform from the GitHub releases
  • You can read my previous article for Getting Started with Bots Using Visual Studio 2019 from here

Register Bot Application

After installing and configuring all of the above listed software and accounts, continue to the below steps.

Step 1: 

Create a new bot or register an existing bot with the Azure Bot Service from here


Step 2: 

Click on Sign in button and login with Azure credential

Step 3:

 Click on Create web app Bot

Step 4: 

Start create Web App Bot and click on Create 


Step 5: 

You can provide the following information in Web app bot and create a new Microsoft App Id and password and click on Create


Once its completed, it will generate Application end point url and appID and there are 4 service will create automatically in azure portal as follows 
  • App service
  • APP service plan
  • Web app bot
  • Application insights.
Open your app Service in Azure and copy the Microsoft App Id, Microsoft App Password,LUIS Hostname,Key and AppID values from application settings .


Create Bot Application using Visual Studio 2019.

You can read my previous article for setup Bot development environment in visual studio 2019 and create simple Bot using Visual Studio 2019 from here

Update AppSeting.JSON File

Open appsetting.json file from Visual studio 2019 and past your MicrosoftAppId, apppassword, LUisAppID, LUISApIKey and host name.


Run Bot Application in Local Emulator

Let we start test our bot application in locally using Bot emulator. Open emulator and click configure new Bot and provide local end point URL and Appid and password.


Publish Bot Application into Azure App Service

Once tested your application in locally. Now, we can publish bot application to Azure. Right click on Bot Project > Select on Publish and start publish bot application into azure


Visual Studio Azure publish Wizard

Azure auto created App service while create web app chat, so select on Microsoft Azure App Service > select on Existing and click on publish


Login and Select Service:

Login with Microsoft Azure account and select the app existing app service from your resource group and click on Ok.


Bot Deploy confirmation:

Copy the Destination URL value to the clipboard (you'll need this value later to test the connection to the bot)


The following screen will display web publish activity status and as well as Site Url, once service published, it will redirect and open the browser.


Test Bot Application on Azure Portal

We have completed all the steps for publish the application using VS 2019, You can open your Azure portal and navigate to your web app Chat channel and Click on test in Web App Chat.


Summary

In this article, I hope you well understood about Deploy a bot application to Azure portal using Visual Studio 2019. If you have any questions/ feedback/ issues, please write in the comment box.


Featured Post

Improving C# Performance by Using AsSpan and Avoiding Substring

During development and everyday use, Substring is often the go-to choice for string manipulation. However, there are cases where Substring c...

MSDEVBUILD - English Channel

MSDEVBUILD - Tamil Channel

Popular Posts