.Net MAUI is a cross-platform framework for creating native mobile and desktop apps with c# and XAML. You can refer to my
previous article for getting started with the Dotnet MAUI application. Building iOS application in Windows machine Using Visual Studio 2022, Will do following two approaches for debugging and build the iOS application.
- Remote Host (Required Mac)
- Xamarin Hot Restart (Without Mac)
In this article, I will show Pair to Mac M1 Chip from windows machine for MAUI iOS app using Visual Studio 2022 preview. I am going to show a POC app with Visual Studio2022 preview, you can also use the same steps in Visual Studio 2019 or 2022++ version.

Mac M1 Chip Setup
Mac Setup is ready here with the following configuration, Upgraded macOS Monterey 12.0.1 version in the Apple M1 Pro Macbook.
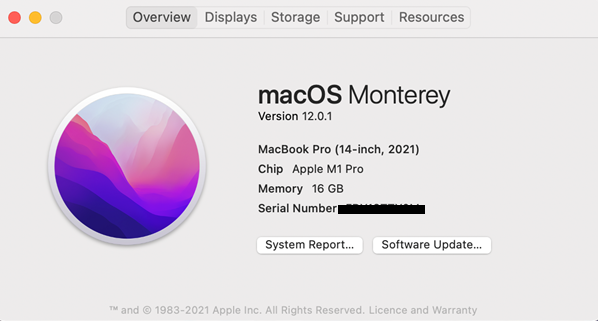
The Mac system installed
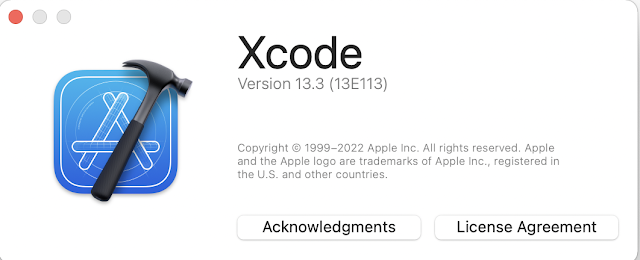
Xcode 13.3 ++ and
Visual Studio for mac. You have to open Xcode manually after installing so that it can add any additional components.


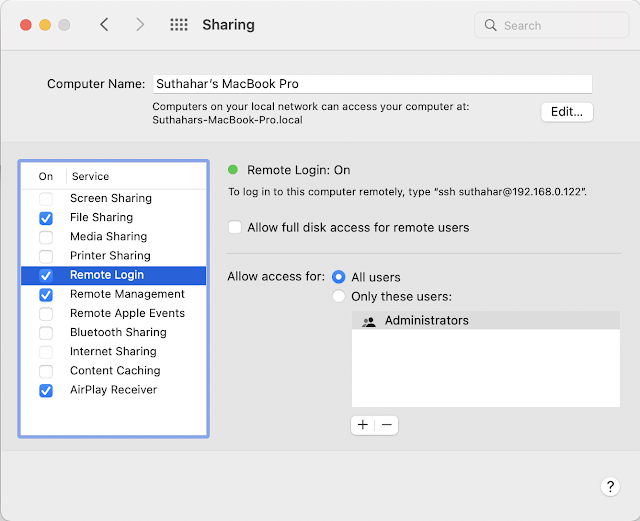
You must follow the below steps to enable Remote Host.
- Select the “System preferences “
- Click on the Sharing pane.


You must configure remote login and follow the below configuration
- Remote login Set as “ON”
- Configured to allow access for all users.
- If prompted, configure the macOS firewall.
You must connect your Mac with the same Wi-Fi network or wired network.

You can click on the Computer icon to connect mac machine or select Tools > iOS > Pair to Mac.

If it is on the same network as the windows machine, the Mac should now be discoverable by Visual studio, if the Mac is still not discoverable, try manually adding a Mac.
Provide Mac name or Mac IP address which is in the remote Login preference on the Macbook.
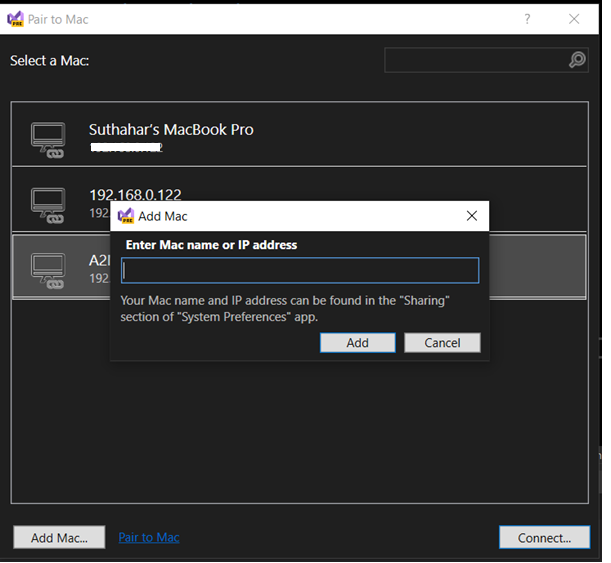
At the prompt, enter your username and password for that machine after the IP address is entered in the above screen.
Pair to Mac uses these credentials to create a new SSH connection to the Mac, Remote Host will take care of automatically checking the connection and verifying the Mac machine setup, if any mismatch you will get the error popup and ask you resolve and retry.
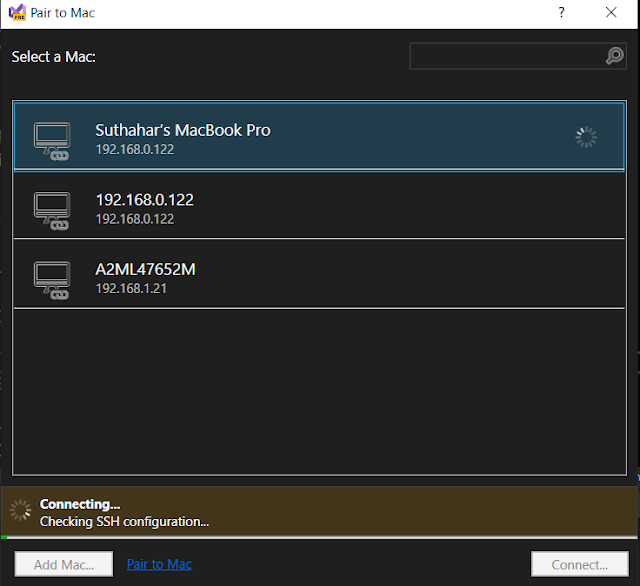
When Visual Studio is connected to a Mac, that Mac's item in the Pair to Mac dialog displays an icon indicating that it is currently connected
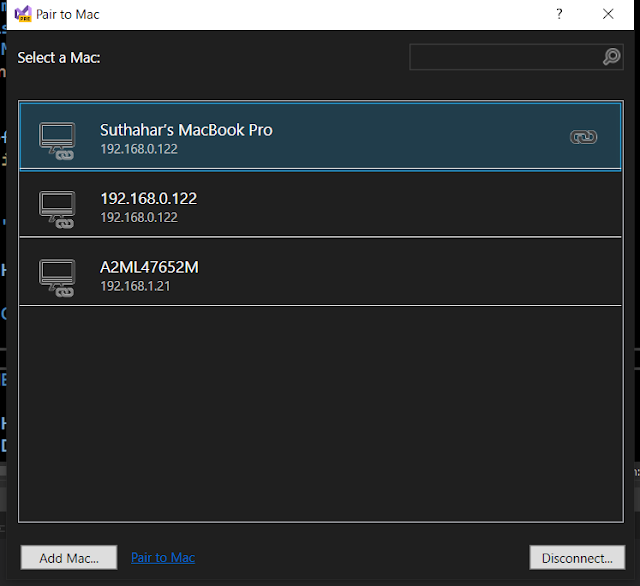
You will be able to see the below screen automatically. All iOS simulators are loaded after the mac connected successfully and also able to see the computer icon indicated with a green icon.

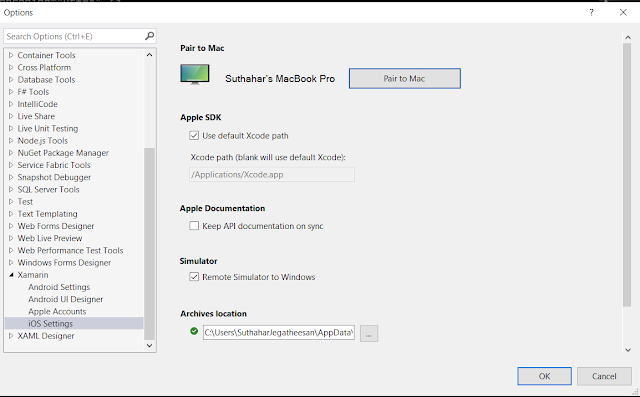
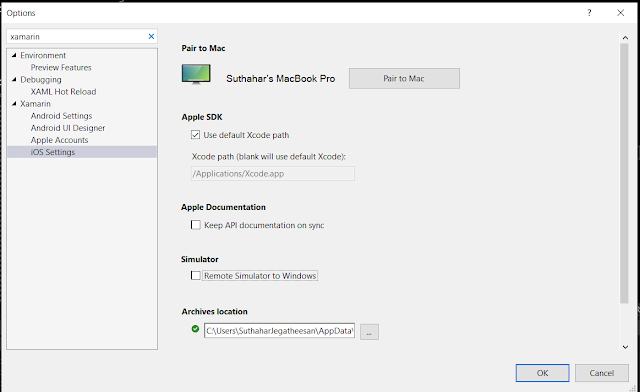
If you have any issue verify in iOS setting a windows machine, On Visual Studio > Tools > options > Select the iOS setting.
- Verify the XCode path, make sure Xcode installed in the application folder from Mac machine
- Remote Simulation should be on, otherwise, Simulator won’t be displayed on windows machine
Remote iOS Simulator shows up as a black screen
Completely unable to use the iOS Simulator for Windows 10, only happening when using an M1-based Mac. When using an Intel-based Mac, we can successfully use the iOS simulator.
A fix for this issue has been Microsoft implemented and is being prepared for release. Microsoft will update to all once it becomes available for download.
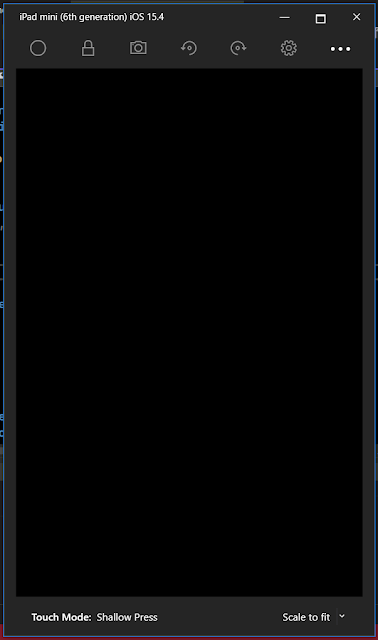
There is a workaround to force the simulator to load on the Mac M1, which works, but is certainly not a great solution and isn’t viable for many.
You can go to Tools->Options->Xamarin->iOS Settings and uncheck ‘Remote Simulator to Windows’.
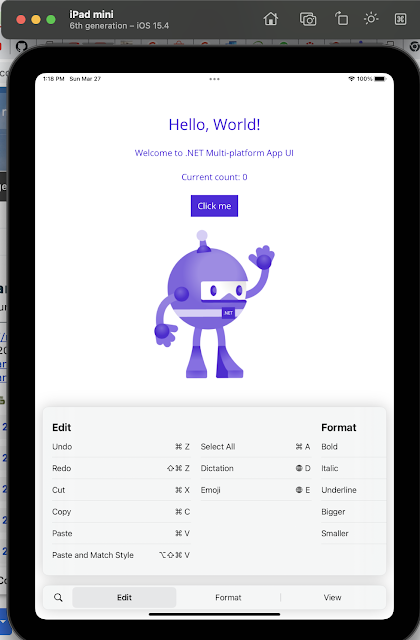
The MAUI application is ready to show on the iOS simulator from Mac M1 chip.
Summary
This article showed steps how to use Pair to Mac M1 chip to connect Visual Studio 2022 preview to a Mac build host, enabling Visual Studio 2022 preview developers to build iOS applications with MAUI
IntroductionThe Passwords and Security Codes (OTP) are a modern necessity required for security and privacy but initially iOS does not support auto read feature.
iOS 12 eases the tedious aspects of account setup and sign-in by automatically suggesting and using strong, unique passwords and by bringing one-time password to the QuickType bar so users can fill them with one tap. Here we’ll learn how to implement autofill OTP in your app using Xamarin Forms .
Message Format Rules
Security code is only work with System keyboard. So, avoid using custom keyboard.
Make sure OTP message phrase has “code” or “passcode” and message is copy.
Create New Xamarin Forms Application
In order to implement Autofill OTP message, let’s start creating a new Xamarin.Forms project using Visual Studio 2019 or VS mac. When accessing
Visual Studio 2019 mac for the first time, you will come across a new interface for opening a creating the projects.
Open Visual Studio Mac >>Create New Project or select open recent application.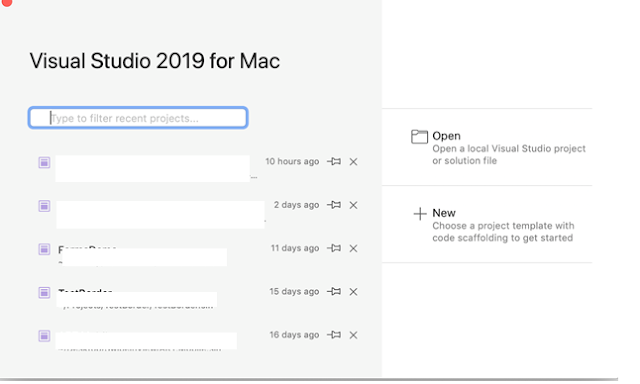
The available templates will appear on a mac like below.
Select Xamarin.Forms application with different mobile platforms.
Custom Control
One time code type available only specific to iOS device, not in Android, so create a Xamarin.Forms custom Entry control in the .NET Standard library project, enabling developers to override the default native rendering with their own platform-specific customization.
using System;
using Xamarin.Forms;
namespace ReadOTPIOS
{
public class AutoFillControl : Entry
{
public AutoFillControl()
{
}
}
}UI Design
The AutoFillControl control can be referenced in XAML in the .NET Standard library project by declaring a namespace for its location and using the namespace prefix on the control element. The following code example shows how the AutoFillControl control can be consumed by a XAML page:
<?xml version="1.0" encoding="utf-8"?>
<ContentPage xmlns="http://xamarin.com/schemas/2014/forms"
xmlns:x="http://schemas.microsoft.com/winfx/2009/xaml"
xmlns:local="clr-namespace:ReadOTPIOS" x:Class="ReadOTPIOS.MainPage"
>
<StackLayout Orientation="Horizontal">
<Label
FontSize="Large"
HorizontalOptions="Center" Text="Welcome to iOS 12 Read and Autofill OTP from SMS using Xamarin Forms" />
<local:AutoFillControl
FontSize="Large"
HorizontalOptions="Center"
Keyboard="Numeric"
Placeholder="XXXXXX" />
</StackLayout>
</ContentPage>IOS Renderer
The following code example shows the custom renderer for the iOS platform. The call to the base class's OnElementChanged method instantiates an iOS UITextField control, with a reference to the control being assigned to the renderer's Control property.
To enable password autofill on a UITextField we need to set the UItextContentTypeproperty as a OneTimeCode.
using ReadOTPIOS;
using ReadOTPIOS.iOS;
using UIKit;
[assembly: ExportRenderer(typeof(AutoFillControl), typeof(AutoFillRenderer))]
namespace ReadOTPIOS.iOS
{
public class AutoFillRenderer: EntryRenderer
{
protected override void OnElementChanged(ElementChangedEventArgs<Entry> e)
{
base.OnElementChanged(e);
if (e.NewElement != null)
{
Control.TextContentType = UITextContentType.OneTimeCode;
}
}
}
}
The application source code available in
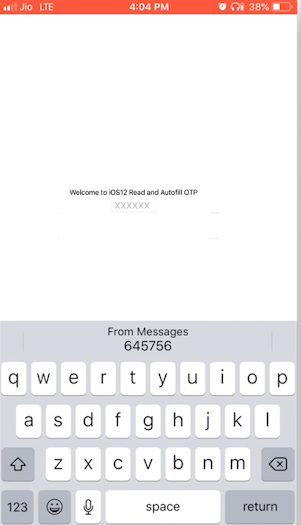
Github. IOS simulator won’t allow to send messages, so let you try and deploy applications to IOS device and send a message to device for testing.
 Summary
This article has demonstrated how to create a Read and
Autofill OTP from SMS using Xamarin Forms Entry control. I hope this article will help you. Please leave your feedback/query using the comments box, and if you like this article, please share it with your friends.
or reload the browserDisable in this text fieldEditEdit in GingerEdit in GingerEnable GingerCannot connect to Ginger Check your internet connection
or reload the browserDisable in this text fieldEditEdit in GingerEdit in Ginger
On 2011 at Xamarin announced great and happy news to all c#.net developer, can develop ios application using xamarin .
On 2016 Microsoft announced that they had acquired Xamarin and all the visual studio developer can develop ios and android application, without pay any extra payment.
iOS developer they can do for testing in simulator if they want to test in the device, need to buy Apple Developer account, its cost 99$ /year.
On June 8 2015 at the Apple Worldwide Developers Conference Xcode version 7 was announced and good news is that you can develop and test your apps on your iOS device without a paid Apple Developer account.
This is great news for all the iOS developer, before upload store we can do testing ios application from device without a paid any payment.

In this article, I am going to share about how to deploy xamarin.ioS application to iOS device using free provisioning file
You can follow bellows steps for how to setup and deploy xamarin.iOS application into iOS device.
Step 1: Add Apple Account from Xcode
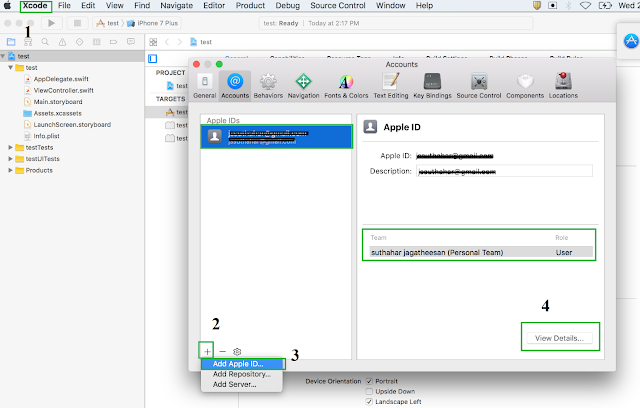
In mac Machine, Open Xcode , Xcode Menu >Preferences > Click on Account tab > Select + Add Apple ID > login with Apple ID
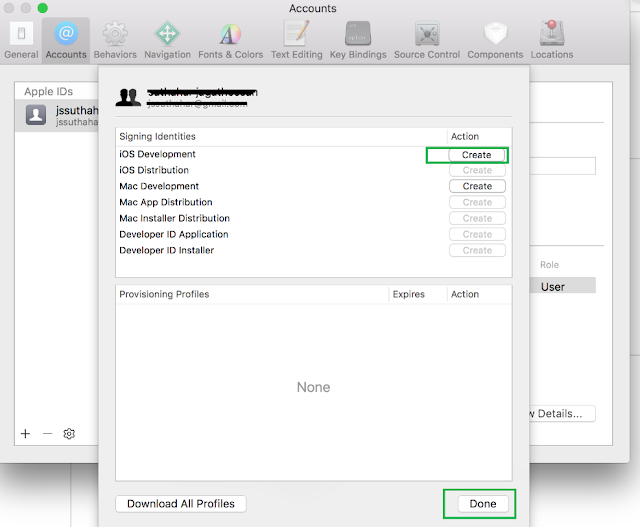
Click on View Details and create signing identity and click on create button next to iOS development
Step 2: Create XCode project:
Xcode > create new project > project name as “testapp” > Connect iphone /IPad from mac machine > Select your device and press run button
You will get Code Singing issue
Issue 1: Xcode 7: Project requires a development team
If your using XCode 7 means, you will get following error

Select your Team as below from Project Options and General tab

Issue 2: Xcode8: Code signing Error in Build Error:
If you are using Xcode 8 or above, the code signing error will appear while build xcode project

Solution:
Step 2.1: Go to the ioS project editor
Step 2.2: Select the General Section
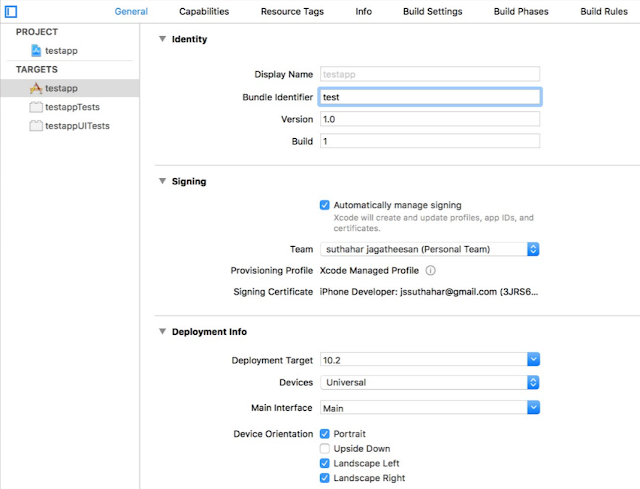
Step 2.3: Select Checkbox for Automatically manage signing
Step 2.4: Select the Personal Team you created earlier from the ‘Team’ dropdown in the ‘Signing’ section
Step 3: Trusting the certificate from device
You will get following error could not launch “Your app name “

In your
iOS device > open the Settings > go to general > Device management (if you’re not getting this option re deploy the application again)
You will see the email address associated with the Apple ID you used to code sign your app.

Tap it, then tap ‘Trust <your_email>’
Now go back to xcode and run the application
Step 4: Update bundle Identifier from Xamarin Project:
In Xamarin.iOS project , Goto Info.Plist file > Change Bundle Identifier (use same xcode project bundle identifier) 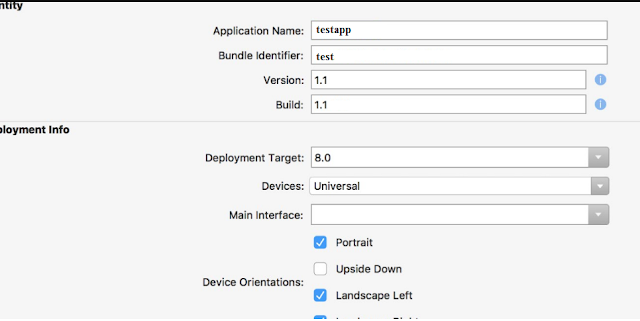
And make sure from project options and select IOS bundle signing > Signing identity select your apple account
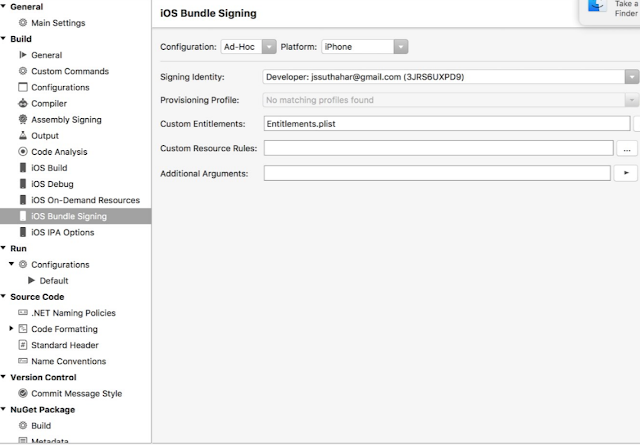
Select your iphone device from xamarin.ios project and click on run the application.

I believe this article will helpful for you deploy application to ios device ,if you have question /issue/feedback share into comments box .
Enable GingerCannot connect to Ginger Check your internet connection
or reload the browserDisable in this text fieldEditEdit in GingerEdit in Ginger
or reload the browserDisable in this text fieldEditEdit in GingerEdit in Ginger
Storyboards feature first introduced in iOS 5 that save time building user interfaces for iOS mobile apps. Storyboards allow you to prototype and design multiple view controller views within one file. Before Storyboards you had to use XIB files and you could only use one XIB file per view (UITableViewCell, UITableView or other supported UIView types).
A Storyboard is the visual representation of all the screens in an application. It contains a sequence of scenes, with each scene representing a View Controller and its Views. These views may contain objects and controls that will allow your user to interact with your application.
The storyboard is a collection of views and controls (or subviews) is known as a Content View Hierarchy. Scenes are connected by segue objects, which represent a transition between view controllers. This is normally achieved by creating a segue between an object in the initial view, and the connecting view. The relationships on the design surface.
The following image shows what a storyboard looks like, and it’s similar to the storyboard you’ll build the Storyboard in the end of the article.
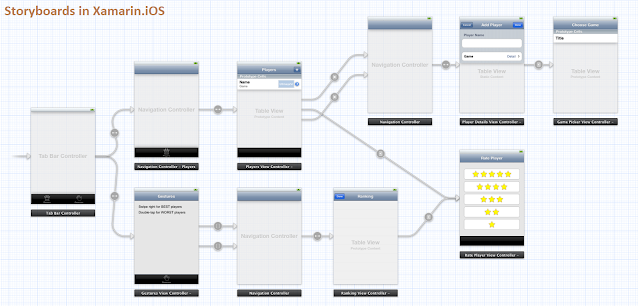
Create New Xamarin.iOS Application In order to learn the storyboard, let’s start creating a new Xamarin.iOSproject using Visual Studio 2019 or VS for Mac. When using Visual Studio 2019 on a Windows machine, you will need to pair the Mac machine.
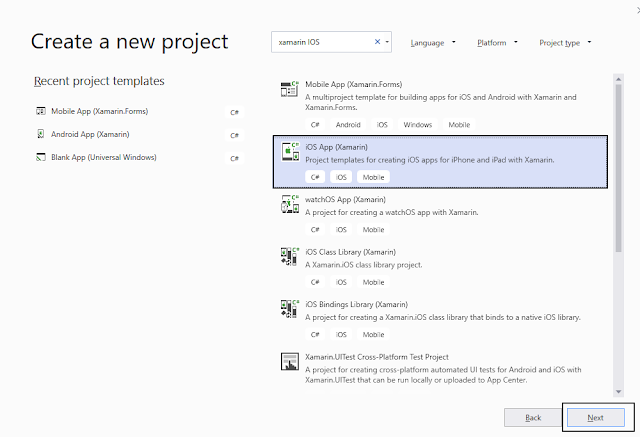
Open Visual Studio 2019 >>Create New Project or select "
Open Recent Application" and the available templates will appear on a Windows like below. Select Xamarin.iOS app and click on “Next”
Create a Empty iPhone/iPad Single View Storyboard Application
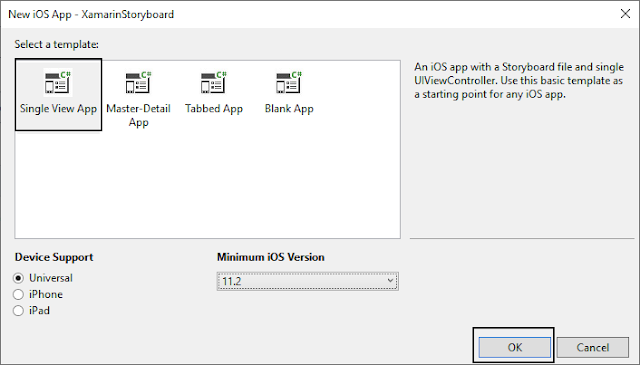
The content of a storyboard is stored as an XML file. Storyboard files are compiled into binary files known as nibs. At runtime, these nibs are initialized and instantiated to create new views. After selection of single view application, solutions template will generate as below
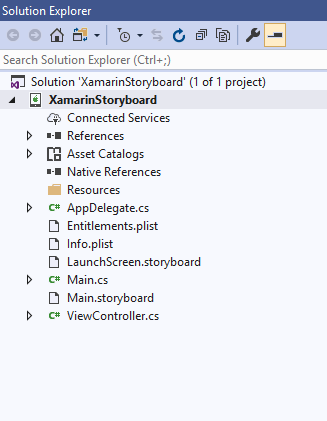
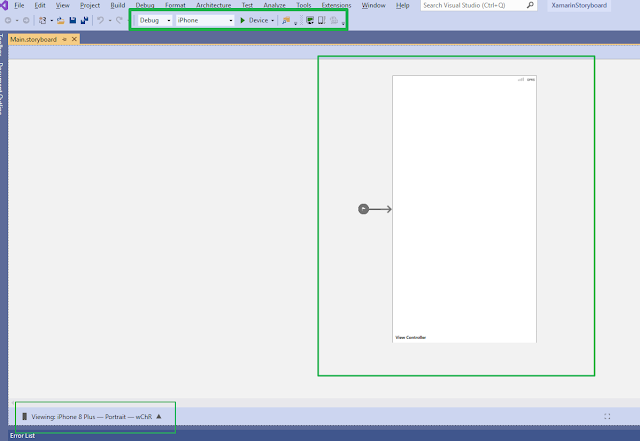
Main StoryBoard: Open Main.storyboard where you can find single view controller. Add one more view controller and update the view controllers as shown below.
View Controller Segue: Let us now connect both the view controllers. Segue is used in iOS development to represent a transition between scenes. To create a segue, hold down the Ctrl key and click-drag from one scene to another. As we drag our mouse, a blue connector appears and select as Show/ Push as image below
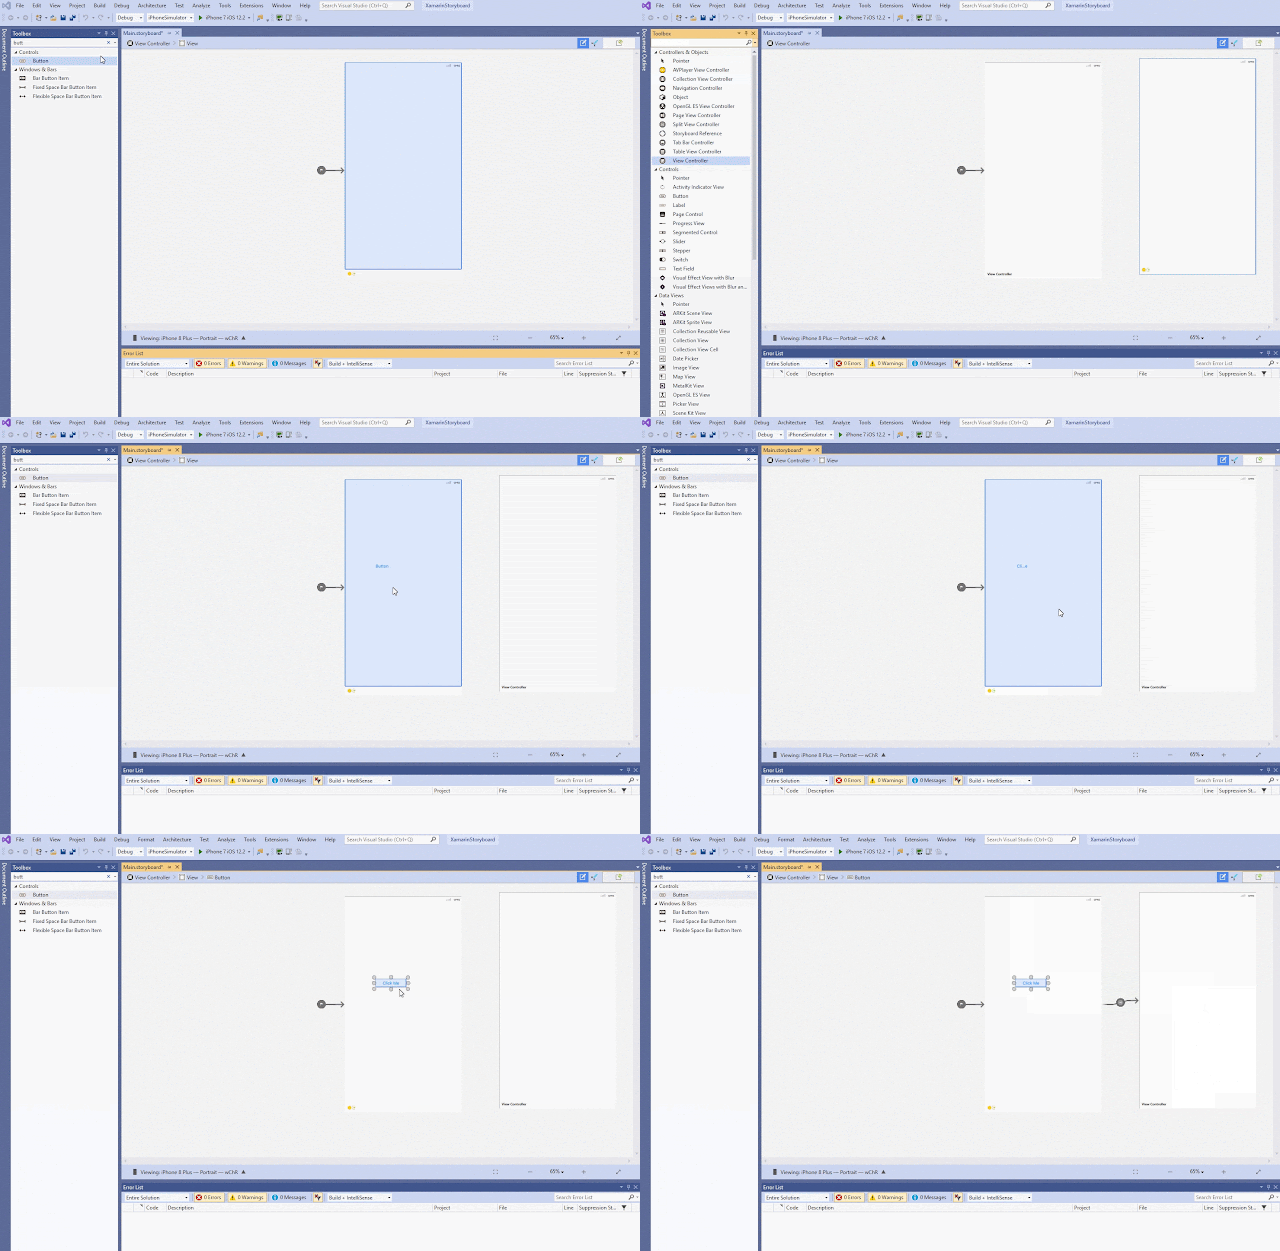
Change View Properties: Add Controls into the view controller and Select the properties, Change the styles as per your needs
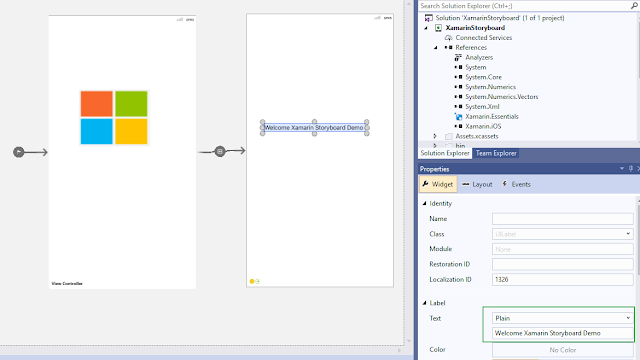
Output: When we run the application in an iPhone device, we'll get the following output and click on button, it will navigate to new screen.

Summary:
This article has demonstrated how to create a iOS Storyboards using Xamairn iOS. I hope this article will help you. Please leave your feedback/query using the comments box, and if you like this article, please share it with your friends.
 Enable GingerCannot connect to Ginger Check your internet connection
or reload the browserDisable in this text fieldEditEdit in GingerEdit in Ginger
Xamarin is great technology for develop cross mobile application development. You can create, Build and Debug iOS application in windows machine using Visual Studio. In this article, I will explain what are the way to debug and build Xamarin.iOS application in windows machine.
Xamarin and Microsoft giving very great solution for create, build and debug IOS application on windows machine using visual studio. but, it cannot do this alone, an IOS app cannot be created without apple Compiler, and it cannot be deployed without apple certificate and code-signing tools. Read below I will explain about software requirement and steps.
Software Requirement
You can install following software from Windows and Mac machine.

Windows Machine
It greatly helps if your machines are physically near each other, since when you build and run on Windows, the iOS Simulator will load on your Mac.
Build and Debug iOS Application
I have explained about basic xamarin.Form application creation in
my previous article .You can refer and create basic xamarin.iOS or xamarin.Form application
After create, Visual Studio will prompt you to prepare your Mac to be the Xamarin build host using below 3 steps.
Mac Machine
Step 1: On the mac Machine, Select “System Preferences” 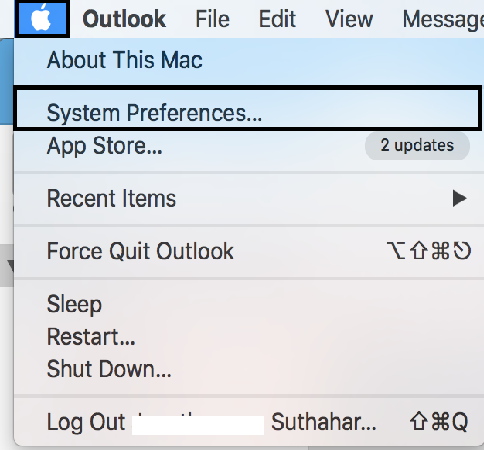
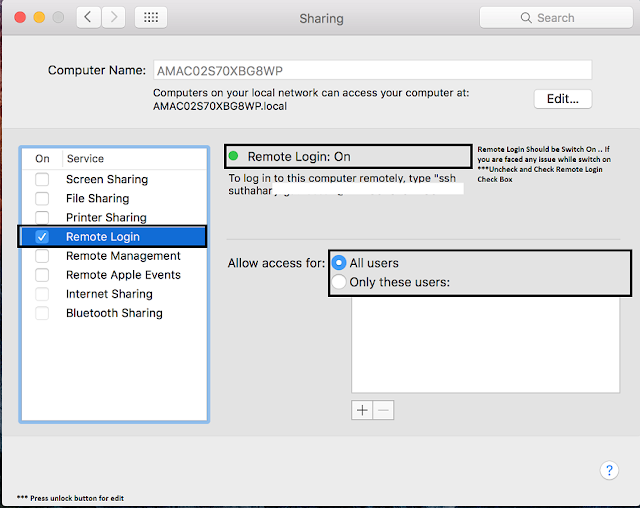
Step 2: In System Preferences, Click on “
Sharing”
Step 3: In Sharing, Turn on Remote Login and Change Allow access to All Users or Only these users and add a user.
Windows Machine
Step 1: In the Visual Studio, you can click on “Connection Indicator “

Step 2: You Can Select your mac name from mac agent window and click on “connect”.
Step 3: you can enter mac username and password and Click on Login .
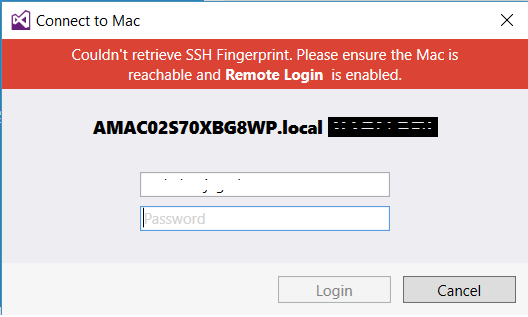
After connection, Connection indicator color will change to green, If its connection is very less bandwidth means it will change to orange color (it’s not recommended for debug application)
Your app will compile and execute, but you won’t see it running on Windows. Instead, you’ll see it on your Mac build host.
iOS Simulator Remoting
The
Evolve 2016 Conference, Xamarin announced iOS Simulator remoting that will soon allow you to interact with apps running in Apple iOS simulator as through the Simulator were running on your Windows Machine.
iOS Simulator Remoting also you need follow above all the steps and below steps as well
Windows Machine
Step 1: Download the
installer and install on your Windows computer
Step 2: After install, In Visual Studio go to Tools > Options > Xamarin > iOS Settings and tick the box for Remote Simulator to Windows:

Output
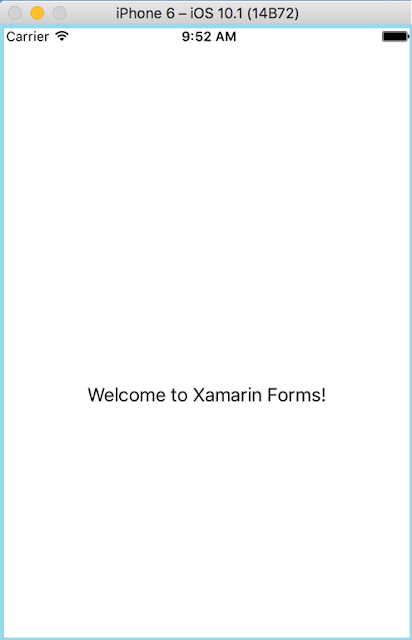
Now build and run solution and ios simulator will open in windows machine
Issues and Resolution
Issue 1:
Error Cannot resolve reference: C:/Program Files (x86)/Reference Assemblies/Microsoft/Framework/Xamarin.iOS/v1.0/Facades/System.IO.FileSystem.Watcher.dll I1Vector.iOS
Resolution:
This issue happened because of different versions of Xamarin.iOS on Windows Machine and mac machine. After updating xamarin.ios, this problem will get resolved.
How to Check xamarin.iOS Version Number ?
In Windows Machine, Go to Visual Studio ➔ Help ➔ About Microsoft Visual Studio
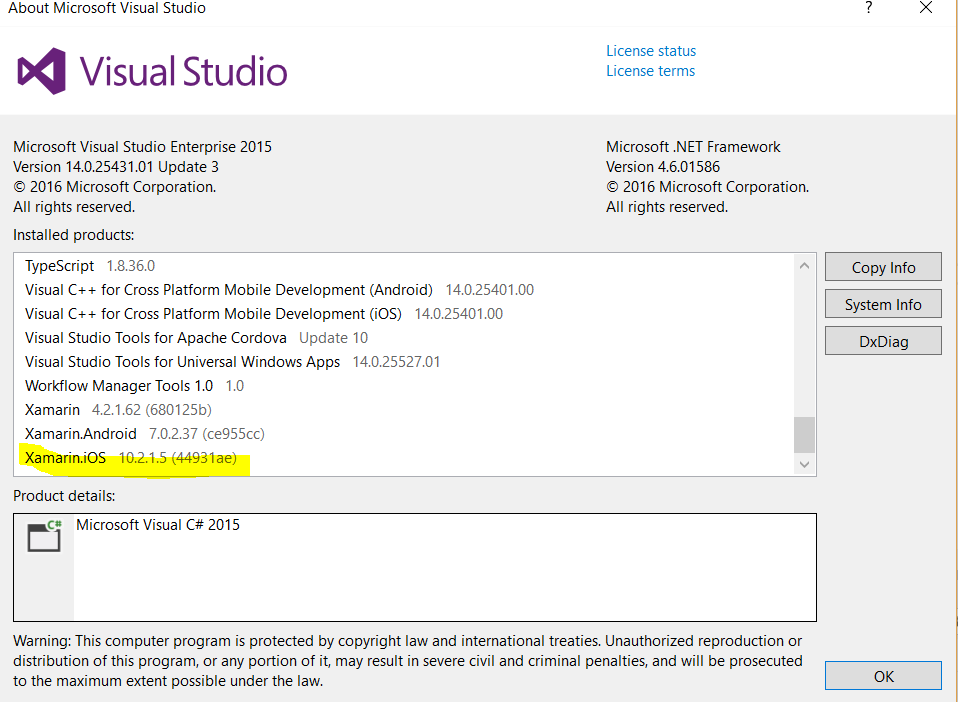
In mac machine, Go to Xamarin Studio ➔ Select Xamarin Studio Menu ➔ Click About Xamarin Studio ➔ click Show details

How to Update Xamarin.Ios in Mac and Windows?
Mac Machine:
Go to xamarin Studio and Click on “Check for Update” and Update
Windows Machine:
Go to Visual Studio ➔ Tools ➔ extensions and updates.
Some time it won’t available in update list. if it’s not available, go to control Panel➔Uninstall program ➔ Select Visual studio ➔ and Click Change option and update
Issue 2: Mac Agent can't connect after update:
Starting connection to mac machine. Xcode license must be accepted in order to be connected and working against the Mac
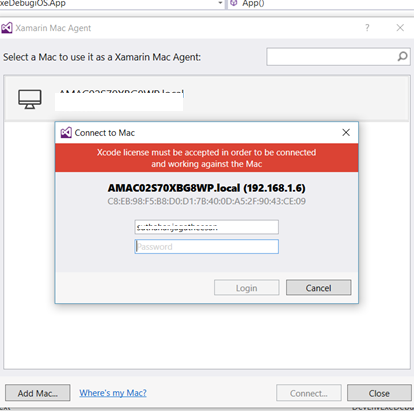
Solution:
Go to Xcode ➔ Preferences ➔ Location
Check if "Command Line Tool" set or Select XCode version
Run sudo xcodebuild -license in terminal
Xcode license must be accepted press Space bar and press q
Issue 3: iOS simulator not display on Windows
Solution 1: Check Windows and Mac firewall rule or disable and test application.
Solution 2:
You need make sure xcode installed in Application Folder. If it’s not ,you need to change in visual studio Apple SDK path
 Enable GingerCannot connect to Ginger Check your internet connection
or reload the browserDisable in this text fieldEditEdit in GingerEdit in Ginger


