Microsoft Cognitive services is set of cloud based intelligence APIs for building richer and smarter application development. Cognitive API will use for Search meta data from Photos and video and emotions, sentiment analysis and authenticating speakers via voice verification.
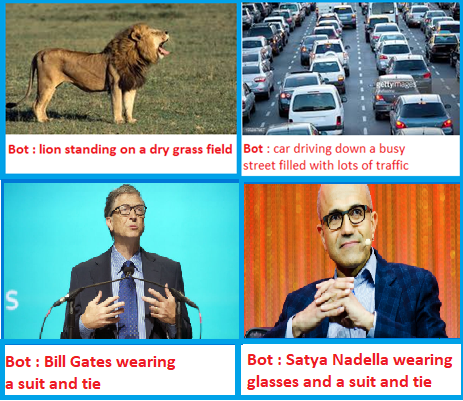
The Computer Vision API will help developers to identify the objects with access to advanced algorithms for processing images and returning image meta data information. In this article, you will learn about Computer Vision API and how to implement Compute Vision API into Bot application.
You can follow below steps for implement object detection in Bot Application
Computer Vision API Key Creation
Computer Vision ApI returns information about visual content found in an image. You can follow below steps for create Vision API key.
Navigate to
https://azure.microsoft.com/en-us/try/cognitive-services/ 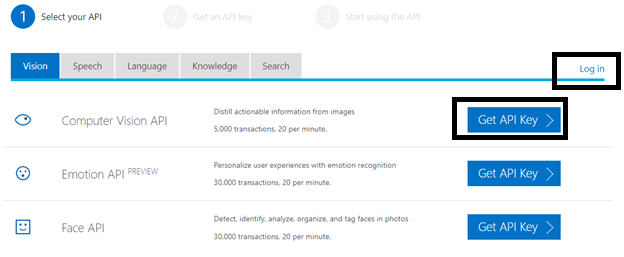
Click on
“Get API Key “or Login with Azure login.
Login with Microsoft Account and Get API key

Copy API key and store securely, we will use this API key into our application
Step 2: Create New Bot Application
Let's create a new bot application using Visual Studio 2017. Open Visual Studio > Select File > Create New Project (Ctrl + Shift +N) > Select Bot application.
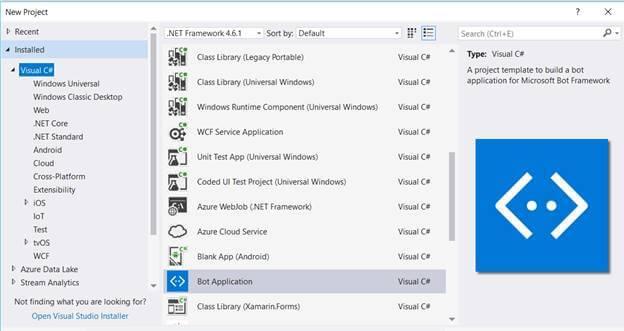
The Bot application template gets created with all the components and all required NuGet references installed in the solutions.

In this solution, we are going edit Messagecontroller and add Service class.
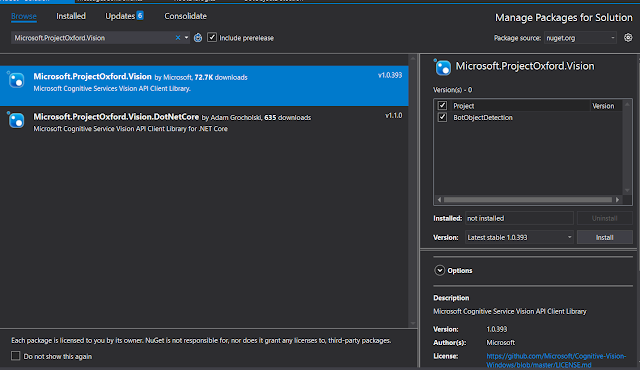
Install Microsoft.ProjectOxford.Vision Nuget Package
The Microsoft project oxford vision nuget package will help for access cognitive service so Install “
Microsoft.ProjectOxford.Vision” Library from the solution
Create Vision Service: Create new helper class to the project called VisionService that wraps around the functionality from the VisionServiceClient from Cognitive Services and only returns what we currently need.
using System;
using System.Collections.Generic;
using System.IO;
using System.Linq;
using System.Threading.Tasks;
using System.Web;
using Microsoft.ProjectOxford.Vision;
using Microsoft.ProjectOxford.Vision.Contract;
namespace BotObjectDetection.Service
{
public class VisionService : ICaptionService
{
/// <summary>
/// Microsoft Computer Vision API key.
/// </summary>
private static readonly string ApiKey = "<API Key>";
/// <summary>
/// The set of visual features we want from the Vision API.
/// </summary>
private static readonly VisualFeature[] VisualFeatures = { VisualFeature.Description };
public async Task<string> GetCaptionAsync(string url)
{
var client = new VisionServiceClient(ApiKey);
var result = await client.AnalyzeImageAsync(url, VisualFeatures);
return ProcessAnalysisResult(result);
}
public async Task<string> GetCaptionAsync(Stream stream)
{
var client = new VisionServiceClient(ApiKey);
var result = await client.AnalyzeImageAsync(stream, VisualFeatures);
return ProcessAnalysisResult(result);
}
/// <summary>
/// Processes the analysis result.
/// </summary>
/// <param name="result">The result.</param>
/// <returns>The caption if found, error message otherwise.</returns>
private static string ProcessAnalysisResult(AnalysisResult result)
{
string message = result?.Description?.Captions.FirstOrDefault()?.Text;
return string.IsNullOrEmpty(message) ?
"Couldn't find a caption for this one" :
"I think it's " + message;
}
}
} In the above helper class, replace vision API key and call the Analyze image client method for identify image meta data
Messages Controller
MessagesController is created by default and it is the main entry point of the application. it will call our helper service class which will handle the interaction with the Microsoft APIs. You can update “Post” method like below
using System;
using System.Diagnostics;
using System.IO;
using System.Linq;
using System.Net;
using System.Net.Http;
using System.Net.Http.Headers;
using System.Text.RegularExpressions;
using System.Threading.Tasks;
using System.Web.Http;
using BotObjectDetection.Service;
using Microsoft.Bot.Builder.Dialogs;
using Microsoft.Bot.Connector;
namespace BotObjectDetection
{
[BotAuthentication]
public class MessagesController : ApiController
{
private readonly ICaptionService captionService = new VisionService();
/// <summary>
/// POST: api/Messages
/// Receive a message from a user and reply to it
/// </summary>
public async Task<HttpResponseMessage> Post([FromBody]Activity activity)
{
if (activity.Type == ActivityTypes.Message)
{
//await Conversation.SendAsync(activity, () => new Dialogs.RootDialog());
var connector = new ConnectorClient(new Uri(activity.ServiceUrl));
string message;
try
{
message = await this.GetCaptionAsync(activity, connector);
}
catch (Exception)
{
message = "I am object Detection Bot , You can Upload or share Image Url ";
}
Activity reply = activity.CreateReply(message);
await connector.Conversations.ReplyToActivityAsync(reply);
}
else
{
HandleSystemMessage(activity);
}
var response = Request.CreateResponse(HttpStatusCode.OK);
return response;
}
private Activity HandleSystemMessage(Activity message)
{
if (message.Type == ActivityTypes.DeleteUserData)
{
// Implement user deletion here
// If we handle user deletion, return a real message
}
else if (message.Type == ActivityTypes.ConversationUpdate)
{
// Handle conversation state changes, like members being added and removed
// Use Activity.MembersAdded and Activity.MembersRemoved and Activity.Action for info
// Not available in all channels
}
else if (message.Type == ActivityTypes.ContactRelationUpdate)
{
// Handle add/remove from contact lists
// Activity.From + Activity.Action represent what happened
}
else if (message.Type == ActivityTypes.Typing)
{
// Handle knowing tha the user is typing
}
else if (message.Type == ActivityTypes.Ping)
{
}
return null;
}
private async Task<string> GetCaptionAsync(Activity activity, ConnectorClient connector)
{
var imageAttachment = activity.Attachments?.FirstOrDefault(a => a.ContentType.Contains("image"));
if (imageAttachment != null)
{
using (var stream = await GetImageStream(connector, imageAttachment))
{
return await this.captionService.GetCaptionAsync(stream);
}
}
string url;
if (TryParseAnchorTag(activity.Text, out url))
{
return await this.captionService.GetCaptionAsync(url);
}
if (Uri.IsWellFormedUriString(activity.Text, UriKind.Absolute))
{
return await this.captionService.GetCaptionAsync(activity.Text);
}
// If we reach here then the activity is neither an image attachment nor an image URL.
throw new ArgumentException("The activity doesn't contain a valid image attachment or an image URL.");
}
private static async Task<Stream> GetImageStream(ConnectorClient connector, Attachment imageAttachment)
{
using (var httpClient = new HttpClient())
{
var uri = new Uri(imageAttachment.ContentUrl);
return await httpClient.GetStreamAsync(uri);
}
}
private static bool TryParseAnchorTag(string text, out string url)
{
var regex = new Regex("^<a href=\"(?<href>[^\"]*)\">[^<]*</a>$", RegexOptions.IgnoreCase);
url = regex.Matches(text).OfType<Match>().Select(m => m.Groups["href"].Value).FirstOrDefault();
return url != null;
}
}
}
Run Bot Application
The emulator is a desktop application that lets us test and debug our bot on localhost. Now, you can click on "Run the application" in Visual studio and execute in the browser

Test Application on Bot Emulator
You can follow the below steps to test your bot application.
Open Bot Emulator.
Copy the above localhost url and paste it in emulator e.g. -
http://localHost:3979 You can append the /api/messages in the above url; e.g. -
http://localHost:3979/api/messages. You won't need to specify Microsoft App ID and Microsoft App Password for localhost testing, so click on "
Connect".
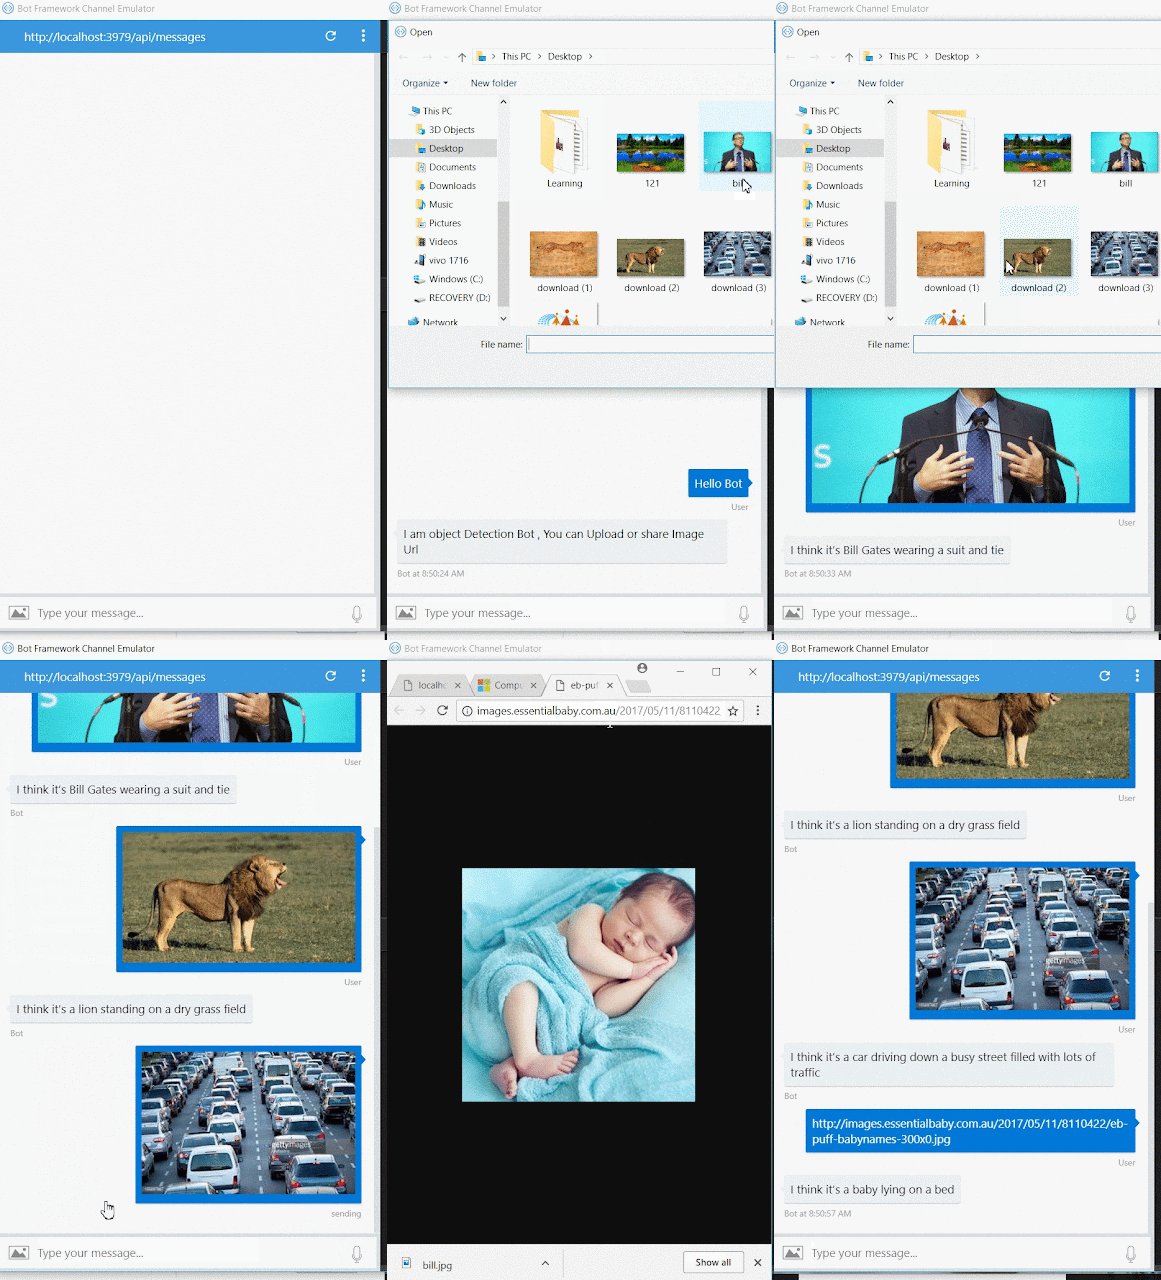
Related Article: I have explained about Bot framework Installation, deployment and implementation in the below article
Summary
In this article, you learned how to create an Intelligent Image Object Detection Bot using Microsoft Cognitive Computer Vision API. If you have any questions/feedback/ issues, please write in the comment box.
Enable GingerCannot connect to Ginger Check your internet connection
or reload the browserDisable in this text fieldEditEdit in GingerEdit in Ginger
The Bot Application runs in an application, like Skype, web chat, Facebook, Message, etc. Users can interact with bots by sending them messages, commands, and inline requests. You control your bots using HTTPS requests to the bot API.
The better visibility, the higher will be the chance of customers making a purchase. Unlike other bots which are available on business web pages which provide visibility only to the customers visiting their site, a Facebook bot is very easy to find. It is visible to around 1.3 billion users of Facebook. A Facebook bot interacts very well with customers. It can receive and send messages, images and provide clickable buttons like Buy Now. In this article, I am going to show how we can connect Facebook Messenger's channel and integrate Bot Application to the Messenger app.
In this Article, I am going to show how we can connect Facebook messengers’ channel and integrate Bot Application to the messengers App.

Create FAQ Bot Application
You can refer
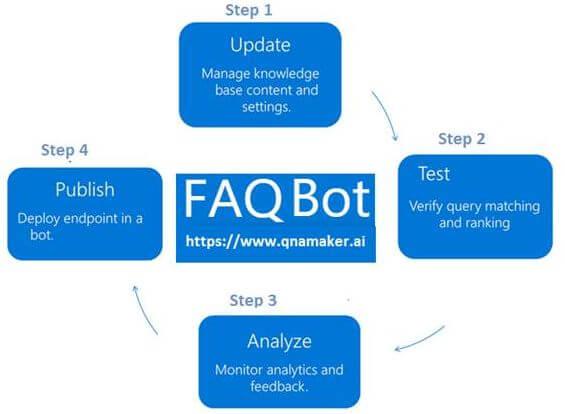
my previews article to create and build a Xamarin FAQ Bot using the Azure Bot Service and deploy it into Azure. I am not using any coding for developing the Bot Application, you can follow the steps provided in the article to create and deploy FAQ Bot.
Setup Facebook Page
We can implement Bot Application to the Facebook page. You can
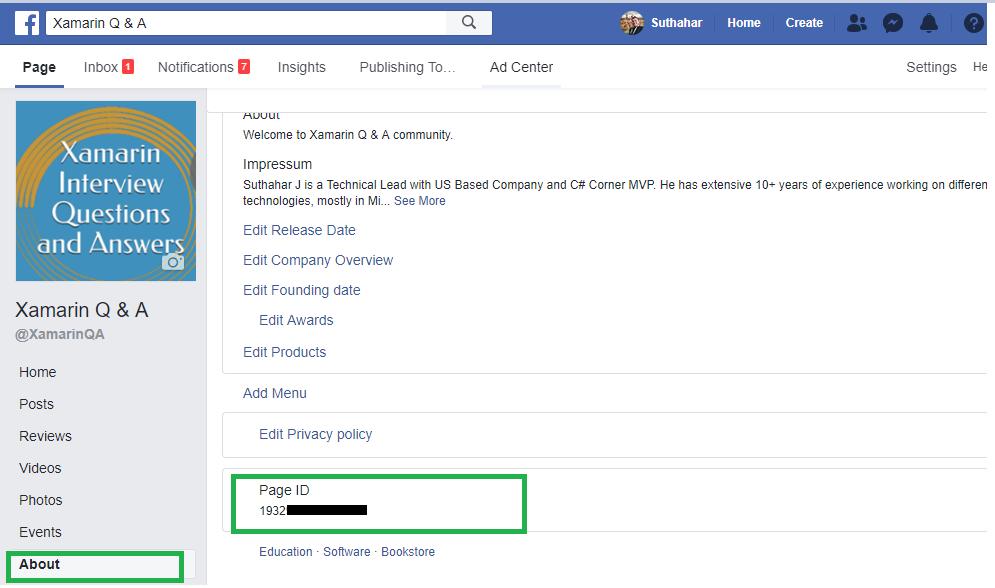
create Facebook page or select existing page and navigate to “About page” for fining and copy the Page ID.
Login to Facebook APP
Create a new Facebook App (
https://bit.ly/1D0BHpg) on the Page and generate an App ID
, App Secret and Page Access Token for integrating Bot to the page messenger. You can click on “Skip and Create APP Id” from following screen.

Create New App ID
Provide display Name and Contact Email for integrating Bot application and Click on Create.

After Create button, it will navigate to the App dashboard screen. The side navigation menu having Settings > Basic and copy the APPID and APP Secret. Provide the Privacy URL, Terms of Service URL, App icon and Select Category.
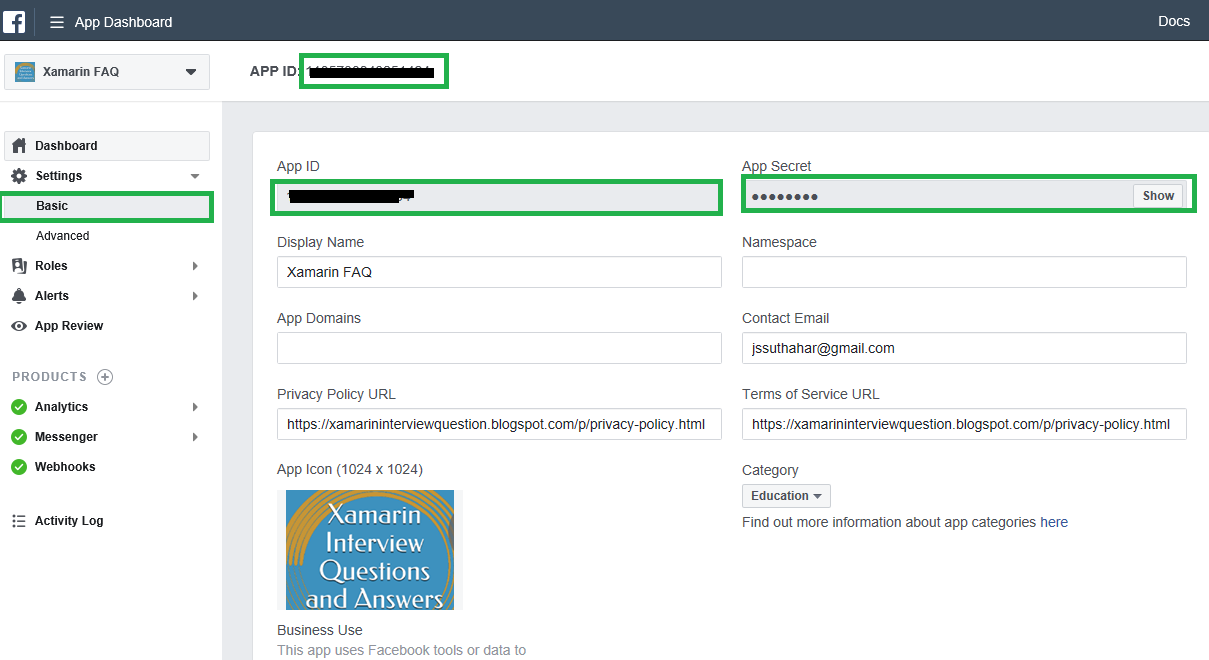
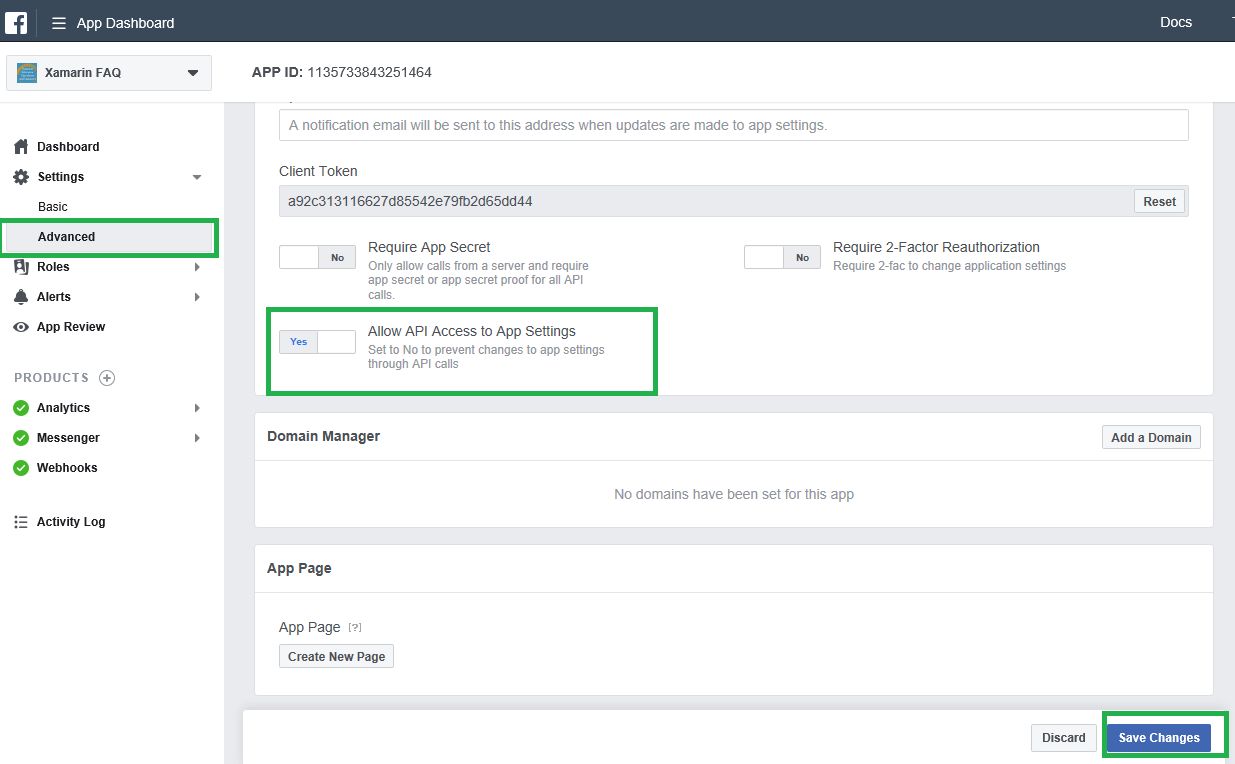
I have shown the following screen to Select Setting > Advanced and Set the "Allow API Access to App Settings slider to "Yes" and click on Save Changes.
Setup Message
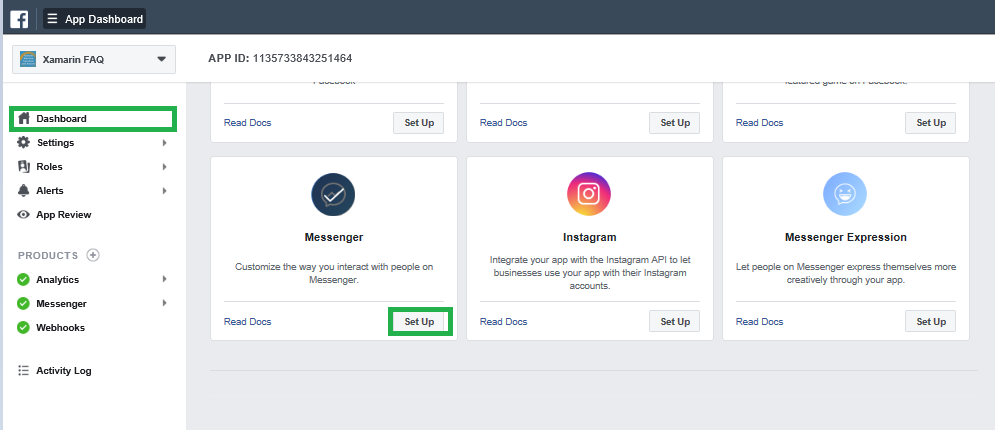
Select Dashboard and Click on Setup button from messenger group
Create Page Access Token
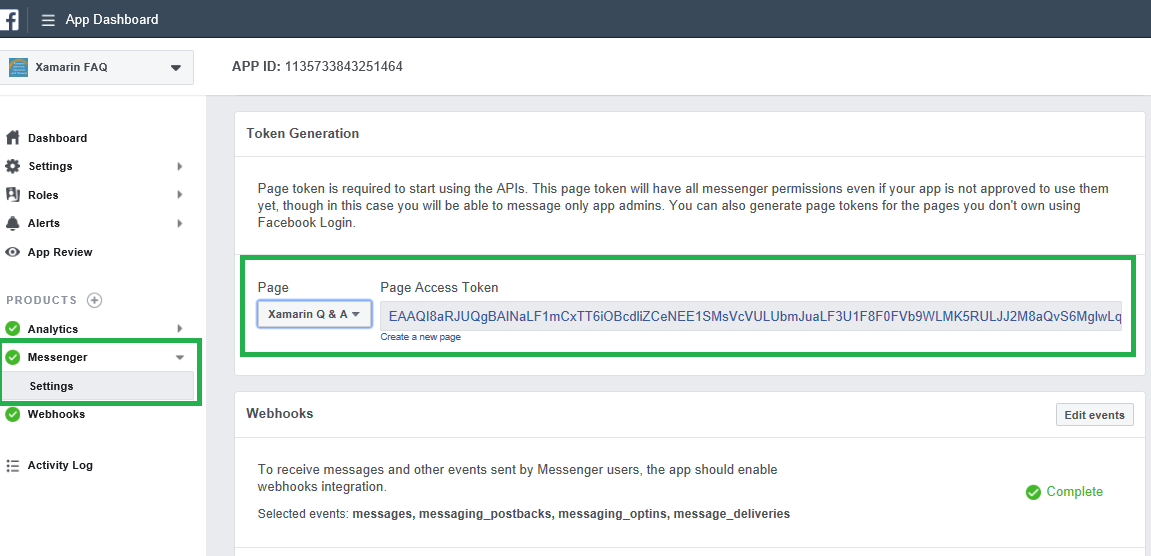
Select Setting from the messenger side navigation menu to generate token, you can select the Page and generate access token and copy the page access token.
Setup Webhooks
Click Set up Webhooks to forward messaging events from Facebook Messenger to the bot.

Provide following callback URL and Verify
token to the
webhooks setup page and select the message, message_postbacks, messaging_optins and message_deliveries subscription fields. The following Steps 2, will show how to generate Callback URL and verify
token from Azure portal.
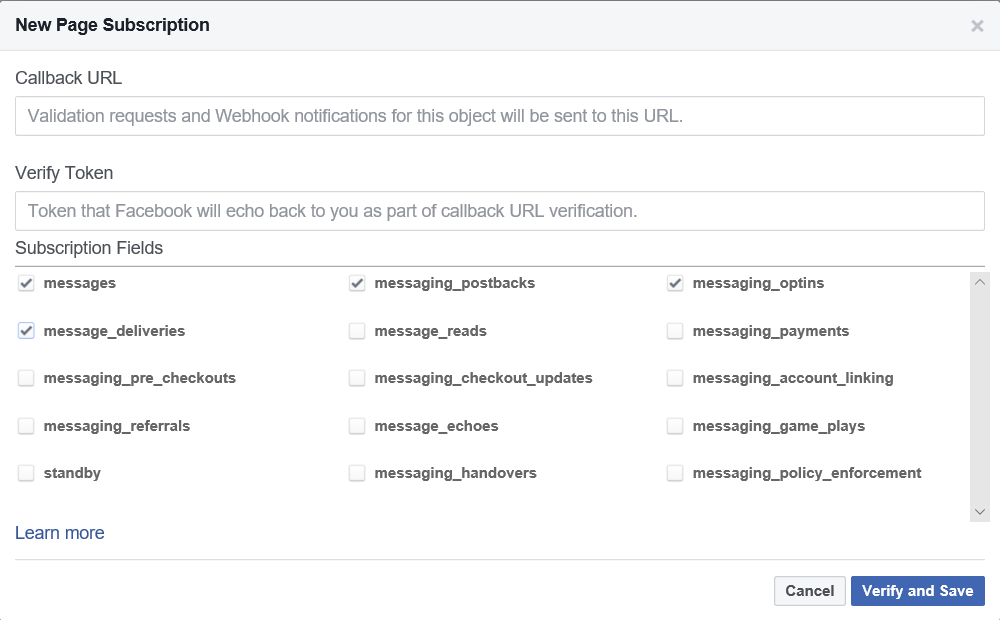
You can click on “Verify and Save “and select the Facebook page to Subscribe the
webhook to the Facebook page.

Connect Facebook Channel
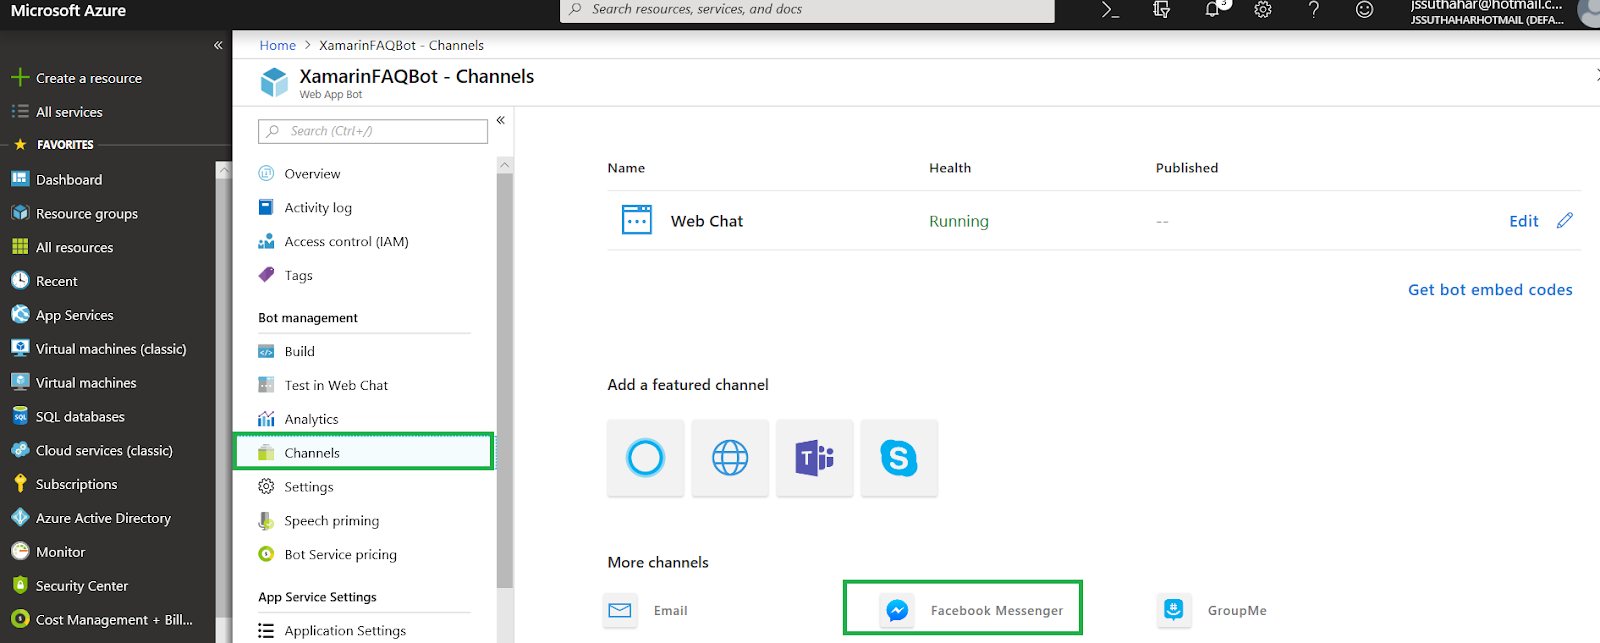
Step 1: Login to Azure portal > Select the “All Resources” > Select Channels > Select Facebook Messengers, let
we start configure “Facebook Messengers “Channel and follow below steps, the end of this article you can able to deploy Bot into the Facebook messenger
Step 2:The
Azure Facebook configuration channel will generate following Callback URL and verify token, You can copy those information and Past to the Facebook
webhook setup screen.
(Return to the Facebook messenger setup screen).
 Step 3
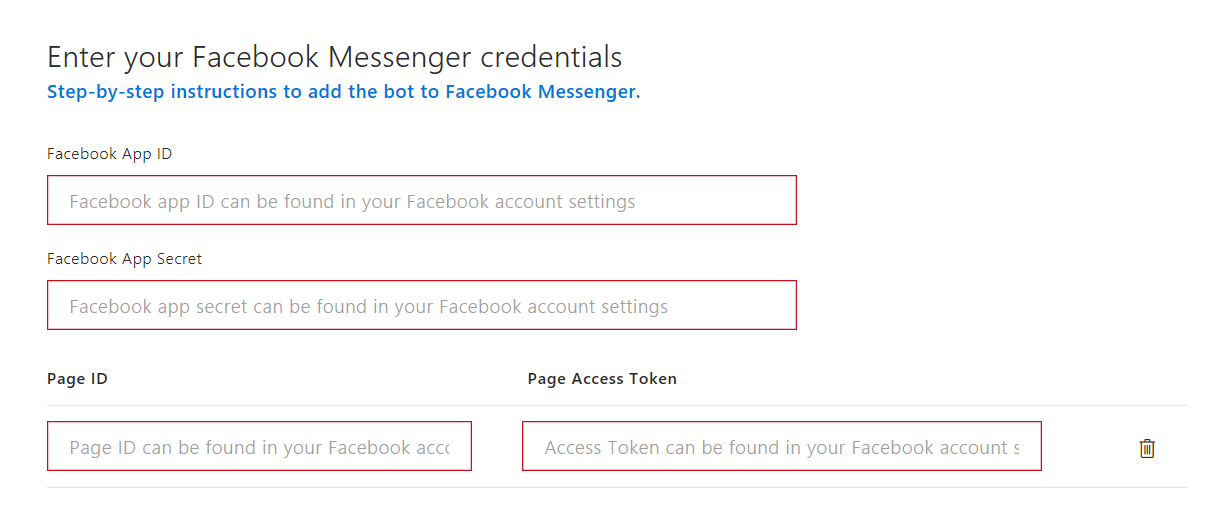
: You can paste the Facebook App ID, Facebook App Secret, Page ID
,and Page Access Token values copied from Facebook Messenger previously. You can use the same bot on multiple
facebook pages by adding additional page ids and access tokens.
Submit to Facebook Review
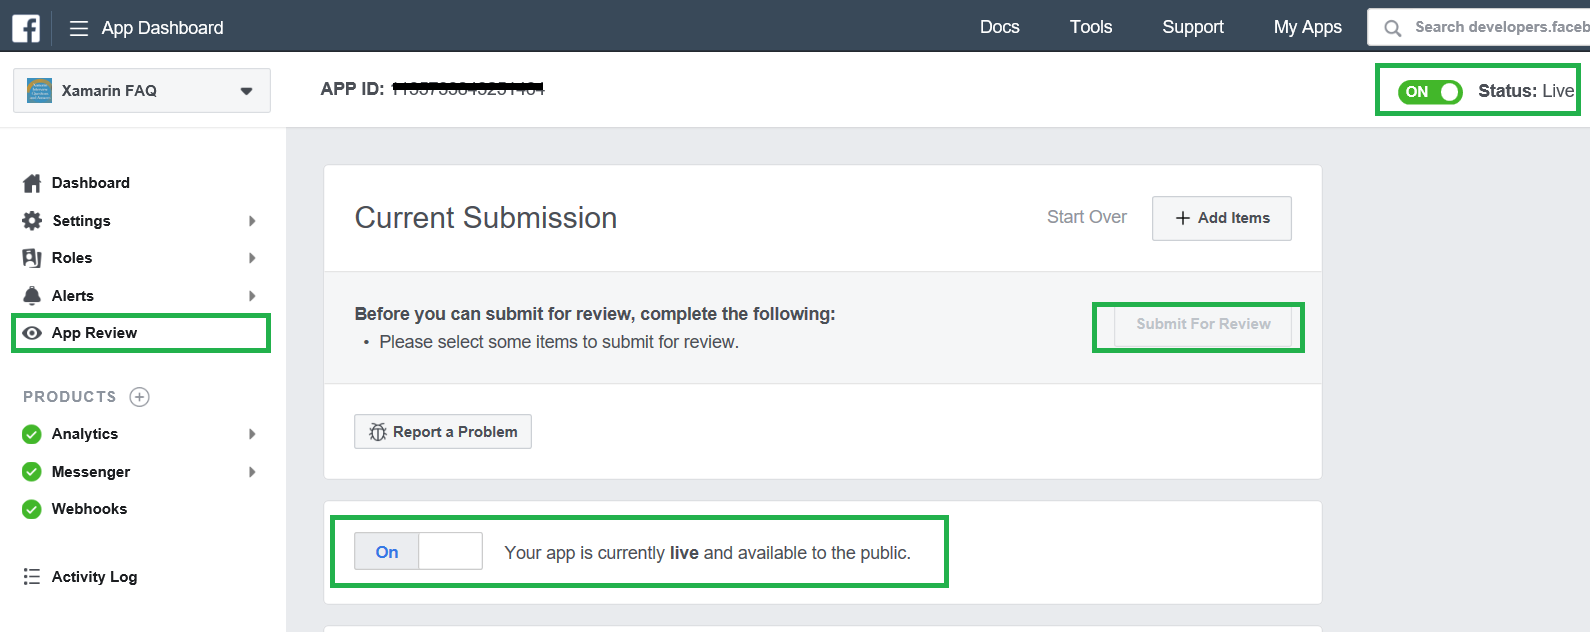
Select App preview and Click and Submit for review after submit will take some time for the
facebook team testing to the messenger bot and you can mark your app live available to the public
, then you can test messenger from the Facebook page
.
Facebook Team reviews and Testing
You can verify Facebook team testing progress, navigate to your Facebook page and Click on Inbox and verify, if anything problem
to the messenger bot, the Team will update the bug list from App review screen.

Xamarin FAQ Messengers testing
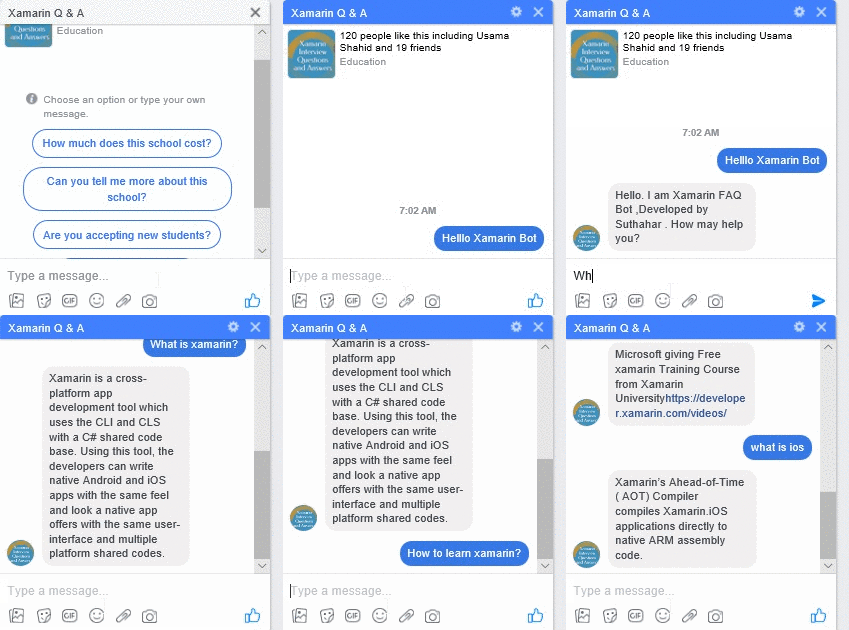
You can select your Facebook page and test your bot application. I have trained 7000+ more questions to the Facebook messenger bot from Xamarin Q & A Page, If you want to look the
xamarin FAQ demo. Navigate to Xamarin Q & A Facebook page and ask your
xamairn related question.

Summary
In this article, you have learned how to integrate bot application right into your Facebook Page via Azure Microsoft AI. If you have any questions/feedback/issues, please write in the comment box.
The Bot Application runs inside an application in different channel like Cortana, Skype, web chat, Facebook, Message, etc. Users can interact with bots by sending them messages, commands, and inline requests. Microsoft has announced Line App new channel added into the Azure portal.
LINE is a new communication app which allows you to make FREE voice calls and send FREE messages whenever and wherever you are. Line is available in different device iPhone, Android, Windows Phone, BlackBerry, and Nokia and even your PC and LINE is a popular messaging app with hundreds of millions of users in India, Japan, Taiwan, Thailand, Indonesia, and other countries. You can follow the below steps for Create FAQ Bot and enable your bot in the Line new channel.
Create FAQ Bot Application
You can refer to
my previews article to create and build a Xamarin FAQ Bot using Azure Bot Service and deploy it into Azure. I am not using any coding for developing the Bot Application, you can follow the provided steps in the article to create and deploy FAQ Bot.
Line Developer Portal
We can implement a Bot Application to the Line apps. You can create a Line developer account or select an existing provider name. Create a new
Line Developer App on the Page and generate an Channel Secret and Channel access token for integrating the Bot to the Line ap. You can start login or create account in the following screen.
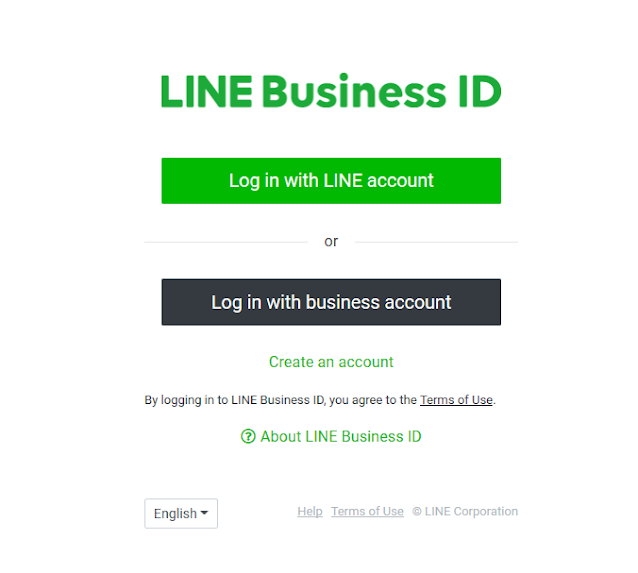
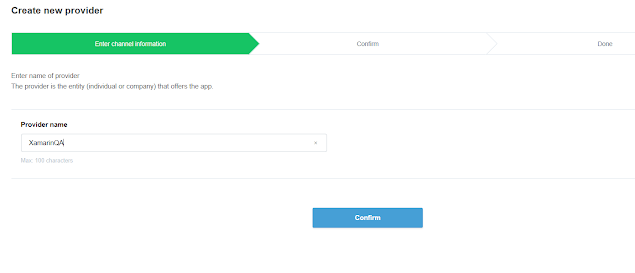
Create Provider
After login, start creating a provider name for your bot or if you already have the provider, select the provider name and do the setup. The provider name is individual owner or company, it’s not app name. Next Click on confirm, if you want change in the future, edit options always enable.
Line Messaging API channel
Create a new Line App on the developer portal and generate a Channel Secret and Channel access token integrating the Bot to the page messenger. You can click on “Message API Create Channel” from the following screen.
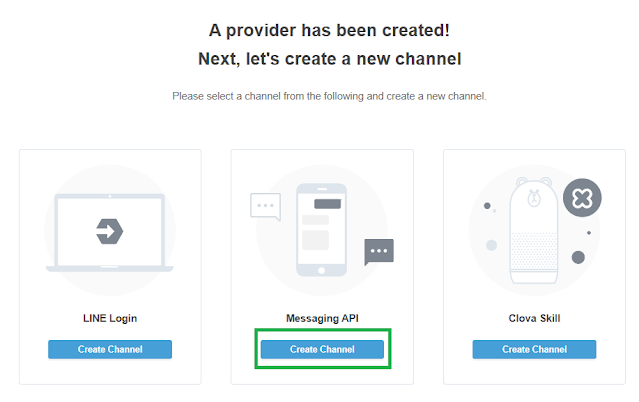
Create New Channel
The following creates new channel screen provide valid your app icon.
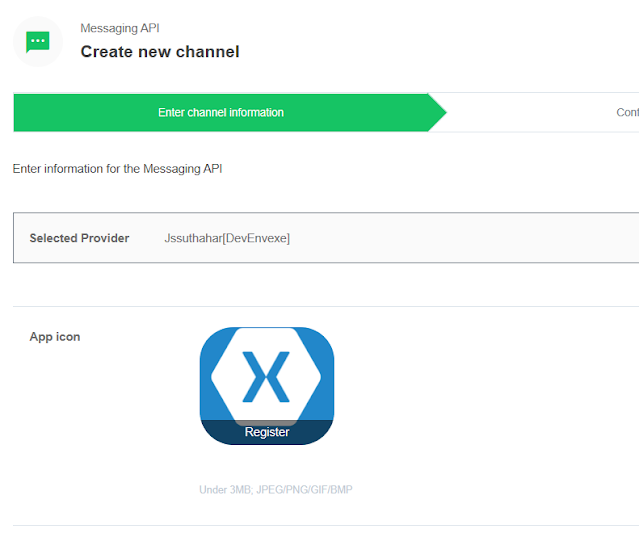
You can Fill out the required fields and confirm your channel settings. You can find the two developer options is available.
Developer trial - A trial plan which lets you create a bot that can send push messages and have up to 50 friends.
Free - A plan which lets you create a bot with an unlimited number of friends.The Push message cannot be sent with this plan.
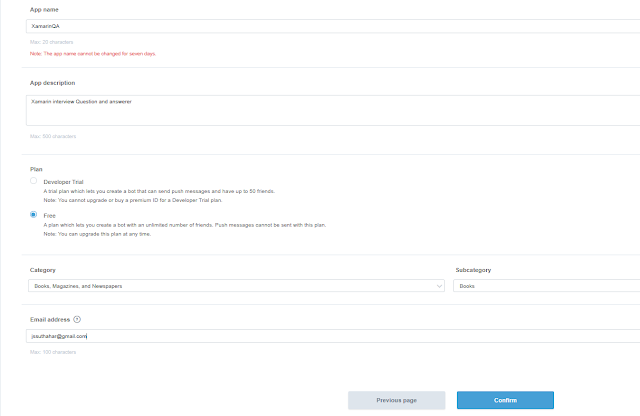
Once you've confirmed your channel settings, you'll be navigating to a following screen, which list all the apps.

Click on the channel you created to access your channel settings, and scroll down to find the Basic information > Channel secret.
You can Save following somewhere for a moment for update in to Azure portal.
Channel Secret – Copy the secret code, if not available, click on Issue
Channel access Token - Scroll further to Messaging settings. There, you will see a Channel access token field, with a click on issue button forget your access token.
Webhook URL - Webhook URL copy from Azure Portal and Update in the Line app developer portal
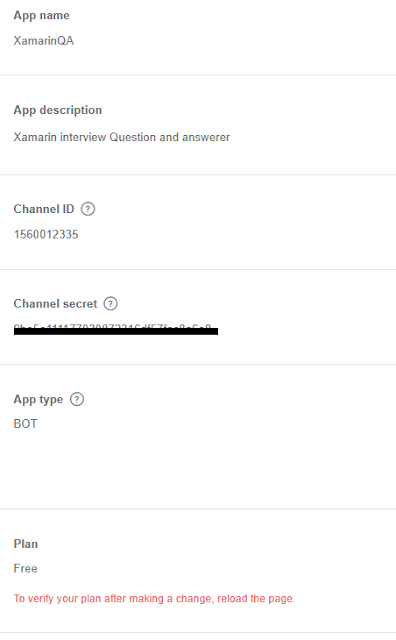
Connect New LINE Channel
Login to
Azure portal > Select the “
All Resources” > Select your Bot Application > Select Channels property > Find and Select New Line icon. Let us start to configure the “Line “Channel and follow the below steps, at the end of this article you will be able to deploy the Bot into the Line apps.
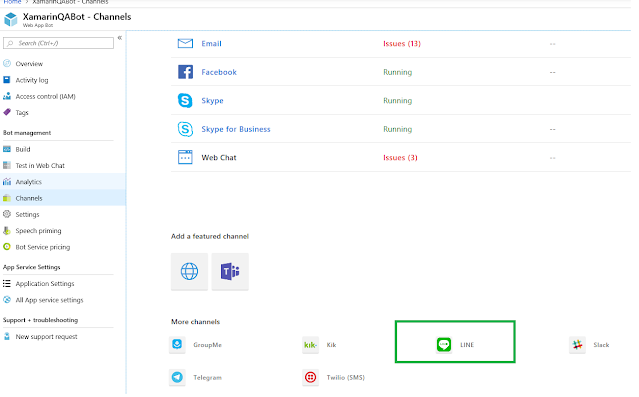
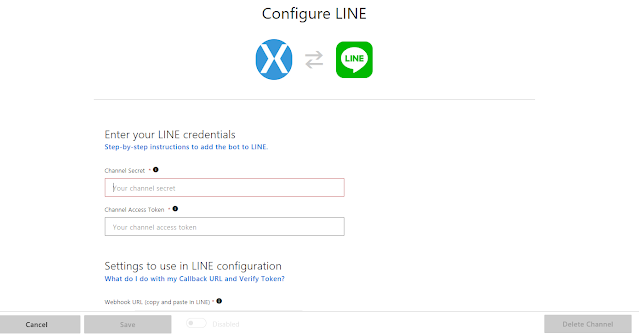
The Azure Line configuration channel will generate the following Webhook URL and past/update the channel secret and access token and click Save button. You can copy following custom webhook URL and Return to the Line Developer portal and update the webhook URL
Test Your Bot
Once you have completed all the above steps, your bot will be successfully configured to communicate with users on LINE and is ready to test.
LINE developer console - Navigate to the settings page and you will see, a QR code of your bot.
Mobile LINE app - go to the right most navigation tab with three dots [...] and tap on the QR code icon.
Live Demo
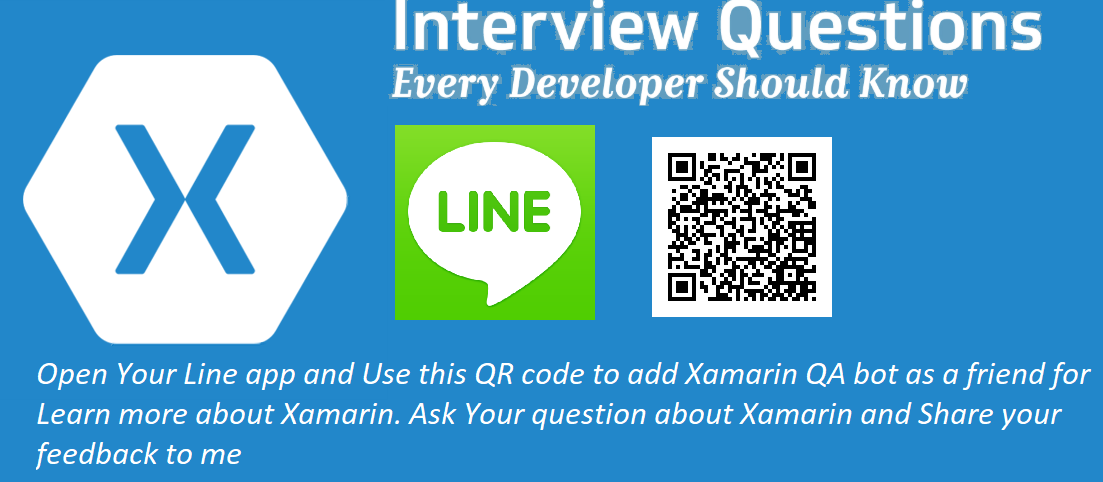
Xamarin Developer Interview questions and answers Bot is ready to use in Line app. Xamarin FAQ Bot will be ready with 7000+ more Xamarin QnA’s. Now you can start open your Line App and > click on three dot line > Scan the following QR Code to add Xamarin QA bot as a friend.
Summary
In this article, you have learned how to integrate a bot application into Line App via Azure Microsoft AI. In case your bot is not responding to any of your messages at all, navigate to your bot in Azure portal, and choose Test in Web Chat. If you have any questions/ feedback/ issues, please write in the comment box.
or reload the browserDisable in this text fieldEditEdit in GingerEdit in GingerEnable GingerCannot connect to Ginger Check your internet connection
or reload the browserDisable in this text fieldEditEdit in GingerEdit in GingerEnable GingerCannot connect to Ginger Check your internet connection
or reload the browserDisable in this text fieldEditEdit in GingerEdit in GingerEnable GingerCannot connect to Ginger Check your internet connection
or reload the browserDisable in this text fieldEditEdit in GingerEdit in GingerEnable GingerCannot connect to Ginger Check your internet connection
or reload the browserDisable in this text fieldEditEdit in GingerEdit in GingerEnable GingerCannot connect to Ginger Check your internet connection
or reload the browserDisable in this text fieldEditEdit in GingerEdit in Ginger


