Input Validation in Xamarin Forms Behaviors

Introduction:
Xamarin.Forms behaviors are created by deriving from the Behavior or Behavior<T> class, where T is the type of the control (Entry, DateTime, etc) to which the behavior should apply.
In this article I will demonstrates how to create and consume Xamarin.Forms behaviors and Input Validation using xamarin Forms Behaviors.
Why We Need Behaviors?
Normally we will write validation code into the code-behind because it directly interacts with the API of the control so that we can create Behaviors and reuse into the different control. We can be used to provide a full range of functionality to controls, like below
- Number Validation
- Date Validation
- Email Validation
- Password Validation
- Compare Validation
- Building and Running the Application
The Creating xamarin.Forms Behaviors application is as follow below steps
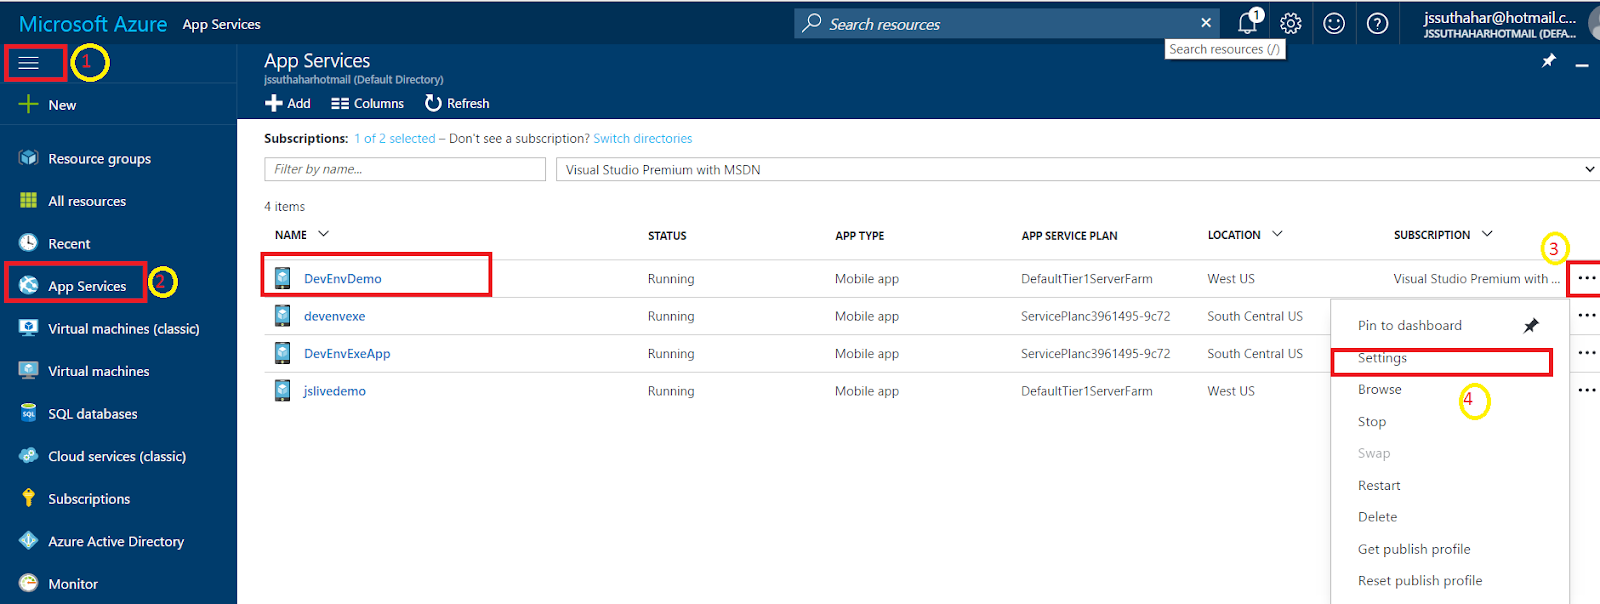
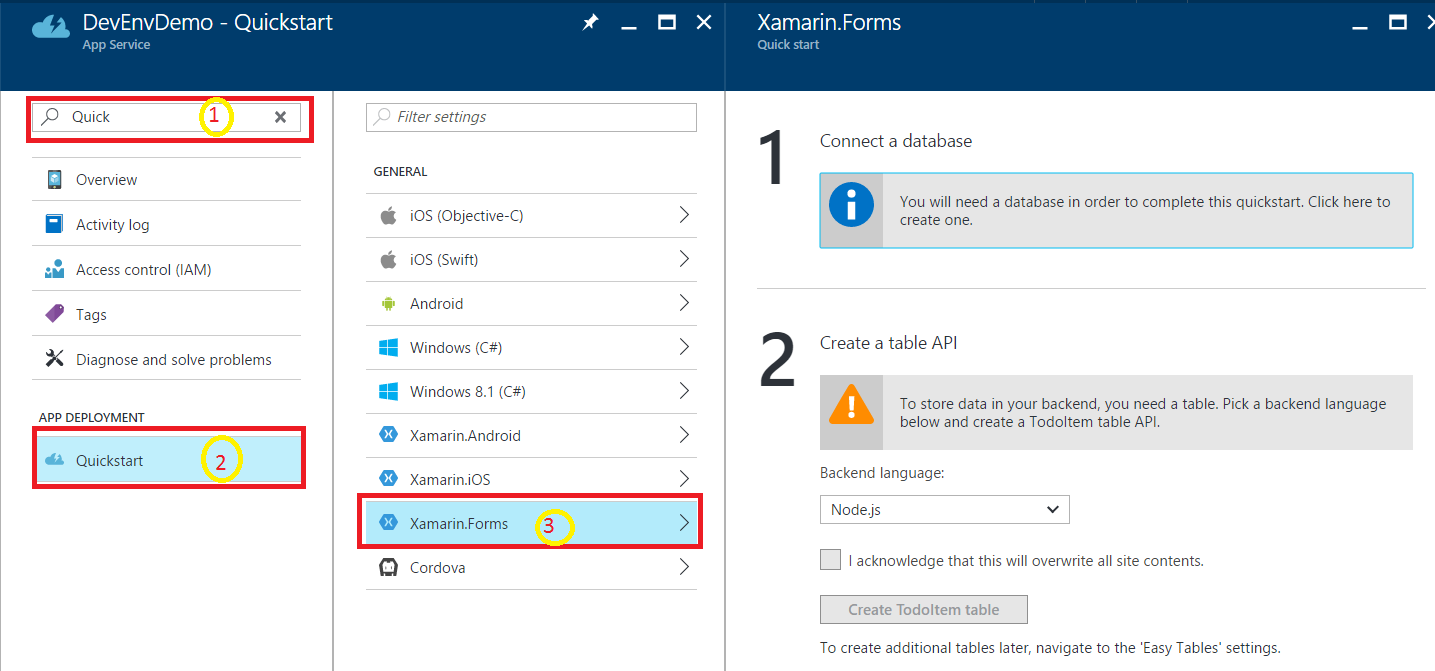
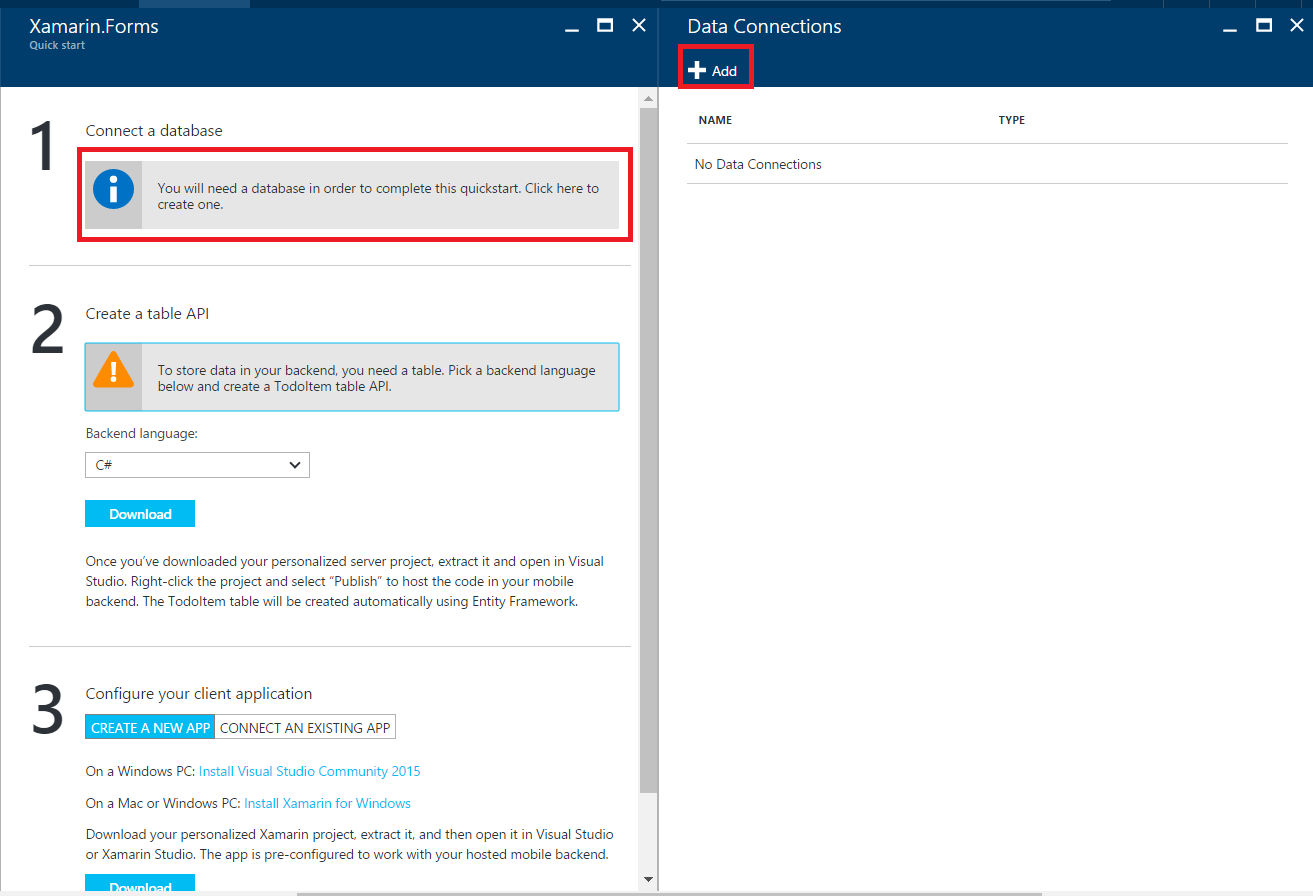
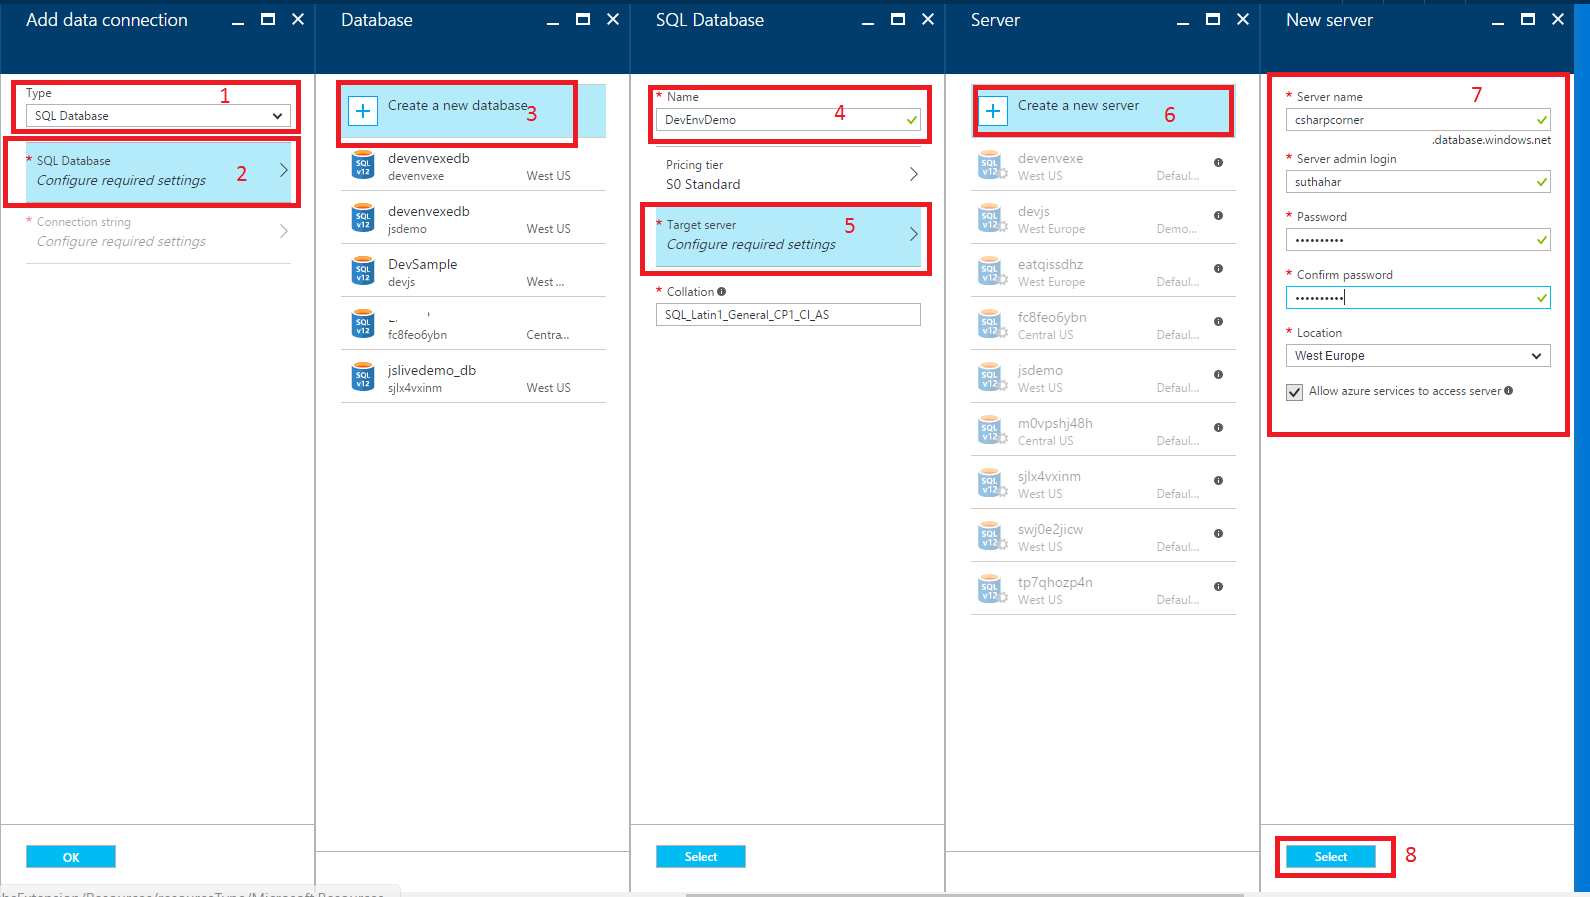
Step 1 - Create new Xamarin Form Application
Let's start with creating a new Xamarin Forms Project in Visual Studio.
Open Run - Type Devenev.Exe and enter - New Project (Ctrl+Shift+N) - select Blank Xaml App (Xamarin.Forms Portable) template

You can find my previous article for more about create new xamarin.Form application from
Here.
Step 2 – Create new class and inherits from the Behavior:
Create a new class and inherits from the Behavior or Behavior<T> class .We can add behavior to any control so you can specify your control name instead of T.

Step 2 –Override Behavior class method:
We need to override OnAttachedTo and OnDetachingFrom method from our validation class

The OnAttachedTo method is fired immediately after the behavior is attached to a control. This can be used to register event handlers or perform other setup that's required to support the behavior functionality.
The OnDetachingFrom method is fired when the behavior is removed from the control. This method receives a reference to the control to which it is attached, and is used to perform any required cleanup.
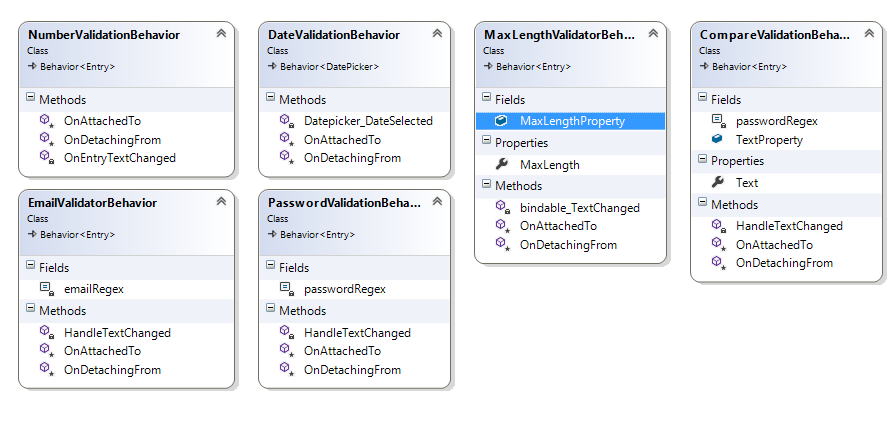
Step 3 –Validation Behavior Class:
3.1 – PasswordValidationBehavior:
The below code is password validation behaviors. Password rule should contain at least 8 character, 1 numeric, 1 lowercase, 1 uppercase, 1 special character [eg: No1C#cornar]
The password validation behavior added into Entry control. We can re-use this behavior to Entry control.
using System.Text.RegularExpressions;
using Xamarin.Forms;
namespace DevenvExeBehaviors
{
public class PasswordValidationBehavior : Behavior<Entry>
{
const string passwordRegex = @"^(?=.*[A-Za-z])(?=.*\d)(?=.*[$@$!%*#?&])[A-Za-z\d$@$!%*#?&]{8,}$";
protected override void OnAttachedTo(Entry bindable)
{
bindable.TextChanged += HandleTextChanged;
base.OnAttachedTo(bindable);
}
void HandleTextChanged(object sender, TextChangedEventArgs e)
{
bool IsValid = false;
IsValid = (Regex.IsMatch(e.NewTextValue, passwordRegex));
((Entry)sender).TextColor = IsValid ? Color.Default : Color.Red;
}
protected override void OnDetachingFrom(Entry bindable)
{
bindable.TextChanged -= HandleTextChanged;
base.OnDetachingFrom(bindable);
}
}
}
3.2 - Date Validation Behaviors:
The below code is Date of birth validation behaviors. I used a date picker and restricted the max date to be 100 years from the current day and min date to be 1.
The DOB validation behavior added into DatePicker control. We can re-use this behavior to Date Picker control.
using System;
using Xamarin.Forms;
namespace DevenvExeBehaviors
{
class DateValidationBehavior : Behavior<DatePicker>
{
protected override void OnAttachedTo(DatePicker datepicker)
{
datepicker.DateSelected += Datepicker_DateSelected;
base.OnAttachedTo(datepicker);
}
private void Datepicker_DateSelected(object sender, DateChangedEventArgs e)
{
DateTime value = e.NewDate;
int year = DateTime.Now.Year;
int selyear = value.Year;
int result = selyear - year;
bool isValid=false;
if(result <=100 && result >0)
{
isValid = true;
}
((DatePicker)sender).BackgroundColor = isValid ? Color.Default : Color.Red;
}
protected override void OnDetachingFrom(DatePicker datepicker)
{
datepicker.DateSelected -= Datepicker_DateSelected;
base.OnDetachingFrom(datepicker);
}
}
}
3.3 - EmailValidation Behaviors
The below code is Email validation behaviors. Email validation behavior added into Entry control. We can re-use this behavior to Entry control.
using System;
using System.Text.RegularExpressions;
using Xamarin.Forms;
namespace DevenvExeBehaviors
{
public class EmailValidatorBehavior : Behavior<Entry>
{
const string emailRegex = @"^(?("")("".+?(?<!\\)""@)|(([0-9a-z]((\.(?!\.))|[-!#\$%&'\*\+/=\?\^`\{\}\|~\w])*)(?<=[0-9a-z])@))" +
@"(?(\[)(\[(\d{1,3}\.){3}\d{1,3}\])|(([0-9a-z][-\w]*[0-9a-z]*\.)+[a-z0-9][\-a-z0-9]{0,22}[a-z0-9]))$";
protected override void OnAttachedTo(Entry bindable)
{
bindable.TextChanged += HandleTextChanged;
base.OnAttachedTo(bindable);
}
void HandleTextChanged(object sender, TextChangedEventArgs e)
{
bool IsValid = false;
IsValid = (Regex.IsMatch(e.NewTextValue, emailRegex, RegexOptions.IgnoreCase, TimeSpan.FromMilliseconds(250)));
((Entry)sender).TextColor = IsValid ? Color.Default : Color.Red;
}
protected override void OnDetachingFrom(Entry bindable)
{
bindable.TextChanged -= HandleTextChanged;
base.OnDetachingFrom(bindable);
}
}
}
3.4 - Number Validation
The below code is Number validation behaviors. The Entry box will allow only numeric value.
using Xamarin.Forms;
namespace DevenvExeBehaviors
{
public class NumberValidationBehavior : Behavior<Entry>
{
protected override void OnAttachedTo(Entry entry)
{
entry.TextChanged += OnEntryTextChanged;
base.OnAttachedTo(entry);
}
protected override void OnDetachingFrom(Entry entry)
{
entry.TextChanged -= OnEntryTextChanged;
base.OnDetachingFrom(entry);
}
void OnEntryTextChanged(object sender, TextChangedEventArgs args)
{
int result;
bool isValid = int.TryParse(args.NewTextValue, out result);
((Entry)sender).TextColor = isValid ? Color.Default : Color.Red;
}
}
}
Step 4 –Behaviors with Parameter:
You can create multiple property in behaviors class and assign value in xaml controls.
Step 4.1- Max length Behaviors
You can restrict the number of characters in the Entry field as given below,
using Xamarin.Forms;
namespace DevenvExeBehaviors
{
public class MaxLengthValidatorBehavior : Behavior<Entry>
{
public static readonly BindableProperty MaxLengthProperty = BindableProperty.Create("MaxLength", typeof(int), typeof(MaxLengthValidatorBehavior), 0);
public int MaxLength
{
get { return (int)GetValue(MaxLengthProperty); }
set { SetValue(MaxLengthProperty, value); }
}
protected override void OnAttachedTo(Entry bindable)
{
bindable.TextChanged += bindable_TextChanged;
}
private void bindable_TextChanged(object sender, TextChangedEventArgs e)
{
if (e.NewTextValue.Length >= MaxLength)
((Entry)sender).Text = e.NewTextValue.Substring(0, MaxLength); }
protected override void OnDetachingFrom(Entry bindable)
{
bindable.TextChanged -= bindable_TextChanged;
}
}
}
Step 4.2 - Compare Validation:
The CompareValidator control allows you to compare the value entered by the user into an input control, such as a
Entry control, with the value entered into another Entry control.
using System;
using System.Collections.Generic;
using System.Linq;
using System.Text;
using System.Text.RegularExpressions;
using System.Threading.Tasks;
using Xamarin.Forms;
namespace DevenvExeBehaviors
{
public class CompareValidationBehavior : Behavior<Entry>
{
public static BindableProperty TextProperty = BindableProperty.Create<CompareValidationBehavior, string>(tc => tc.Text, string.Empty, BindingMode.TwoWay);
public string Text
{
get
{
return (string)GetValue(TextProperty);
}
set
{
SetValue(TextProperty, value);
}
}
protected override void OnAttachedTo(Entry bindable)
{
bindable.TextChanged += HandleTextChanged;
base.OnAttachedTo(bindable);
}
void HandleTextChanged(object sender, TextChangedEventArgs e)
{
bool IsValid = false;
IsValid = e.NewTextValue ==Text;
((Entry)sender).TextColor = IsValid ? Color.Default : Color.Red;
}
protected override void OnDetachingFrom(Entry bindable)
{
bindable.TextChanged -= HandleTextChanged;
base.OnDetachingFrom(bindable);
}
}
}
Step 5 – Add Behaviors into Control:
Refer below xaml code for add behaviors into entry box
<Entry x:Name="txtpassword" IsPassword="True" Placeholder="Enter Your Password" >
<Entry.Behaviors>
<local:PasswordValidationBehavior />
</Entry.Behaviors>
</Entry>
Step 6 – Add Multiple Behaviors into Control:
Refer below code for attach multiple behaviors into single entry box and pass parameter value
<Entry IsPassword="True" Placeholder="Enter same as above" >
<Entry.Behaviors>
<local:PasswordValidationBehavior />
<local:CompareValidationBehavior BindingContext="{x:Reference txtpassword}" Text="{Binding Text}"/>
</Entry.Behaviors>
</Entry>
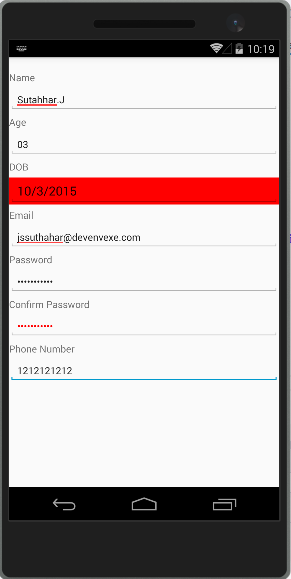
Step 7 -UI Design
You can refer below UI Design for all control and behaviors Design
<?xml version="1.0" encoding="utf-8" ?>
<ContentPage xmlns="http://xamarin.com/schemas/2014/forms"
xmlns:x="http://schemas.microsoft.com/winfx/2009/xaml"
xmlns:local="clr-namespace:DevenvExeBehaviors"
x:Class="DevenvExeBehaviors.MainPage" >
<StackLayout Padding="0,20,0,0">
<Label Text="Name" FontSize="Small" />
<Entry Placeholder="Enter Your Name" />
<Label Text="Age" FontSize="Small" />
<Entry Placeholder="Age" FontSize="Small">
<Entry.Behaviors>
<local:MaxLengthValidatorBehavior MaxLength="2"/>
<local:NumberValidationBehavior/>
</Entry.Behaviors>
</Entry>
<Label Text="DOB" FontSize="Small" />
<DatePicker >
<DatePicker.Behaviors>
<local:DateValidationBehavior/>
</DatePicker.Behaviors>
</DatePicker>
<Label Text="Email" FontSize="Small" />
<Entry Placeholder="Enter Your Email ID" >
<Entry.Behaviors>
<local:EmailValidatorBehavior />
</Entry.Behaviors>
</Entry>
<Label Text="Password" FontSize="Small" />
<Entry x:Name="txtpassword" IsPassword="True" Placeholder="Enter Your Password" >
<Entry.Behaviors>
<local:PasswordValidationBehavior />
</Entry.Behaviors>
</Entry>
<Label Text="Confirm Password" FontSize="Small" />
<Entry IsPassword="True" Placeholder="Enter same as above" >
<Entry.Behaviors>
<local:PasswordValidationBehavior />
<local:CompareValidationBehavior BindingContext="{x:Reference txtpassword}" Text="{Binding Text}"/>
</Entry.Behaviors>
</Entry>
<Label Text="Phone Number" FontSize="Small" />
<Entry Placeholder="Enter 10 digit phone number" >
<Entry.Behaviors>
<local:MaxLengthValidatorBehavior MaxLength="10"/>
<local:NumberValidationBehavior />
</Entry.Behaviors>
</Entry>
</StackLayout>
</ContentPage>
You can download sample source code and run the application .


 This can be accessed from anywhere in your Xamarin