Introduction:

The Bot Framework enables you to build bots that support different types of interactions with users. You can design conversations in your bot to be freeform. Your bot can also have more guided interactions where it provides the user choices or actions. The conversation can use simple text strings or more complex rich cards that contain text, images, and action buttons. And you can add natural language interactions, which let your users interact with your bots in a natural and expressive way.

In this article, we can deploy a bot to azure using visual studio 2017, register app with bot portal and testing it with the Bot Framework Emulator.

Setup and Create New Bot Application.

You can read my previous article for Getting Started with Bots Using Visual Studio 2017 from following URL http://www.c-sharpcorner.com/article/getting-started-with-bots-using-visual-studio-2017/

You need azure account for deploy bot application to azure so If you do not have an Azure account, you can click following url for a free trial azure subscription. https://azure.microsoft.com/en-us/free/

Register Bot Application:

Step 1: Navigate to Bot Framework Portal from https://dev.botframework.com/
Step 2: Click on Sign in button and login with credential
Step 3: Click on Create a Bot or Skill
Step 4: Click on Create a Bot and click on Register
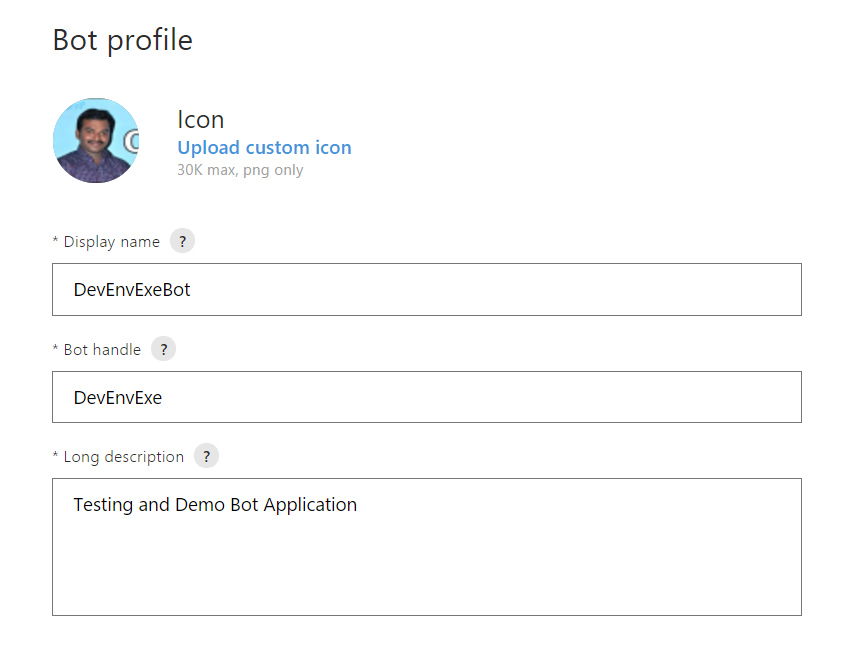
Step 5: Upload relevant app png icon and max size should be 30k
Step 6: Provide your bot's Display Name.
Step 6: Provide a Description of your bot.
Step 7: Provide your bots Https endpoint in configuration section.

We are not yet deployed our bot to the cloud so leave the endpoint blank for now. we will return to the Bot Framework Portal later and specify the endpoint after we have deployed our bot.

Step 8: On the next page, click Generate an app password to continue.
Step 9: Copy and securely store the password that is shown, and then click Ok.
Step 10: Click Finish and go back to Bot Framework.
Step 11: Back in the Bot Framework Portal, the App ID field is now populated.
Click 12: Click on Register to complete the registration process.

Update Web Configuration file:

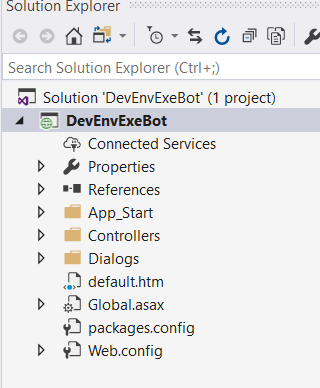
Open your project in Visual Studio and update the Microsoft App Id and Microsoft App Password values in your web configuration settings to specify the app ID and password values that were generated for your bot during the above registration process.


<appSettings>
<!-- update these with your BotId, Microsoft App Id and your Microsoft App Password-->
<add key="BotId" value="DevEnvExeBot" />
<add key="MicrosoftAppId" value="2f3edda3-d36d-4d88-8acf-e448d870348e" />
<add key="MicrosoftAppPassword" value="L6KOPcc3jqZB6hKPe06yxsH" />
</appSettings>

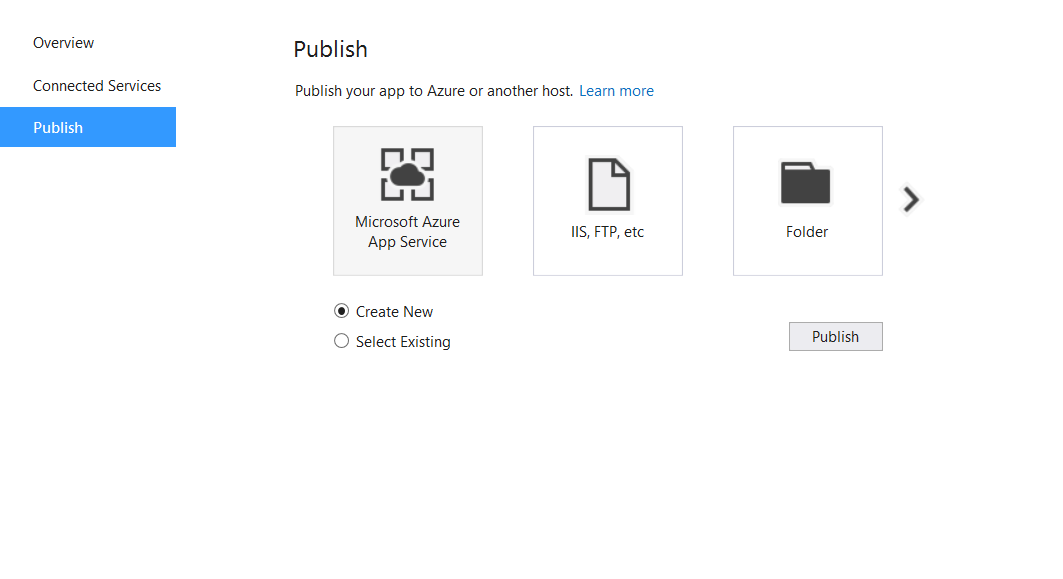
Azure publishing wizard:

Step 1: Right click on Project > Select on Publish and start publish bot application into azure


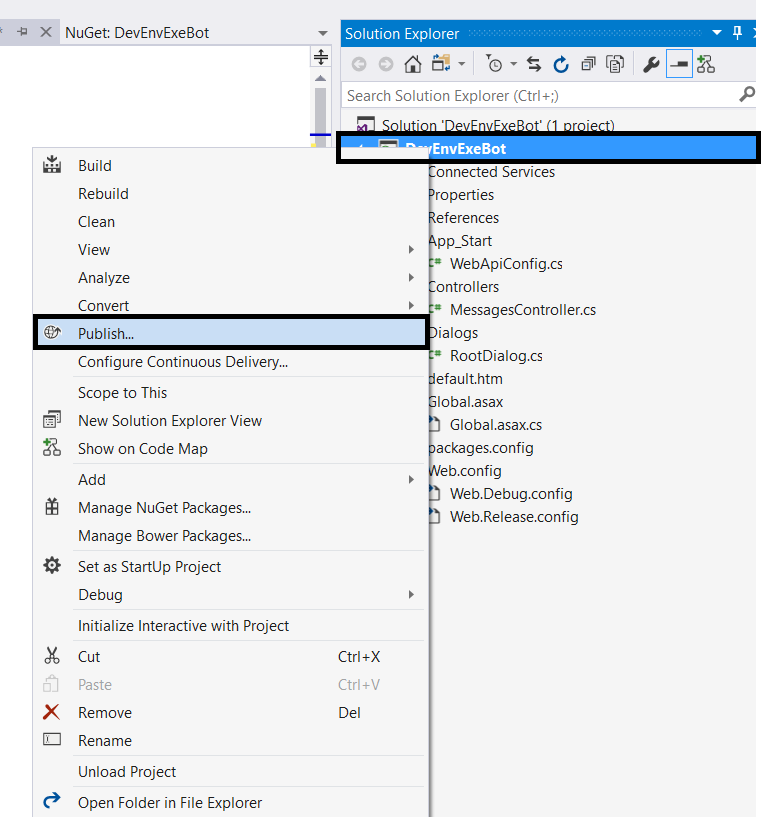
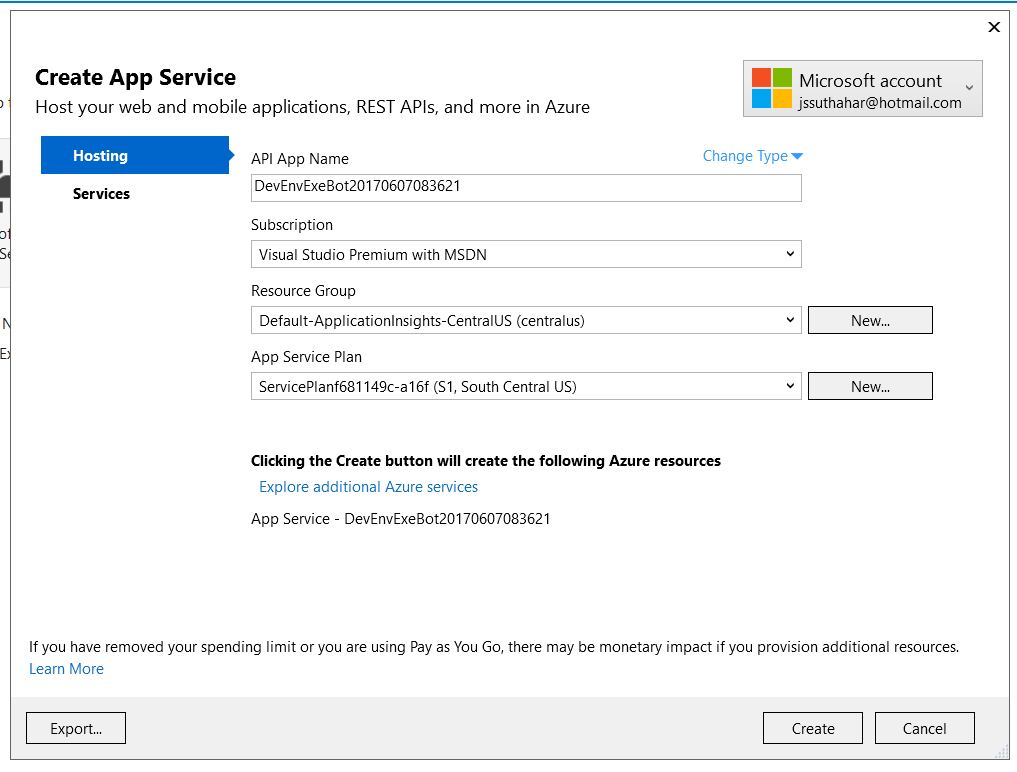
Step 2: Select on Microsoft Azure App Service > select on Create New and click on Publish button


Step 3: Login with Microsoft azure account and click on create app service


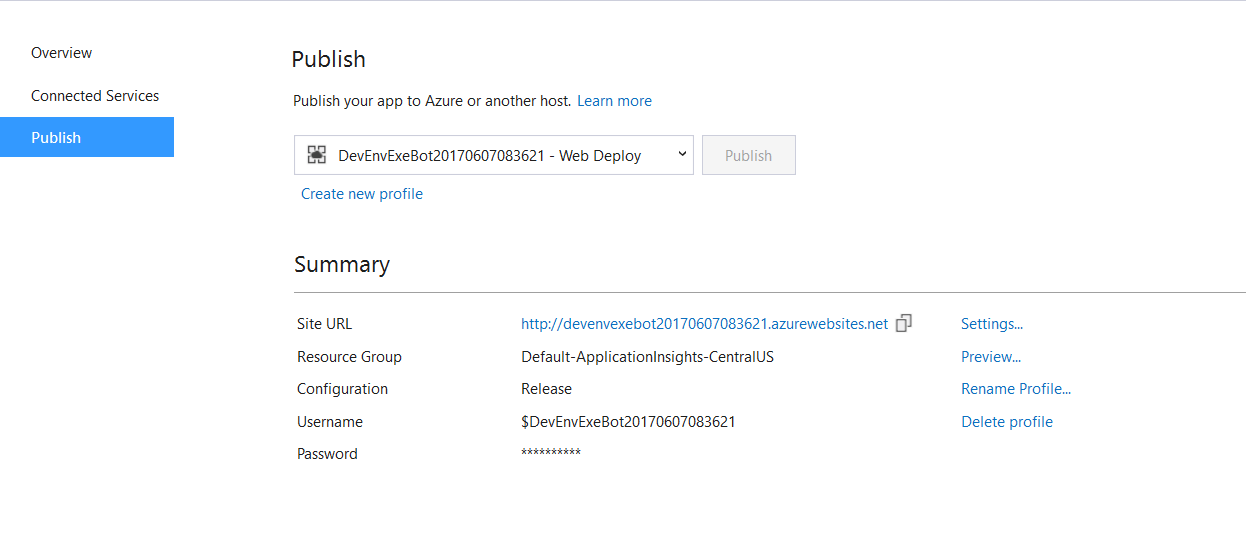
Step 4: Copy the Destination URL value to the clipboard (you'll need this value later to test the connection to the bot)


Update Site Url from Bot Portal:

Step 1: Sign in to the Bot framework Portal - https://dev.botframework.com/
Step 2: Click My Bots.
Step 3: Select the bot that you want to configure and click Settings.
Step 4: Provide your bot's HTTPS endpoint. This is the endpoint where your bot will receive HTTP POST messages from Bot Connector. If you built your bot by using the Bot Builder SDK, the endpoint should end with /api/messages.
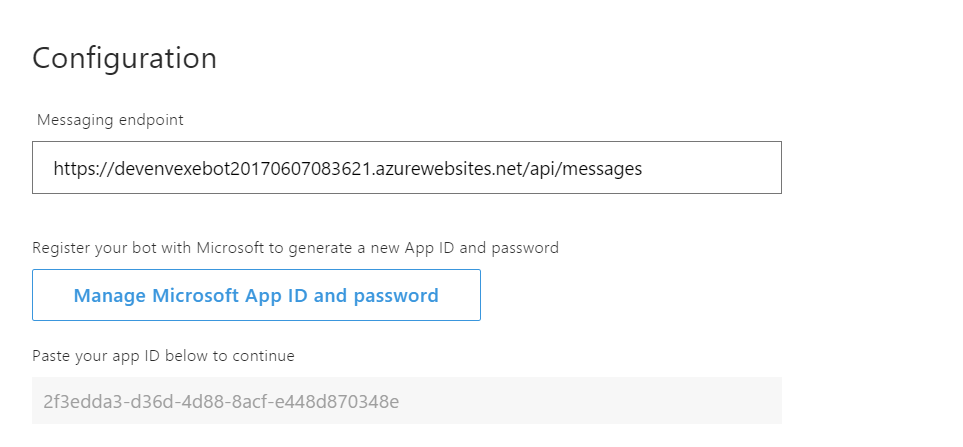
Step 5: Click on Save Changes.

Test Bot Application on Portal:

After publish Bot application into azure, you can test bot application from portal and emulator .

Step 1: Sign in to the Bot framework Portal - https://dev.botframework.com/
Step 2: Click on Test and provide input text


Test Bot Application on Emulator:

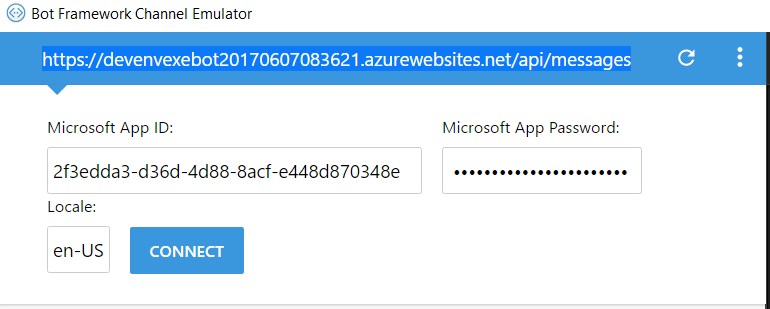
Open Bot Emulator and Provide your bot's HTTPS endpoint with api/messages .
Provide Microsoft App ID and Password and click on Connect


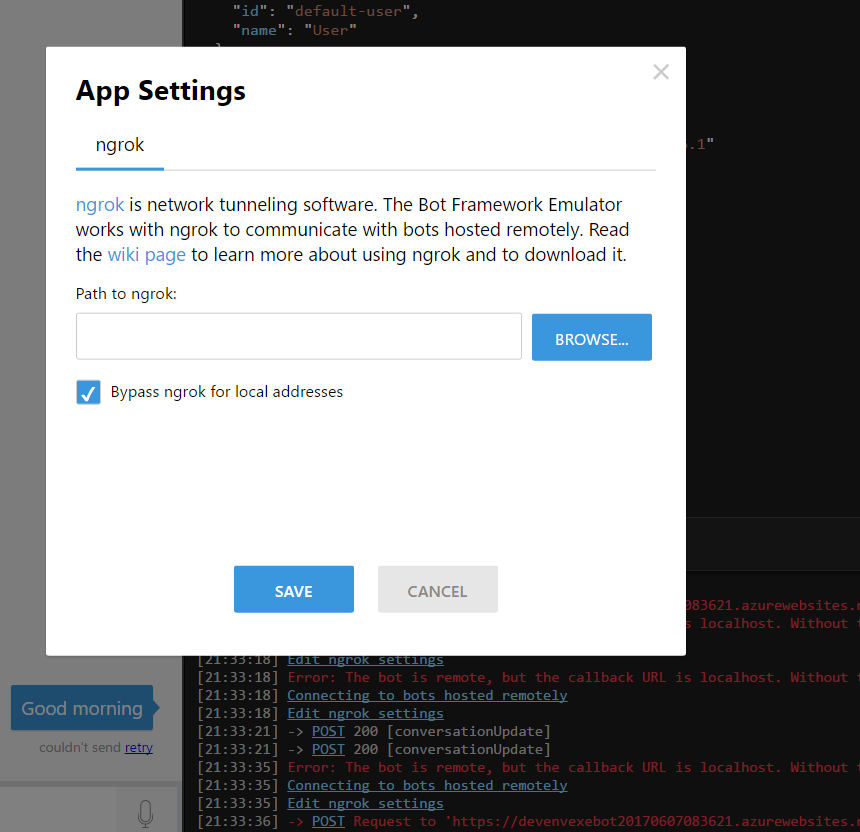
If you are getting following error, Click on Edit Tunneling (ngrok) setting.


download Tunneling (ngrok.exe) from https://ngrok.com/download and click on browse and associate ngrok.exe path


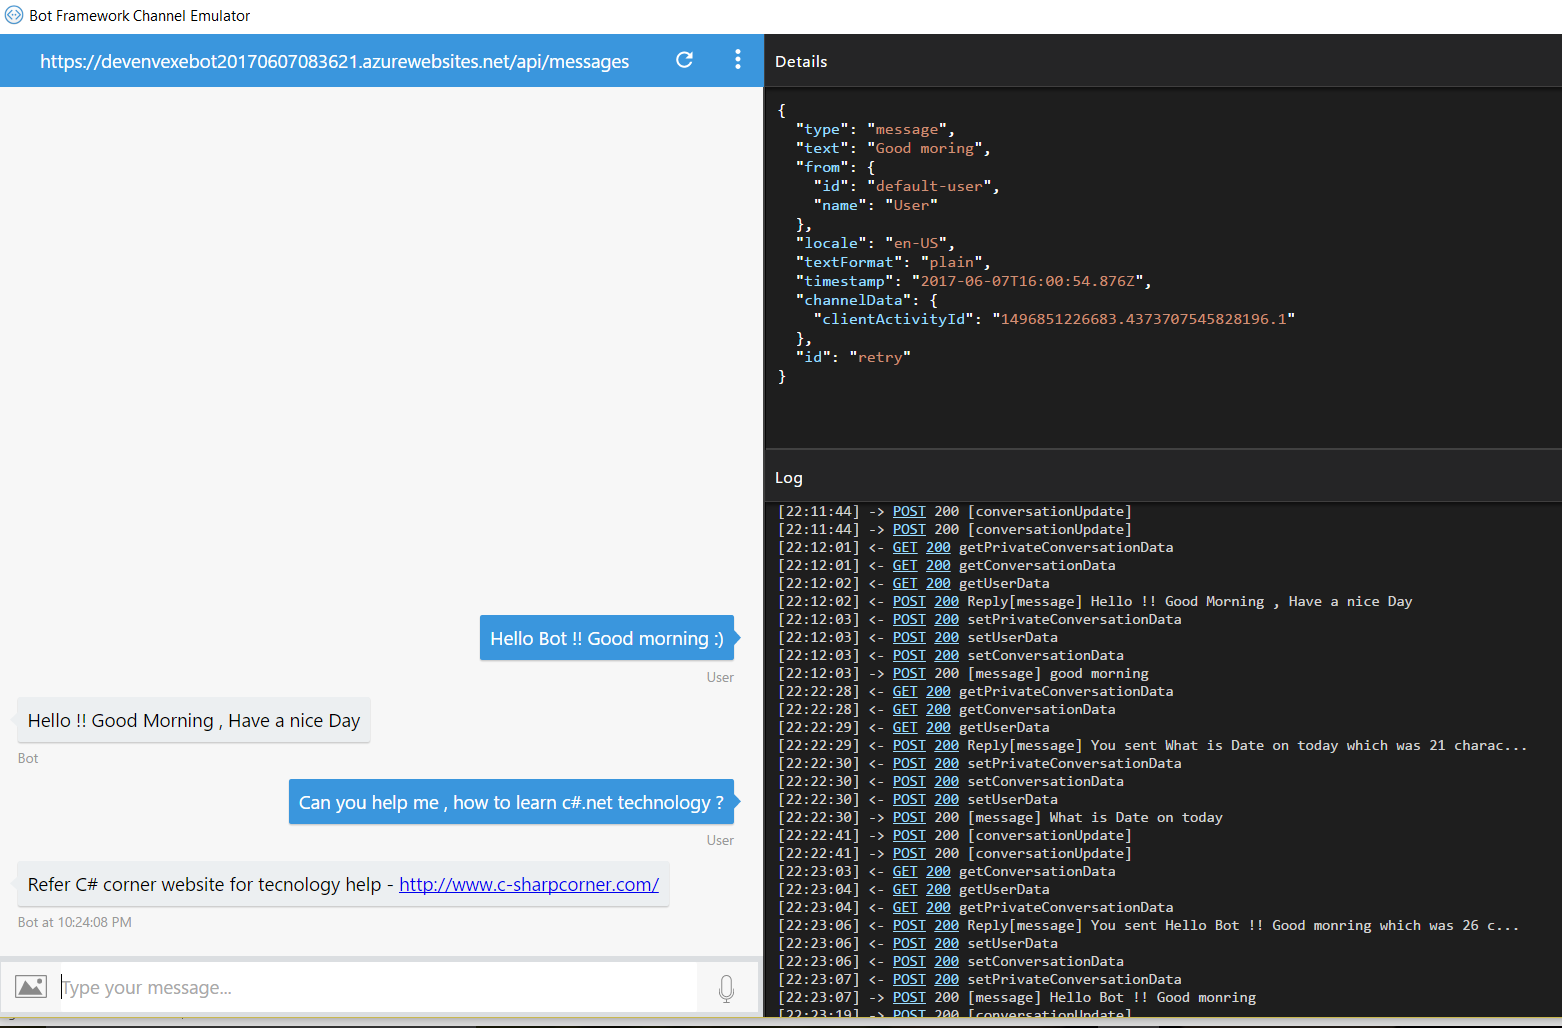
Click on refresh from Bot emulator and provide your input for test application


Download

You can download the complete source code from MSDN sample.


Summary

In this article, your learned how to Deploy a bot to Azure using Visual studio 2017. If you have any questions/ feedback/ issues, please write in the comment box.

Introduction:

The Bot Framework enables you to build bots that support different types of interactions with users. You can design conversations in your bot to be freeform. Your bot can also have more guided interactions where it provides the user choices or actions. The conversation can use simple text strings or more complex rich cards that contain text, images, and action buttons. And you can add natural language interactions, which let your users interact with your bots in a natural and expressive way.

In this article, we can create a bot by using the Visual studio 2017 with Bot template and testing it with the Bot Emulator.

Install Visual Studio 2017:

Download Visual Studio 2017 from the following URL given below.

Download Visual Studio 2017 from https://www.visualstudio.com/downloads/.
Refer Visual Studio 2017 system requirement from https://www.visualstudio.com/en-us/productinfo/vs2017-system-requirements-vs.


Note:

You can build bots for free with Visual Studio 2017 Community.

The Bot Builder SDK for .NET currently supports Only on Windows. Visual Studio for Mac is not supported.

Bot Application template:

Download the Bot Application template from the following url http://aka.ms/bf-bc-vstemplate and install the template by saving the .zip file to your Visual Studio 2017 project templates directory.
The Visual Studio 2017 project templates directory is typically located following url

%USERPROFILE%\Documents\Visual Studio 2017\Templates\ProjectTemplates\Visual C#\


Create New Project:

Let's start with creating a new Bot application in Visual Studio 2017.
Click on Windows Key > Select Visual Studio 2017.

Now, open VS and create new project with c# project, select the Bot applications template as per below


The Bot application was created with all of the components and installed all required Nuget reference


Update Bot Builder Nuget Package:

Verify your application Microsoft.Bot.Builder nuget package was installed under reference .if not , refer follow below steps
Right-click on the Bot project(DevEnvExeBot) and select Manage NuGet Packages.In the Browse tab, type "Microsoft.Bot.Builder" and click on Search
Locate the Microsoft.Bot.Builder package in the list of search results, and click the Update button for that package or Uninstall and Install the package .


Update Code:

The Default application added simple conde snipper, no need to change anything. if you want to test your custom message, you can change like below.

You can find messagereceiveAsync method from Dialogs / RootDialog.cs file.

In this method activity.Text will return user text input so you can reply message based input text .

private async Task MessageReceivedAsync(IDialogContext context, IAwaitable
{
var activity = await result as Activity;
// calculate something for us to return
int length = (activity.Text ?? string.Empty).Length;
// return our reply to the user
//test
if (activity.Text.Contains("technology"))
{
await context.PostAsync("Refer C# corner website for tecnology http://www.c-sharpcorner.com/");
}
else if (activity.Text.Contains("morning"))
{
await context.PostAsync("Hello !! Good Morning , Have a nice Day");
}
//test
else if (activity.Text.Contains("night"))
{
await context.PostAsync(" Good night and Sweetest Dreams with Bot Application ");
}
else if (activity.Text.Contains("date"))
{
await context.PostAsync(DateTime.Now.ToString());
}
else
{
await context.PostAsync($"You sent {activity.Text} which was {length} characters");
}
context.Wait(MessageReceivedAsync);
}

Install bot Emulator:

You will need to download and install the emulator for testing bot application .You can download bot emulator from https://docs.microsoft.com/en-us/bot-framework/debug-bots-emulator .


Run Bot Application:

The emulator is a desktop application that lets you test and debug your bot on localhost or remotely. Now, you can click on run the application in any browser


Test Application on Bot Emulator:

  • You can follow below steps for test bot application
  • Open Bot Emulator
  • Copy above localhost url and past it from emulator eg: http://localHost:3979
  • You can append the /api/message from above localhost url eg: http://localHost:3979/api/messages.
  • You won't need to specify Microsoft App ID and Microsoft App Password for localhost testing so click on Connect


Download

You can download the complete source code from MSDN sample. 


Summary:

This article your learned about how to create Bot application using visual studio 2017.If you have any questions/ feedback/ issues, please write in the comment box.

Introduction:

Visual Studio 2017 was launched on March 7, 2017 with many fresh and exciting features for Visual Studio developers and Xamarin Live Player Announced on stage at Build 2017.

Developing iOS and Android apps on a Windows PC and run on Xamarin Live Player app no need to setup emulator or connect cable to deploy the code and You have the app running from Visual Studio, either with or without the debugger, you can enable “Live Run” mode, which will constantly deploy your code as you edit it.


Setup on Windows machine:

Download and Install Visual Studio 2017 15.3 Preview or above from https://www.visualstudio.com/vs/preview/

Update Xamarin for VS 2017 from https://marketplace.visualstudio.com/items?itemName=Xamarin.XamarinUpdater
Connect PC and device on the same Wifi network
Xamarin Live Player will support only on Visual Studio, does not work on xamarin studio


Setup on Mobile Device:

Download and Install Xamarin Live Player on iOS device from https://itunes.apple.com/us/app/xamarin-live-player/id1228841832?ls=1&mt=8

Download and Install Xamarin Live Player on Android Device from https://play.google.com/store/apps/details?id=com.xamarin.live

Step 1:

Create New Xamarin Forms Application:

Let's start with creating a new Xamarin project in Visual Studio.

Click on Windows Key > Select Visual Studio 2017 Preview


Step 2: Select New Template:

New Project (Ctrl+Shift+N) -> select Portable Blank Xaml app.


Step 3: Select Live Player:

Choose live Player in the device list

If you have already paired a device, it will be available as an option.


Otherwise you'll be prompted to pair a device when required. When you press Pair to Visual Studio, use the camera to scan the barcode showing on your computer or enter the code you see on your device on screen


You can click on Tools > Xamarin Live Player > Manage Devices


Step 4: Run and Debug Application:

Select your device and run the application.

Start Without Debugging – you can edit the app and see the changes occur on the device Start Debugging – you can set breakpoints and inspect variables, but code cannot be edited.

Issues and Resolutions:

I have shared some implementation, development issues and solution given below.


Mobile Device Does connect to PC ?

Solution:

Make sure device and computer are on same network
Restart Xamarin Live player app

if Device connect with Cable, you disconnect and deploy the application

No option to select Xamarin Live Player in the device list?

Solution:

Ensure you are using Visual Studio 2017 15.3 Preview from https://www.visualstudio.com/vs/preview/

Install the Xamarin Updater from:

https://marketplace.visualstudio.com/items?itemName=Xamarin.XamarinUpdater

Update all the things in Extensions & Updates under Updates > Xamarin Preview which will download the available updates.

Close Visual Studio, which auto-launches the installer for the downloaded updates.

Relaunch Visual Studio after the installation finishes.

Summary:

This article you learned about Xamarin Live Player ,VS system requirement, install Visual studio preview 15.3 and issue and resolution.
If you have any question/ feedback/ issues, please write them in the comment box

Introduction:

Visual Studio 2017 for mac was launched at MS Build 2017 with many fresh and exciting features for Visual Studio developers in mac machine. Mac OS user can build apps for mobile, web, and cloud with Xamarin and .NET Core, games with Unity using Visual Studio.

In this article, I will share how to create new Xamarin.Forms application using Visual studio for mac.
System Requirement:

Visual Studio 2017 for mac will install and run on the following operating system
MacOS Sierra 10.12 or Mac OS X El Capitan 10.11
Xcode 8.3 or above requires macOS Sierra 10.12,
Xamarin.Android requires the 64-bit Java Development Kit (JDK)
1.8 GHz or faster processor with min 4GB RAM .

Install Visual Studio for mac:

Download Visual Studio 2017 for mac from https://www.visualstudio.com/vs/?os=mac .If you are downloading before May 17, you will get free 60-day access to Xamarin University.


Create New Xamarin.Forms Application:

Step 1: Launch VS from mac:

Launch Visual Studio for mac from Launchpad


Step 2: Create New Solution :

Create New Solution (File >New Solution) or VS home screen > Click on New Project


Step 3: Choose a Template:

Visual Studio for mac will support to develop apps for Android, macOS, iOS, tvOS, watchOS, web, and cloud. Code fast and test. Here, I will select xamarin.Forms template under multiplatform .


Step 4: Multiplatform Xamarin.Forms Application:

The Multiplatform Xamarin.Forms App and the Native App project templates now provide you a quick way to create a multiplatform mobile app with cloud backend. This template will include Xamarin.iOS ,Xamairn.Android and share code with cloud service .

Provide App name. identifier, platform and mobile backend detail from following screen


Step 5: Configure Your Application:

Provide the project, solution name, local location and version control details from following screen


Step 6: Solution successfully Created:

You can do Drag and Drop UI Design for iOS and android with Live preview and building, deployment, debugging the application.


Step 7: Run the Application:

Debug and Run the xamarin application


Summary:

This article you learned VS system requirement, install Visual studio from mac and how to create new xamarin application using Visual studio for mac.

If you have any question/ feedback/ issues, please write them in the comment box
Databind two control properties or view model property that have incompatible types / Validation, you need a piece of code in between, that converts the value from source to target type and back. This piece of code is called ValueConverter. A value converter is a class, that implements the interface IValueConverter with the two methods object Convert(object value) and object ConvertBack(object value).

In this article, I will share about IValueConverter in xamarin.forms application

Create New Xamarin Forms Application:

Let's start with creating a new Xamarin Forms Project in Visual Studio.

Open Run - Type Devenev.Exe and enter - New Project (Ctrl+Shift+N) - select Blank Xaml App (Xamarin.Forms Portable) template.

You can refer my previous article for create new xamarin forms application from here - http://www.c-sharpcorner.com/article/how-to-create-first-xamarin-form-application/


Create New Value Convert Class:

You can create new Value Converter class now, Right Click Project > Add New Item > Add Class File, Name as “ MaxLengthConverter” .

In the following sample, I am getting value from Editor control and checking text length ,if text length less than 100 words means label color changed green or Red color .

Inherit IvalueConverter interface and add xamarin.Forms name space .

using System;
using System.Globalization;
using Xamarin.Forms;

namespace MVVMXamarin
{
class MaxLengthColorConverter : IValueConverter
{
public object Convert(object value, Type targetType, object parameter, CultureInfo culture)
{
if (value != null)
{
int count = value.ToString().Length;
if (count > 100)
{
return Color.Red;
}
}
return Color.Green;
}

public object ConvertBack(object value, Type targetType, object parameter, CultureInfo culture)
{
throw new NotImplementedException();
}
}
}

Implement Value Convert in Xaml:

In the following xaml page, added converter class within Resource Dictionary and added convert class key from control
<?xml version="1.0" encoding="utf-8" ?>
<ContentPage xmlns="http://xamarin.com/schemas/2014/forms"
xmlns:x="http://schemas.microsoft.com/winfx/2009/xaml"
x:Class="MVVMXamarin.ConvertDemo"
xmlns:local="clr-namespace:MVVMXamarin;assembly=MVVMXamarin">
<ContentPage.Resources>
<ResourceDictionary>
<local:MaxLengthColorConverter x:Key="cnmaxlength"></local:MaxLengthColorConverter>
</ResourceDictionary>
</ContentPage.Resources>
<StackLayout>
<Label Text="About You"></Label>
<Editor x:Name ="txtname"></Editor>
<Label BindingContext="{x:Reference Name=txtname}" Text="Please Say about you within 100 words" BackgroundColor="{Binding Path=Text,Converter={StaticResource cnmaxlength}}"
VerticalOptions="Center" HorizontalOptions="Center" />
</StackLayout>
</ContentPage>

Implement value Converter in C#:

In the following sample code shown, how add converter class into c# binding control .You can add your converter class into Setbinding method.
StackLayout layout = new StackLayout();
Label lbltitle = new Label();
lbltitle.Text = "About Me";
layout.Children.Add(lbltitle);
var editor = new Editor();
layout.Children.Add(editor);
var label = new Label();
label.Text = "Please Say about you within 100 words";
label.SetBinding(Label.BackgroundColorProperty, new Binding("BackgroundColor",mode:BindingMode.Default, source: editor,converter: new MaxLengthColorConverter(),stringFormat:null));
layout.Children.Add(label);
this.Content = layout;


I believe this article will help you for how to use IValueConverter

Download Source code :


Databinding is a mechanism in Xamarin Forms Application. Binding is common context, is the process of mapping a property on a Page, to a property in a view or ViewModel. In this Article I will show how bind Control property to Control property binding in xamarin Forms.

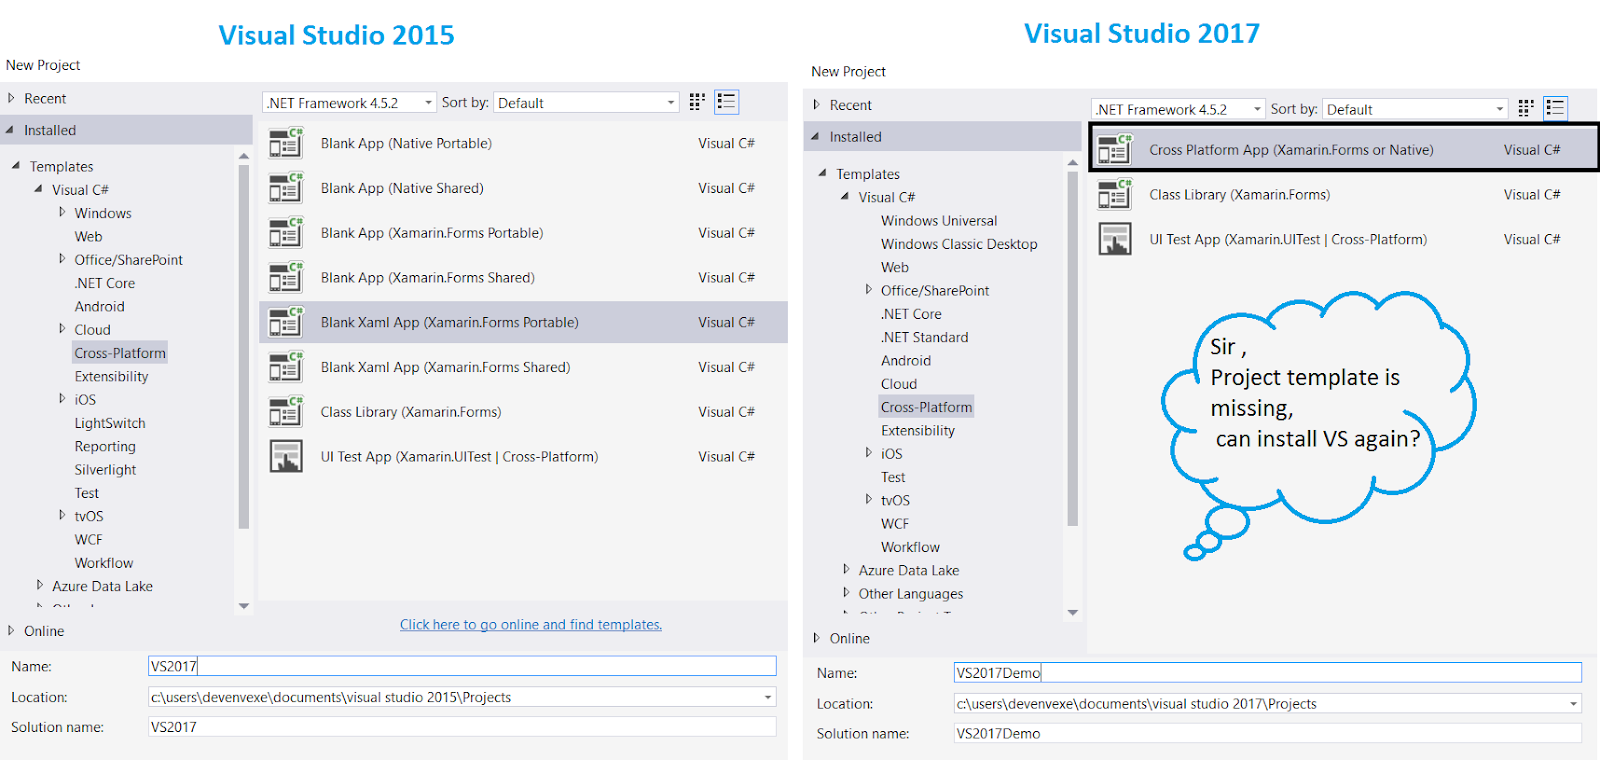
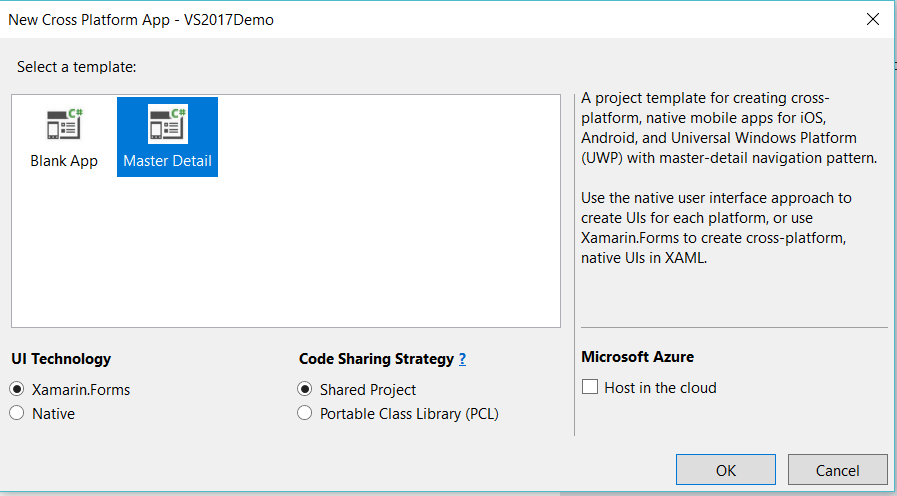
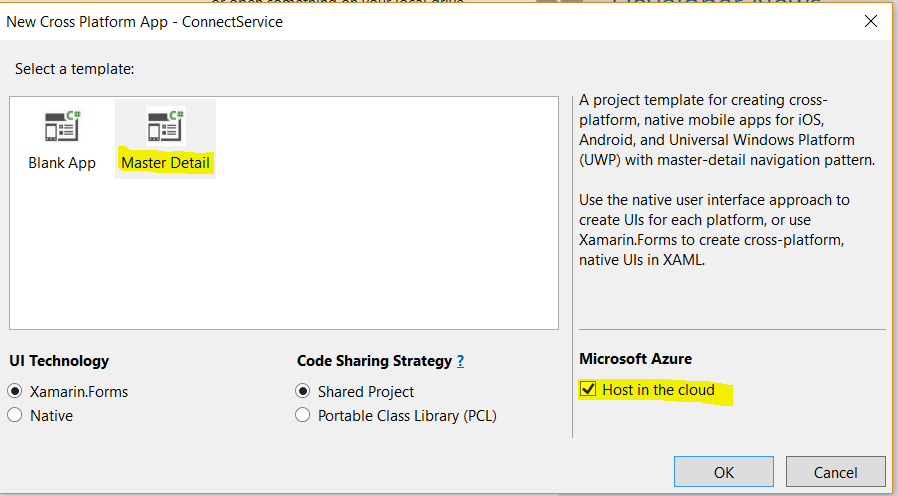
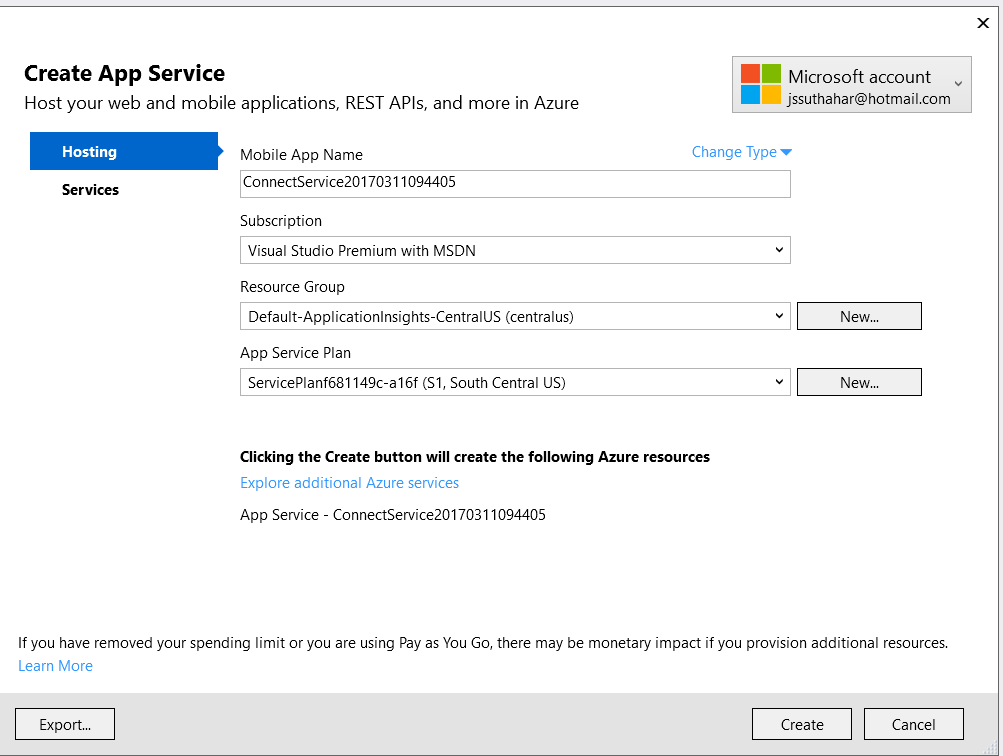
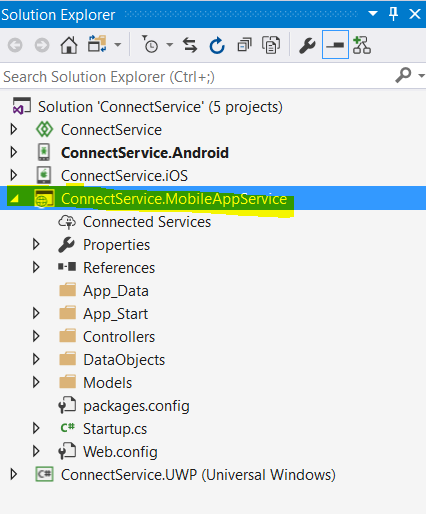
Create New Xamarin. Forms Application:

Let's start with creating a new Xamarin Forms Project in Visual Studio.

Open Run - Type Devenev.Exe and enter - New Project (Ctrl+Shift+N) - select Blank Xaml App (Xamarin.Forms Portable) template.

You can refer my previous article for create new xamarin forms application from here - http://www.c-sharpcorner.com/article/how-to-create-first-xamarin-form-application/


Binding Control to Control using xaml :

Data bindings can be defined to link properties of two Controls on the same page. In this case, you set the BindingContext of the target object using the x: Reference markup extension.

In the following sample added one Entry control and Label control for print text

<StackLayout>
<Entry x:Name ="txtname"></Entry>
<Label Text="Welcome Mr.." VerticalOptions="Center" HorizontalOptions="Center" />
<Label BindingContext="{x:Reference Name=txtname}" Text="{Binding Path=Text}"
VerticalOptions="Center" HorizontalOptions="Center" />
</StackLayout>
Entry Control Name : txtname

Label control adding Binding Context and Binding the value.

While assign binding Context, we can use following two way

BindingContext="{x:Reference Name=txtname} OR BindingContext="{x:Reference txtname} // Name attribute is not required

Same like while assign value to property, we can use following two way

Text="{Binding Path=Text}" OR Text="{Binding Text}" // Path attribute is not required


Binding Control with String Builder:

All the database data or other srorage data is not formatted data so you Can bind Property with string or any type like below

<Label BindingContext="{x:Reference Name=txtname}" Text="{Binding Path=Text, StringFormat='Welcome Mr {0}'}"/>
<StackLayout>
<Entry x:Name ="txtname"></Entry>
<Label BindingContext="{x:Reference Name=txtname}" Text="{Binding Path=Text, StringFormat='Welcome Mr {0}'}"
VerticalOptions="Center"
HorizontalOptions="Center" />
</StackLayout>

Binding Control in C#:

You can do it effectively the same way as the XAML example simply by setting your view's BindingContext or Source to the other view.

label.SetBinding(Label.TextProperty, new Binding("<Property Name>", stringFormat: "Welcome Mr {0}", source: <BindingContext Control name>));

or

var label = new Label{ BindingContext = <Control Name> };
label.SetBinding(Label.TextProperty, new Binding("<Property Name>", stringFormat: "Welcome Mr {0}"));
StackLayout layout = new StackLayout();
var editor = new Editor();
layout.Children.Add(editor);
var label = new Label();
label.SetBinding(Label.TextProperty, new Binding("Text", stringFormat: "Welcome Mr {0}", source: editor));
layout.Children.Add(label);
this.Content = layout;

Binding User Control:

Xamarin Forms doesn’t have a control called a User Control. However, we can make any VisualElement, or combination of Visual Element’s into a reusable control, to use on different pages, just like a User Control.

Create User Control:

Right Click PCL project > Select” Forms XAML View” and click on Add


In xaml and C# file, change content View to any layout control like Grid, Stack layout

In Xaml Page:

<?xml version="1.0" encoding="UTF-8"?>
<Grid xmlns="http://xamarin.com/schemas/2014/forms" xmlns:x="http://schemas.microsoft.com/winfx/2009/xaml" x:Class="MVVMXamarin.MyControl">
<Label Text="{Binding Text, Source={x:Reference this}}" />
</Grid>

In Code behind file, you might want to make your control, have a bindable property to pass data through to it, on each page it is used. First, create a Bindable Property in your UserControl. It doesn’t have to be bindable if you just want to pass a static value through, however if you want to bind to it, you must make it bindable.

using System;
using System.Collections.Generic;
using System.Linq;
using System.Text;
using System.Threading.Tasks;
using Xamarin.Forms;
namespace MVVMXamarin
{
public partial class MyControl : Grid
{
public MyControl()
{
InitializeComponent();
}

public static readonly BindableProperty TextProperty = BindableProperty.Create(nameof(Text), typeof(string), typeof(MyControl));
public string Text
{
get
{
return (string)GetValue(TextProperty);
}
set
{
SetValue(TextProperty, value);
}
}
}
}

Going to your MainPage, you can now assign a value to the Text property. You can also use {Binding PropertyName} if you want, as this is a bindable property.

<StackLayout>
<Entry x:Name ="txtname"></Entry>
<local:MyControl BindingContext="{x:Reference Name=txtname}" Text="{Binding Path=Text, StringFormat='Welcome Mr {0}'}">
</local:MyControl>
</StackLayout>

Introduction:
Visual Studio 2017 successfully was launched on march 7 2017 with many fresh and exciting features for Visual Studio developers. On February 24, 2016 Xamarin and Microsoft announced that Microsoft signed a definitive agreement to acquire Xamarin . Microsoft Build 2016 announced that they will open-source the Xamarin SDK and that they will bundle it as a free tool within Visual Studio's integrated development environment.
Now We are celebrating our Visual Studio 20th anniversary and one year anniversary and release Visual studio 2017 with many features.
In this article, I will share Visual studio 2017 Xamarin project template, Cloud Storage template, Xamarin Forms preview.
Download and Install Visual Studio 2017:
Download Visual Studio 2017 from following url by March 14 and get free 60-day access to Xamarin University.
  1. Refer Visual Studio 2017 System requirement from here
Create New Xamarin Project:
After successfully install Visual studio 2017, Go to Run (Windows key +R) > type Devenv.exe or Select from windows application list and Select New project from File menu > New Project (ctrl +Shift+N) or Click on more project template from VS Start screen
Visual Studio 2017 have different project template so no worry for new project window have only 3 project template. You can follow below steps for create new xamarin forms application using VS 2017
New Project >Select Cross -Platform from Template > Cross platform App(Xamarin.Forms or native) .it will show following screen
The Xamarin.Forms UI Template, Project template for creating cross platform, native mobile apps for iOS,Android ,UWP  and Select Blank UI or master detail menu using xamarin Forms  UI .
The Native UI, native user interface approach to create UI for each platform.
The Host in the cloud, Cross mobile application automatically integrated with azure cloud storage and create new project for cloud
Xamarin.Forms Previewer:
Microsoft and Xamarin team made many enhancements to the xamarin.Forms Previewer from Visual Studio 2017 . You can preview cross mobile application while design xaml based application.
Create New Blank / Master details xamarin form application and open Forms Preview window and activate follow below steps
Step 1: VS 2017 > click on View > Select Other Windows > Select Forms Preview
Step 2: The project preview needs to be built before preview the application
Step 3: Android Application preview, be sure that you have the latest Java 1.8 x64 installed from here
Step 4: install java 1.8 x64 and change to Android JDK path from Visual studio
             Goto Tools  Menu> Select Options > Xamarin> Android Setting > change Java Development kit                         location
Step 5: The iOS renderer required an active connection to your mac agent for preview .
Step 6: If you are getting any issue while connecting mac, please make sure xamarin version is same from both machine
Step 7: If you get error like this, this version of Xamarin.iOS requires the iOS 10.2 SDK (shipped with Xcode 8.2) when the managed linker is disabled Either upgrade Xcode, or enable the managed linker. two way we can resolve this issue.
    • It appears you have not updated Xcode. Check on your Mac and update xcode.
    • Another option would be to choose to 'Link Framework SDKs only'  right Click on iOS Project > Property > iOS Build > General tab>Linker Behavior > Link Framework SDKs only
Step8: If your facing any other issue, try closing and re-opening the XAML file and it will get resolve


Host in the cloud:
VS 2017 introduced new cloud xamarin template with online and offline storage. Just follow below few steps for create cloud storage app with iOS, Android, and Windows 10 platform. the template includes tabbed navigation, MVVM, settings, and more. You can follow below steps for Host in the cloud.
Step 1: Select master detail template.
Step 2: Select “Host in the cloud” and click on Okay
Step3: Create / Login Azure Account and configure the application and Click on Create


Step 4: you can refer following solution structure .its automatically MobileAppService added
And debug and run application


If you have any question /feedback /issue, write in the comment box.

Featured Post

AI Evolution Explained: GenAI vs LLMs vs AI Agents vs Agentic AI vs Intelligent AI

Artificial Intelligence (AI) is one of the most exciting technologies in our world today. But the terms that come with it like GenAI, LLMs, ...

MSDEVBUILD - English Channel

MSDEVBUILD - Tamil Channel

Popular Posts