Introduction:

The Bot Framework enables you to build bots that support different types of interactions with users. You can design conversations in your bot to be freeform. Your bot can also have more guided interactions where it provides the user choices or actions. The conversation can use simple text strings or more complex rich cards that contain text, images, and action buttons. And you can add natural language interactions, which let your users interact with your bots in a natural and expressive way.

In this article, we can deploy a bot to azure using visual studio 2017, register app with bot portal and testing it with the Bot Framework Emulator.

Setup and Create New Bot Application.

You can read my previous article for Getting Started with Bots Using Visual Studio 2017 from following URL http://www.c-sharpcorner.com/article/getting-started-with-bots-using-visual-studio-2017/


You need azure account for deploy bot application to azure so If you do not have an Azure account, you can click following url for a free trial azure subscription. https://azure.microsoft.com/en-us/free/

Register Bot Application:

Step 1: Navigate to Bot Framework Portal from https://dev.botframework.com/

Step 2: Click on Sign in button and login with credential

Step 3: Click on Create a Bot or Skill

Step 4: Click on Create a Bot and click on Register

Step 5: Upload relevant app png icon and max size should be 30k

Step 6: Provide your bot's Display Name.

Step 7: Provide a Description of your bot.


Step 7: Provide your bots Https endpoint in configuration section.

We are not yet deployed our bot to the cloud so leave the endpoint blank for now. we will return to the Bot Framework Portal later and specify the endpoint after we have deployed our bot.

Step 8: On the next page, click Generate an app password to continue.

Step 9: Copy and securely store the password that is shown, and then click Ok.

Step 10: Click Finish and go back to Bot Framework.

Step 11: Back in the Bot Framework Portal, the App ID field is now populated.

Click 12: Click on Register to complete the registration process.

Update Web Configuration file:

Open your project in Visual Studio and update the Microsoft App Id and Microsoft App Password values in your web configuration settings to specify the app ID and password values that were generated for your bot during the above registration process.


<appSettings>
<!-- update these with your BotId, Microsoft App Id and your Microsoft App Password-->
<add key="BotId" value="DevEnvExeBot" />
<add key="MicrosoftAppId" value="2f3edda3-d36d-4d88-8acf-e448d870348e" />
<add key="MicrosoftAppPassword" value="L6KOPcc3jqZB6hKPe06yxsH" />
</appSettings>

Azure publishing wizard:

Step 1: Right click on Project > Select on Publish and start publish bot application into azure


Step 2: Select on Microsoft Azure App Service > select on Create New and click on Publish button


Step 3: Login with Microsoft azure account and click on create app service

Step 4: Copy the Destination URL value to the clipboard (you'll need this value later to test the connection to the bot)


Update Site Url from Bot Portal:

Step 1: Sign in to the Bot framework Portal - https://dev.botframework.com/

Step 2: Click My Bots.

Step 3: Select the bot that you want to configure and click Settings.

Step 4: Provide your bot's HTTPS endpoint. This is the endpoint where your bot will receive HTTP POST messages from Bot Connector. If you built your bot by using the Bot Builder SDK, the endpoint should end with /api/messages.
Step 5: Click on Save Changes.

Test Bot Application on Portal:

After publish Bot application into azure, you can test bot application from portal and emulator .

Step 1: Sign in to the Bot framework Portal - https://dev.botframework.com/

Step 2: Click on Test and provide input text


Test Bot Application on Emulator:

Open Bot Emulator and Provide your bot's HTTPS endpoint with api/messages .

Provide Microsoft App ID and Password and click on Connect


If you are getting following error, Click on Edit Tunneling (ngrok) setting.


download Tunneling (ngrok.exe) from https://ngrok.com/download and click on browse and associate ngrok.exe path


Click on refresh from Bot emulator and provide your input for test application 


Summary

In this article, your learned how to Deploy a bot to Azure using Visual studio 2017. If you have any questions/ feedback/ issues, please write in the comment box.
The Bot Framework enables you to build bots that support different types of interactions with users. You can design conversations in your bot to be freeform. Your bot can also have more guided interactions where it provides the user choices or actions. The conversation can use simple text strings or more complex rich cards that contain text, images, and action buttons. And you can add natural language interactions, which let your users interact with your bots in a natural and expressive way.

In this article, we can create a bot by using the Visual studio 2017 with Bot template and testing it with the Bot Emulator.

Install Visual Studio 2017:

Download Visual Studio 2017 from the following URL given below.

Download Visual Studio 2017 from https://www.visualstudio.com/downloads/.

Refer Visual Studio 2017 system requirement from https://www.visualstudio.com/en-us/productinfo/vs2017-system-requirements-vs.


Note:

You can build bots for free with Visual Studio 2017 Community.

The Bot Builder SDK for .NET currently supports Only on Windows. Visual Studio for Mac is not supported.

Bot Application template:

Download the Bot Application template from the following url http://aka.ms/bf-bc-vstemplate and install the template by saving the .zip file to your Visual Studio 2017 project templates directory.

The Visual Studio 2017 project templates directory is typically located following url

%USERPROFILE%\Documents\Visual Studio 2017\Templates\ProjectTemplates\Visual C#\


Create New Project:

Let's start with creating a new Bot application in Visual Studio 2017.

Click on Windows Key > Select Visual Studio 2017.
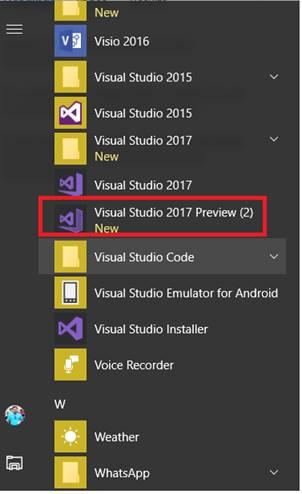


Now, open VS and create new project with c# project, select the Bot applications template as per below


The Bot application was created with all of the components and installed all required Nuget reference


Update Bot Builder Nuget Package:

Verify your application Microsoft.Bot.Builder nuget package was installed under reference .if not , refer follow below steps

Right-click on the Bot project(DevEnvExeBot) and select Manage NuGet Packages.

In the Browse tab, type "Microsoft.Bot.Builder" and click on Search

Locate the Microsoft.Bot.Builder package in the list of search results, and click the Update button for that package or Uninstall and Install the package .


Update Code:

The Default application added simple conde snipper, no need to change anything. if you want to test your custom message, you can change like below.

You can find messagereceiveAsync method from Dialogs / RootDialog.cs file.

In this method activity.Text will return user text input so you can reply message based input text .

private async Task MessageReceivedAsync(IDialogContext context, IAwaitable<object> result)
{
var activity = await result as Activity;
// calculate something for us to return
int length = (activity.Text ?? string.Empty).Length;
// return our reply to the user
//test
if (activity.Text.Contains("technology"))
{
await context.PostAsync("Refer C# corner website for tecnology http://www.c-sharpcorner.com/");
}
else if (activity.Text.Contains("morning"))
{
await context.PostAsync("Hello !! Good Morning , Have a nice Day");
}
//test
else if (activity.Text.Contains("night"))
{
await context.PostAsync(" Good night and Sweetest Dreams with Bot Application ");
}
else if (activity.Text.Contains("date"))
{
await context.PostAsync(DateTime.Now.ToString());
}
else
{
await context.PostAsync($"You sent {activity.Text} which was {length} characters");
}
text.Wait(MessageReceivedAsync);
}

Install bot Emulator:

You will need to download and install the emulator for testing bot application .You can download bot emulator from https://docs.microsoft.com/en-us/bot-framework/debug-bots-emulator .

Run Bot Application:

The emulator is a desktop application that lets you test and debug your bot on localhost or remotely. Now, you can click on run the application in any browser

Test Application on Bot Emulator:

  • You can follow below steps for test bot application
  • Open Bot Emulator
  • Copy above localhost url and past it from emulator eg: http://localHost:3979
  • You can append the /api/message from above localhost url eg: http://localHost:3979/api/messages.
  • You won't need to specify Microsoft App ID and Microsoft App Password for localhost testing so click on Connect


Summary:

This article your learned about how to create Bot application using visual studio 2017.
If you have any questions/ feedback/ issues, please write in the comment box.

Introduction:

The Bot Framework enables you to build bots that support different types of interactions with users. You can design conversations in your bot to be freeform. Your bot can also have more guided interactions where it provides the user choices or actions. The conversation can use simple text strings or more complex rich cards that contain text, images, and action buttons. And you can add natural language interactions, which let your users interact with your bots in a natural and expressive way.

Bot Builder SDK introduced Form Flow, it will automatically generate the dialogs conversation based on your property and type that a specified on a class. Bot Dialog also its more powerful but handling a conversation like a registration, ordering, its required more effort to complete process using bot dialog.

In this article will help you to understand how to use Bot Form Flow and how you can use them to collect information from the users. We are creating sample Demo Bot for Bus booking bot.


Prerequisite:

I have explained about Bot framework Installation, deployment and implementation in the below article

Create New Bot Service:

Let’s create a new bot service application using Visual Studio 2017. Open Visual Studio > Select File on menu > Create New Project (Ctrl + Shift +N) > Select Bot application


The Bot application template was created with all the components and all required NuGet references installed in the solutions and add new class for BusFormFlow to the project.


In this Solution, we have two main class MessagesController.cs and BusFormFlow class. Let us start discussing here.

Create New FormFlow Class:

We can start create a class that represents our form and create properties for each field. Form fields can be one of the following types

Enum
List of Enum
Integral – sbyte, byte, short, ushort, int, uint, long, ulong
Floating point – float, double
String
DateTime
FormFlow will automatically validate type based on user input and reply the validation message.
Create a new enum field for Bus start from.
///
/// From City Enum
///

public enum FromCity
{
Bangalore,Chennai,Madurai,Trichy,Coimbatore,Tanjore,pudukkottai
}

The bot output look like below


Create a new enum field for Bus end point.

///
/// To City Enum
///

public enum ToCity
{
Bangalore, Chennai, Madurai, Trichy, Coimbatore, Tanjore, Pudukkottai
}

The bot output look like below 


Create a new enum for Bus type

///
/// Bus Type Enum
///

public enum BusType
{
AC, NonAC,Slepper, Siting
}

The output look like below


Create a new enum for gender

///
/// Gender
///

public enum Gender
{
Male,Female
}

The output look like below 


create a class for FormFlow with the [Serializable] attribute and create build Form method for show form flow

using Microsoft.Bot.Builder.FormFlow;
using Microsoft.Bot.Builder.Dialogs;
using System;

namespace FormFlowBot.FormFlow
{
[Serializable]

public class BusFormFlow
{

///
/// List of Form Flow
///

public FromCity? FromAddress;
public ToCity? ToAddress;
public DateTime? StartDate;
public BusType? BusTypes;
public Gender? SelectGender;
public string Name;
public int Age;
///
/// Build Form
///
///

public static IForm<BusFormFlow> BuildForm()
{
return new FormBuilder<BusFormFlow>()
.Message("Welcome to the BotChat Bus Booking !")
.OnCompletion(async (context, profileForm) =>
{
string message = "Your Bus booking Successfully Completed .You will get confirmation email and SMS .Thanks for using Chat Bot Bus Booking , Welcome Again !!! :)";
await context.PostAsync(message);
})
.Build();
}
}
}

Calling Form Flow :

The Messagescontroller class added in the solution and add the following MakeRootDialog from a Messagescontroller class

internal static IDialog<BusFormFlow> MakeRootDialog()
{
return Chain.From(() => FormDialog.FromForm(BusFormFlow.BuildForm));
}
Call MakeRootDialog from post method in MessagesController calss
///
/// POST: api/Messages
/// Receive a message from a user and reply to it
///

public async Task<HttpResponseMessage> Post([FromBody]Activity activity)
{
if (activity.Type == ActivityTypes.Message)
{
await Conversation.SendAsync(activity, MakeRootDialog);
}
else
{
HandleSystemMessage(activity);
}
var response = Request.CreateResponse(HttpStatusCode.OK);
return response;
}

Run Bot Application:

The emulator is a desktop application that lets we test and debug our bot on localhost. Now, you can click on "Run the application" in Visual studio and execute in the browser.


  • Test Application on Bot Emulator
  • You can follow the below steps for test your bot application.
  • Open Bot Emulator.
  • Copy the above localhost url and paste it in emulator e.g. - http://localHost:3979
  • You can append the /api/messages in the above url; e.g. - http://localHost:3979/api/messages.
  • You won't need to specify Microsoft App ID and Microsoft App Password for localhost testing, so click on "Connect".

Summary:

In this article, how to use FormFlow and how you can use them to collect information from the users. If you have any questions/ feedback/ issues, please write in the comment box.
Azure Functions is a solution for easily running small pieces of code in the cloud. We can create, execute, and test our custom logic function without creating a VM or web applications and also without needing to install any software or infrastructure to run the function. In this article, How to implement azure functions and directly called through HTTP from Xamarin Forms Application 


Create Azure Functions :

I have explained about different ways to create basic Azure Functions in my previous article, you can refer any of the below one article for creating new Azure functions.

Create New Xamarin Forms Client Application :

We need to create a new blank Xamarin.Forms application and add a new XAML page .You can refer to my previous article for setting up and creating new Xamarin.Forms application.

If you have already installed VS on your machine, open Visual Studio >> Create New Project ( Ctrl +Shift +N) >> Select Cross Platform Template >> Select Blank Xamarin Forms Application >> Provide Project name and Press OK

The Solution will be created with all the platform and PCL projects.

.

Design portable UI :

The UI will have a few elements on the screen. Entry Control for providing user input value and label for print output text .

<?xml version="1.0" encoding="utf-8" ?>
<ContentPage xmlns="http://xamarin.com/schemas/2014/forms"
xmlns:x="http://schemas.microsoft.com/winfx/2009/xaml"
x:Class="AzureFunctionsDemo.MainPage">
<StackLayout>
<!--Title text-->
<Label Text ="Building Serverless Mobile App with Azure Functions using Xamarin Forms" HorizontalOptions="Center" TextColor="Green" FontSize="30" />
<!--Provide Input Parameter to Azure Functions-->
<Entry TextColor="Green" x:Name="txtname" Placeholder =" Enter Your Name" />
<!--Click On Button For Communicate to Azure Functions-->
<Button Text="Connect to Azure Functions" Clicked="OnButtonClicked" />
<!--Activity Indicator will show progress of client and Azure connection and excution-->
<ActivityIndicator x:Name="waitindicator" IsVisible ="false"
Color="Black" />
<!--Output label-->
<Label x:Name="lblname" HorizontalOptions="Center" TextColor="Green" FontSize="30" />
</StackLayout>
</ContentPage>

Create Aure Functions Helper Class :

Its time to integrate Azure functions in to the Mobile Applciation ,now you can add Newtonsoft.JSON from portable project . Right Click on Portable Project > Manage Nuget Packages > Select Newtonsoft.Json from Browse tab > click on Install


Create Uri custom extension method for append the query string .

public static class Common
{
/// <summary>
/// BuildQueryString
/// </summary>
/// <param name="uri"></param>
/// <param name="parameters"></param>
/// <returns></returns>
public static Uri BuildQueryString(this Uri uri, Dictionary<string, string> parameters)
{
var stringBuilder = new StringBuilder();
string str = "?";
foreach (KeyValuePair<string, string> item in parameters)
{
stringBuilder.Append(str + item.Key + "=" + item.Value);
str = "&";
}
return new Uri(uri + stringBuilder.ToString());
}
}

We already created Get Azure Functions, before writing c# code, copy functions url of Azure portal and write HTTP get client method as per below. The HTTP Client will automatically include in the latest Dot net framework.

using Newtonsoft.Json;
using System;
using System.Collections.Generic;
using System.Linq;
using System.Net.Http;
using System.Text;
using System.Threading.Tasks;
namespace AzureFunctionsDemo
{
public class AzureFunctionHelper
{
// Remember to paste below your Azure Function url copied before in the Portal:
const string AZURE_FUNCTION_URL = "https://devenvexefunctiondemo.azurewebsites.net/api/HttpTriggerCSharp1";
// Remember to paste below your Azure Function Key copied before in the Portal:
const string AZURE_CODE = "fnNK7ncbR3QKAgMgXAaV1gnPMgaPaqUTH3mbv7gi9nM9zt7yJImeng==";

/// <summary>
///Get Azure Functions
/// </summary>
/// <typeparam name="T"></typeparam>
/// <param name="name"></param>
/// <returns></returns>

public async Task<object> GetAsync<T>(string value)
{
var httpClient = new HttpClient();
Dictionary<string, string> query = new Dictionary<string, string>();
query["code"] = AZURE_CODE;
query["name"] = value;
Uri uri = new Uri(AZURE_FUNCTION_URL).BuildQueryString(query);
var content = await httpClient.GetStringAsync(uri);
return JsonConvert.DeserializeObject(content);
}
}

Now you can start calling GetAsync method from MainPage.xaml.cs file

using System;
using Xamarin.Forms;
namespace AzureFunctionsDemo
{
public partial class MainPage : ContentPage
{
public MainPage()
{
InitializeComponent();
}
async void OnButtonClicked(object sender, EventArgs args)
{
//Show Wait indicator
waitindicator.IsVisible = true;
waitindicator.IsRunning = true;
//Calling Azure Function
AzureFunctionHelper oazurehelper = new AzureFunctionHelper();
var value = await oazurehelper.GetAsync<string>(txtname.Text);
//print azure fucntion return value
lblname.Text = value.ToString();
//Disable wait Indicator after loading output
waitindicator.IsVisible = false;
waitindicator.IsRunning = false;
}
}
}

We have completed all the code for consuming Azure Function from xamarin, we can select the platform and Press F5, the output look like below


Summary :

You have Learned from here ,how to create an Azure function without own server . Azure Functions were directly called through HTTP from Xamarin Forms Application .This article share for beginners , you should try different service in Azure Functions and implement in Xamarin Forms Application .

If you have any questions/ feedback/ issues, please write in the comment box.

Introduction:

Azure Functions is a solution for easily running small pieces of code in the cloud. We can create, execute, and test our custom logic function without creating a VM or web applications and also without needing to install any software or infrastructure to run the function.

In this article, you will learn about create, test, debug and deploy azure functions using Visual Studio 2017. Azure Functions tools are available as part of the Azure development workload in Visual Studio 2017 version 15.3, or a later version.


Prerequisites:

Download and Install Visual 2017 version 15.3 .

If you already Installed Visual Studio 2017, Update Visual Studio from Extensions and updates

Open Visual Studio 2017 > Tools > Extensions and Updates > Select product Updates under the Products category and select Visual studio update 15.3 preview 7.0 version and click on update


Step 1: 

Create Azure Functions Project in Visual Studio 2017

Open Visual Studio 2017 Preview 15.3 > Select File >click on New Project (Ctrl +Shift +N) > Select on Visual C# >Click on Cloud > select Azure Functions, type a Name for your project, and click on OK


Step 2: 

Create New Function
Azure Functions Solution will generate like below with host.json and locl.settings.json file .


In Solution Explorer, right-click on your Azure function project and select Add > New Item. Select Azure Function and click Add.


Select HttpTrigger as Azure Function type, select Functions for Access Rights, and click Create. The function created is accessed by an HTTP request from any client.


After click on Ok, will generates a new class with a Static Run method, that is attributed with [FunctionName] attribute. The [FunctionName] attribute indicates that the method is the entry for an Azure Function

using System.Linq;
using System.Net;
using System.Net.Http;
using System.Threading.Tasks;
using Microsoft.Azure.WebJobs;
using Microsoft.Azure.WebJobs.Extensions.Http;
using Microsoft.Azure.WebJobs.Host;

namespace DevEnv_AzureFunctionsDemo
{
public static class DemoFunctions
{
[FunctionName("DemoFunctions")]
public static async Task<HttpResponseMessage> Run([HttpTrigger(AuthorizationLevel.Function, "get", "post", Route = null)]HttpRequestMessage req, TraceWriter log)
{
log.Info("C# HTTP trigger function processed a request.");
// parse query parameter
string name = req.GetQueryNameValuePairs()
.FirstOrDefault(q => string.Compare(q.Key, "name", true) == 0)
.Value;
// Get request body
dynamic data = await req.Content.ReadAsAsync<object>();
// Set name to query string or body data
name = name ?? data?.name;
return name == null
? req.CreateResponse(HttpStatusCode.BadRequest, "Please pass a name on the query string or in the request body")
: req.CreateResponse(HttpStatusCode.OK, "Hello " + name + "Welcome C# Corner ");
}
}
}

Step 3:

 Azure Functions Test:

You can Press F5 for run, test and debug your azure function, if prompted, accept the request from Visual Studio to download and install Azure Functions Core (CLI) tools. You may also need to enable a firewall exception so that the tools can handle HTTP requests.

Copy the Azure function local deploy url on runtime output window


Append the name parameter to the query string. Use an actual name for the <Enter a name here> placeholder.
https://<Local Host url> /api/<Your Function Name>? name=<Enter a name here>
Paste the URL into your browser, and you should get a response similar to the following.


If you are Function locally working as expected means, you can initiate to publish the project to Azure.

Step 4:

 Publish Project to Azure:

If you don't have an Azure subscription, create a free account before start deploy azure function.

In Solution Explorer, right-click the project and select Publish. Choose Create New and then click on Publish.


If you haven't already connected Visual Studio to your Azure account, click Add an Account and Provide the login details and connect

In the Create App Service dialog, provide Hosting settings as specified below


Click Create to create a function app in Azure with these settings. After the provisioning is complete, make a note of the Site URL value, which is the address of your function app in Azure.
Copy the base URL of the function app from the Publish profile page. Replace the localhost:port of the URL you used when testing the function locally with the new base URL. As before, make sure to append the query string with &name=<yourname> to this URL and execute the request.

Download Source Code :


Related Article:


Summary:

In this article, you learned about Azure Functions and how to create, test, publish Azure Functions using visual studio 2017.

If you have any questions/ feedback/ issues, please write in the comment box.

Featured Post

Azure AI Service, Studio, ML & Foundry – Which One Do You Need?

If you have used Microsoft AI tools in the past, you might remember popular services like Cognitive Services and the Bot Framework. These to...

MSDEVBUILD - English Channel

MSDEVBUILD - Tamil Channel

Popular Posts