Introduction:

Visual Studio 2019 publicly available from April 2 2019 and it’s includes many improvements for Xamarin mobile developers in Visual Studio. Microsoft mainly focused on key areas to make more productive when authoring Xamarin apps, including optimizations to build and deployment times as well as improvements to UI authoring experiences.

Let we look today steps by step all the awesome Visual Studio 2019 Xamarin Developer. Visual Studio 2019 and Visual Studio 2019 for Mac are now available so you can start download and start use with awesome VS feature .


Lower disk impact

VS2019 release focuses on the fundamental’s stability and performance. Visual Studio 2017 required minimum 23 GB or more, but visual studio 2019 is now 3.28x smaller in the size, it’s Just 5GB to 7GB and you can do faster installation with lower disk impact, no need to wait very long time for installation.


Solutions creation

Visual studio team improved solutions creation time by up to 2x and solutions load time by 23% on real world profiled solutions.

Android SDK Update:

Managing Android SDKs can be very difficult, especially when working on complex solutions across teams. Some of them not aware, difference between target, compile, and minimum framework version, Visual studio 2017 tried for Android SDK auto update but manually enable from Tool options .

Visual Studio 2019 will automatically analyze our app while project load, determine if you have the necessary Android SDK configuration to build, and offer to install those components for you to resolve any configuration conflicts.


Faster Build and Deployment:

Visual studio 2019 improved Xamarin Build and Deployment, you can check your enterprise application build times are 26.6% faster than Visual studio 2017version and Deployment times are now twice as fast.


Shell Project template

Visual studio 2019 added Shell project template to the Xamairn Form. Shell provides 3 tiers of elements to our application and then gets out of your way to start populating the app with content and features.In Shell template you will get it following 

A simplified way to express the high level of your application architecture in a single file (AppShell.xaml)

A hierarchy of common UI navigation patterns that suite your target mobile platforms: flyout menu, bottoms tabs, top tabs 

A robust navigation service that provides URI-based routing so you can jump directly to any part of your application with ease 

An extensible template-based infrastructure to easily customize elements of your UI


Visual design experiences for iOS and Android

Visual Studio 2019 improved new IntelliSense experience for XAML with matching around the control and property names to ensure you receive the correct suggestion.

The XAML Previewer shows you how your Xamarin.Forms XAML page will look on iOS and Android. When you make changes to your XAML, you'll see them previewed immediately alongside your code. The XAML Previewer is available in Visual Studio and Visual Studio for Mac.

You can now edit common attributes for your Xamarin.Forms controls in the property panel for Visual Studio 2019 on Windows. Open the property panel by going to View → Properties Window. The property panel will show attributes for whatever control is currently in focus in your XAML file.


Summary

In this article, your learned What is new in Xamarin Development in Visual Studio 2019. If you have any questions/ feedback/ issues, please write in the comment box.

Introduction:

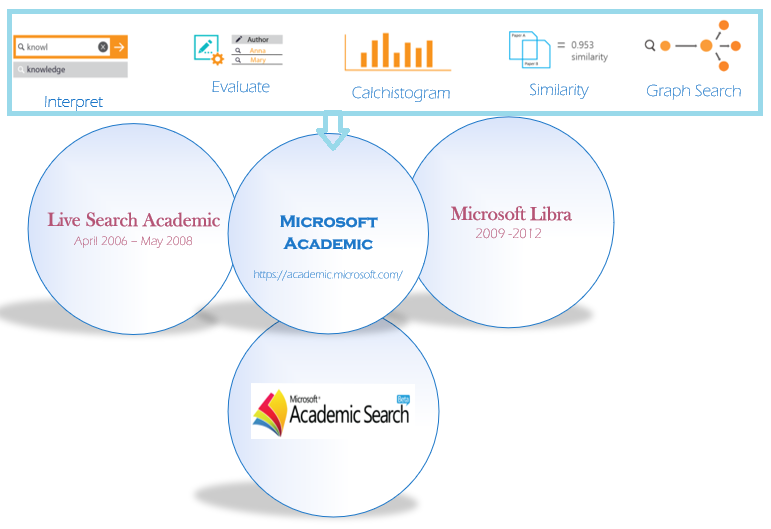
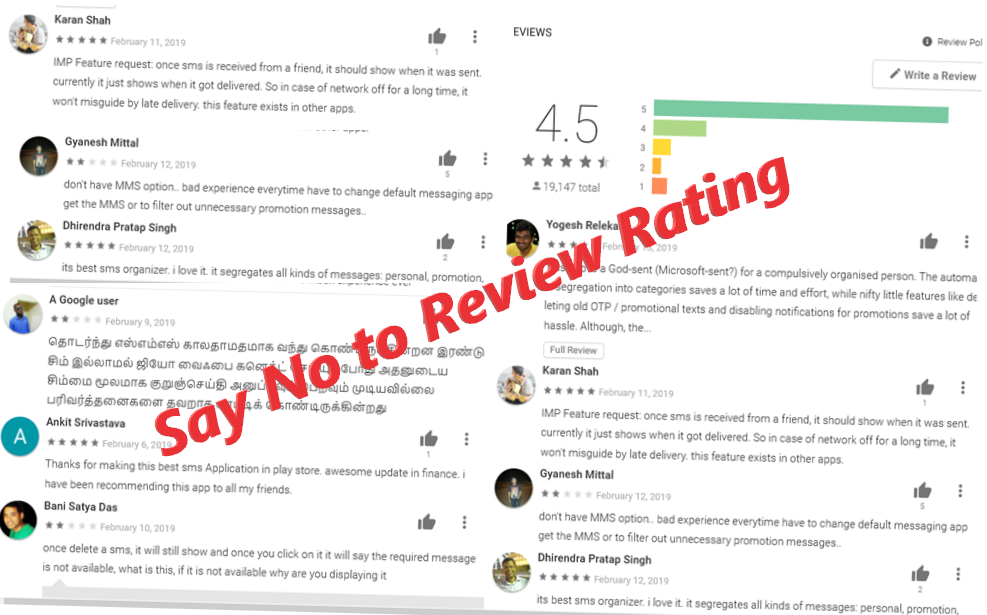
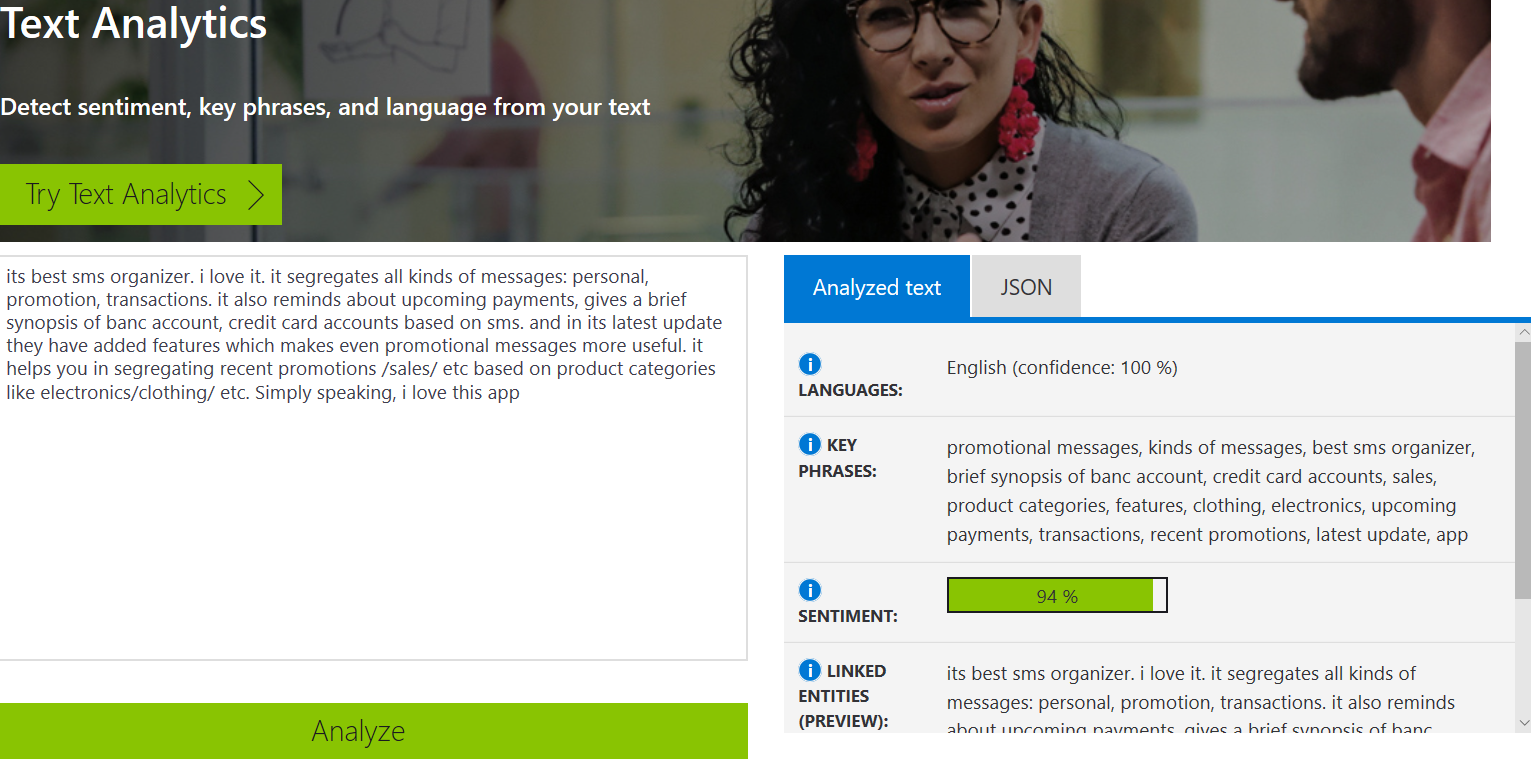
Sentiment analysis seeks to understand a subject’s attitude or emotional reaction towards a specific topic or brand. Sentiment analysis does not have to be complicated and technical. It could be something as simple as getting a person in your team to find what is being said about your brand and product on review page and identify how much of it is good and how much of isn’t. There is no need for a big budget and developer into complicated software, the cognitive service text Analytics API is a cloud-based service that provides advanced natural language processing over raw text, and includes four main functions: sentiment analysis, key phrase extraction, language detection, and entity linking.


The most of the companies and brands now use sentiment analysis to find out what people are saying about them on social media. A bad review on social media can destroy a brand’s reputation if ignored or poorly handled. They aren’t simply rating their experience with 1 star or 5 stars. They’re also expressing their thoughts, feeling, expectations in free form text. This can be challenging to handle, especially if your company is getting a lot of feedback. When you have tens or even hundreds of thousands of feedbacks to read and manage, its easy to use cognitive text analytics service API.

The Sentiment Analysis API evaluates text input and returns a sentiment score for each document, ranging from 0 (negative) to 1 (positive). This capability is useful for detecting positive and negative sentiment in social media, customer reviews, and discussion forums. Content is provided by you, models and training data are provided by the service.

Currently, Sentiment Analysis supports English, German, Spanish, and French. Other languages are in preview. In this article, I will show how we can integrate sentiment API from Xamarin Mobile application using visual studio 2019


Text Analytics API Price:

The Text Analytics API can be purchased in units of the S0-S4 tier at a fixed price. Each unit of a tier comes with included quantities of API transactions. If the user exceeds the included quantities, overages are charged at the rate specified in the pricing table below. These overages are prorated and the service is billed on a monthly basis. The included quantities in a tier are reset each month. In the S tier, the service is billed for only the amount of Text Records submitted to the service. You can read more about pricing based on country check out here.


Create Text Analytics API Key:

You need to create an Azure account, generate API key and end point URL based region for implementation to the Xamarin Mobile application.

Step 1: 

Create Free Azure subscription and Login to portal

Step 2: 

Create On “+ Create a resource “> Under Azure Marketplace, select AI + Machine learning and discover the list of available featured. > Select “Text Analytics”


Step 3: 

 On the create page, provide the name, pricing, resource group and click on Create.

Step 4:

Wait for a few seconds. After the Cognitive Services account is successfully deployed, click the notification or tile in the dashboard to view the account information. You can copy the Endpoint URL and Key in the Overview section for API calls in our Xamarin applications.


Build Xamarin Forms Application using Visual Studio 2019:

Let's start with creating a new Xamarin Forms Project using Visual Studio 2019. When accessing Visual Studio 2019 for the first time, you will come across a new interface for opening a creating the projects.

Open Run >> Type “Devenev.Exe” and enter >> Create New Project (Ctrl+Shift+N) or select open recent application.


The available templates will appear on a window like below. Select Xamarin Forms application with different mobile platform.


Provide project name, Location and solution name in the following configure new project screen


Select as Blank apps and select the platform


The Solution will be created with all the platform and PCL projects.


PCL UI Design:

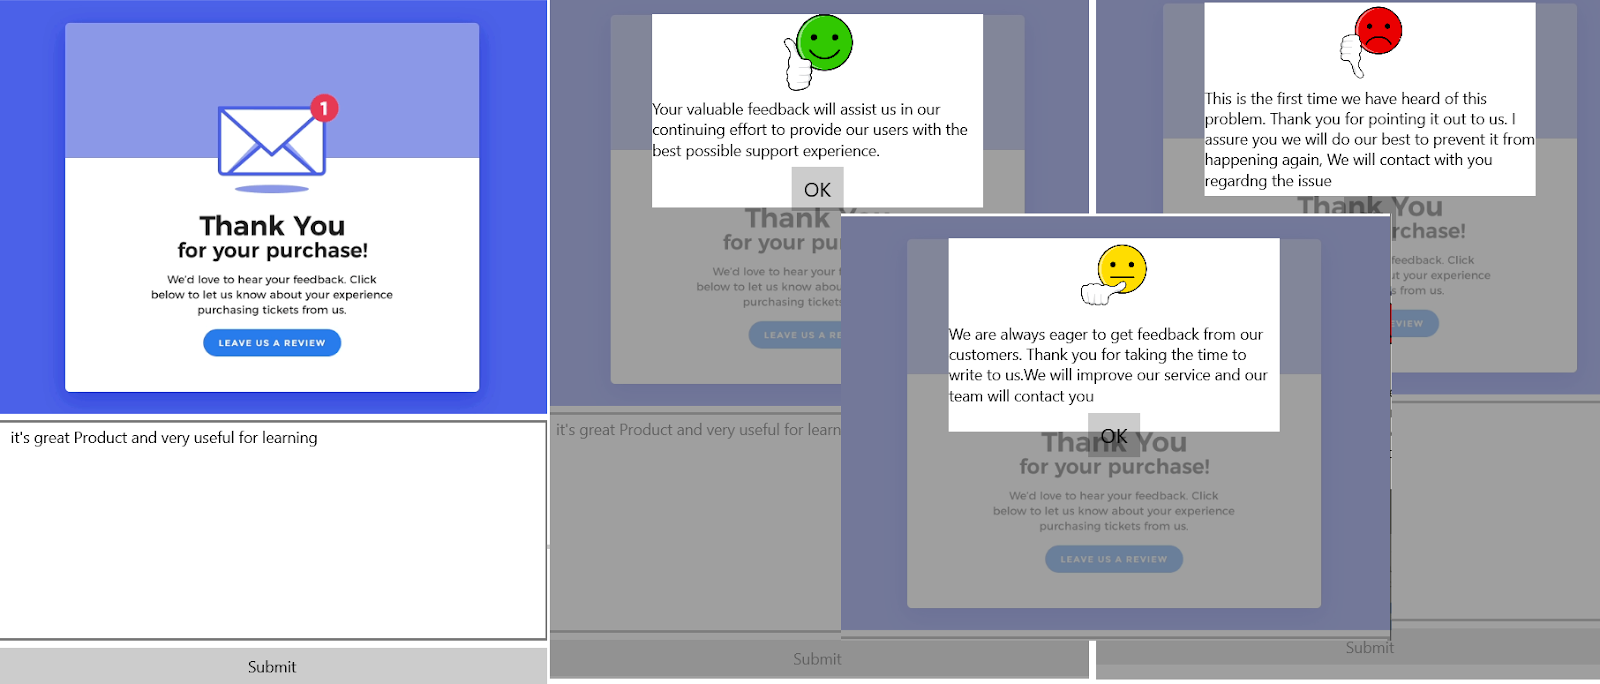
The UI will have a few elements on the screen and overlay content view window. Editor control for providing user input value and overlay window for show the result.

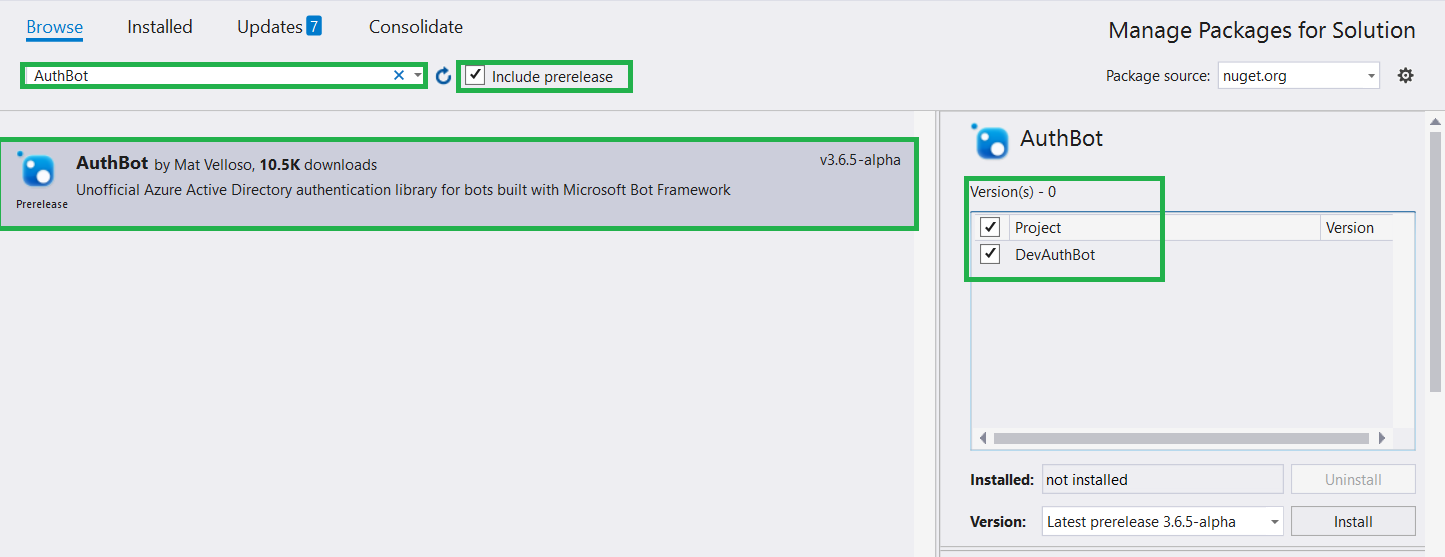
You can add Newtonsoft.JSON to solutions. Right click on Solutions > Manage NuGet Packages > select Newtonsoft.Json from Browse tab > click on Install.

<?xml version="1.0" encoding="utf-8" ?>
<ContentPage xmlns="http://xamarin.com/schemas/2014/forms"
xmlns:x="http://schemas.microsoft.com/winfx/2009/xaml"
xmlns:local="clr-namespace:MobileFeedback"
:Class="MobileFeedback.MainPage">
<ContentPage.Content>
<AbsoluteLayout>
<!-- Normal Page Content -->
<StackLayout AbsoluteLayout.LayoutBounds="0, 0, 1, 1"
AbsoluteLayout.LayoutFlags="All">
<Image Source="product.gif" VerticalOptions="Start" HorizontalOptions="Start" Margin="0,0,0,0" ></Image>
<Editor x:Name="txtfeedback" WidthRequest="100" HeightRequest="200"></Editor>
<Button Text="Submit" Clicked="Submit_Clicked"></Button>
</StackLayout>
<!-- Overlay -->
<ContentView x:Name="overlay"
AbsoluteLayout.LayoutBounds="0, 0, 1, 1"
AbsoluteLayout.LayoutFlags="All"
IsVisible="False"
BackgroundColor="#C0808080"
Padding="10, 0">
<StackLayout Orientation="Vertical"
BackgroundColor="White"
HeightRequest="175"
WidthRequest="300"
HorizontalOptions="Center"
VerticalOptions="Start"
Margin="0,20,0,0" >
<Image x:Name="imgstatus" WidthRequest="70" HeightRequest="70"></Image>
<Label Text="" x:Name="lblStatus"></Label>
<StackLayout Orientation="Horizontal" HorizontalOptions="Center">
<Button Text="OK" FontSize="Small"
VerticalOptions="CenterAndExpand"
HorizontalOptions="Center"
Clicked="OnOKButtonClicked" />
</StackLayout>
</StackLayout>
</ContentView>
</AbsoluteLayout>
</ContentPage.Content>
</ContentPage>

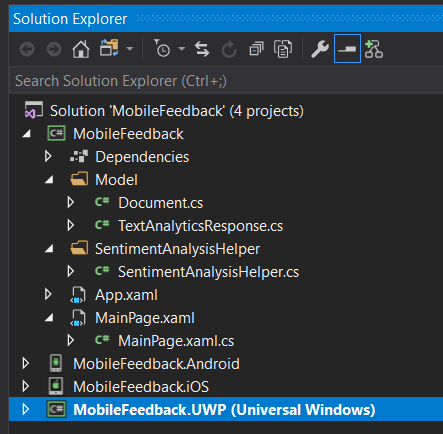
Create Document Entity Class:

Create class for Document class, it will deserialize the response and return an object of type TextAnalyticsResponse.The response format defined by the API looks like below document entity
using System;
using System.Collections.Generic;
using System.Text;
namespace MobileFeedback
{
class Document
{
public string Id { get; set; }
public double? Score { get; set; }
}
class TextAnalyticsResponse
{
public List<Document> Documents { get; set; }
}
}

Create SentimentAnalysisHelper Helper Class:

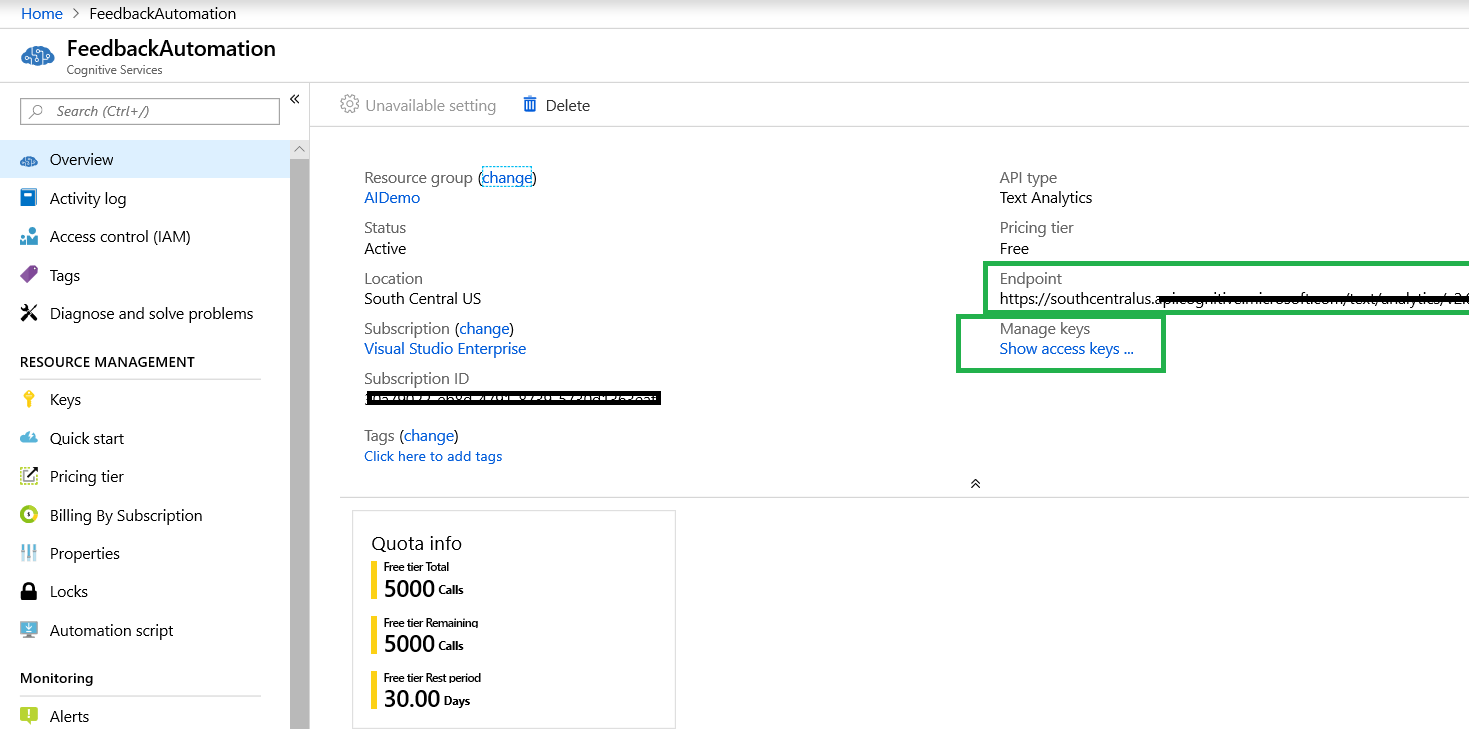
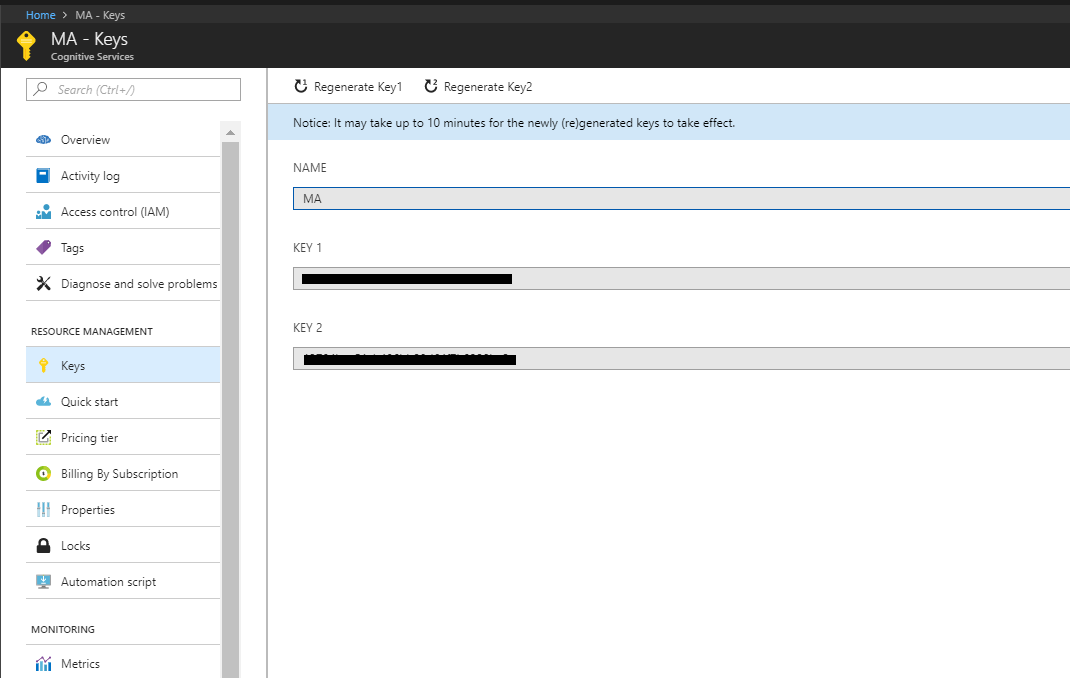
You can replace Text Analytics API service endpoint and subscription key. If you don't already have these go back to the previous steps. Below is the complete class you need to add. we have to appended /sentiment to the end of the ApiUri in order to invoke the sentiment operation.


using Newtonsoft.Json;
using System;
using System.Collections.Generic;
using System.Net.Http;
using System.Text;
namespace MobileFeedback
{
static class SentimentAnalysisHelper
{
private const string ApiUri = "<API url>”;
private const string SubscriptionKey = "<your Key>";
private const string Text = "The food was delicious and there were wonderful staff.";
private static readonly HttpClient Client = GetClient();
private static HttpClient GetClient()
{
var client = new HttpClient();
client.DefaultRequestHeaders.Add("Ocp-Apim-Subscription-Key", SubscriptionKey);
client.DefaultRequestHeaders.Add("ContentType", "application/json");
client.DefaultRequestHeaders.Add("Accept", "application/json");
return client;
}
private static TextAnalyticsResponse DeserializeTextAnalyticsResponse(string json)
{
return JsonConvert.DeserializeObject<TextAnalyticsResponse>(json);
}
public static TextAnalyticsResponse GetSentiment(string text)
{
var body = JsonConvert.SerializeObject(new
{
Documents = new object[]
{
new
{
Text = text,
Id = Guid.NewGuid()
}
}
});
using (var content = new ByteArrayContent(Encoding.UTF8.GetBytes(body)))
{
var responseMessage = Client.PostAsync(ApiUri, content).Result;
responseMessage.EnsureSuccessStatusCode();
var json = responseMessage.Content.ReadAsStringAsync().Result;
return DeserializeTextAnalyticsResponse(json);
}
}
}
}

You can add following to code behind in the design file. we'll add a method(GetSentiment) to call the Text Analytics API sentiment endpoint. It will deserialize the response and return an object of type TextAnalyticsResponse .The method will take a string text as input, create the request body, and then send it to the Text Analytics API using an HttpClient instance.
using System;
using System.Collections.Generic;
using System.Linq;
using System.Text;
using System.Threading.Tasks;
using Xamarin.Forms;
using System.Net.Http;
using System.Threading;
namespace MobileFeedback
{
public partial class MainPage : ContentPage
{
public MainPage()
{
InitializeComponent();
}
private void Submit_Clicked(object sender, EventArgs e)
{
TextAnalyticsResponse result = SentimentAnalysisHelper.GetSentiment(txtfeedback.Text);
double? score = result.Documents.FirstOrDefault().Score;
if(score < 0.5)
{
imgstatus.Source = "bad.png";
lblStatus.Text = "This is the first time we have heard of this problem. Thank you for pointing it out to us. I assure you we will do our best to prevent it from happening again, We will contact with you regardng the issue";
}
else if(score > 0.5 && score < 0.9)
{
imgstatus.Source = "okay.png";
lblStatus.Text = "We are always eager to get feedback from our customers. Thank you for taking the time to write to us.We will improve our service and our team will contact you";
}
else if(score> 0.9)
{
imgstatus.Source = "happy.png";
lblStatus.Text = "Your valuable feedback will assist us in our continuing effort to provide our users with the best possible support experience.";
}
overlay.IsVisible = true;
}
void OnOKButtonClicked(object sender, EventArgs args)
{
overlay.IsVisible = false;
}
void OnCancelButtonClicked(object sender, EventArgs args)
{
overlay.IsVisible = false;
}
}
}

We have completed the code for consuming TextAnalytics API. Now, we can select the platform and press F5. The output looks like below


Summary

In this article, you learned how to consuming TextAnalytics API and automate customer feedback without using rating. I hope this article will help you. Please leave your feedback/query using the comments box, if you like this article, please share it with your friends.

Introduction:

Visual Studio 2019 streamlines your experience so you can get right down to focused work. Microsoft announced Visual studio 2019 will launch on April 2, 2019 with many attractive features. Initially preview version not supported Bot template. Microsoft released update Bot Template with VS 2019 support on Feb 13, in this article, we will learn how to create a bot by using Visual Studio 2019 with Microsoft Bot Framework template, and will be testing it with the Bot Emulator version 4.2.1.


The Bot Framework enables you to build bots that support different types of interactions with users. You can design conversations in your bot to be free. Your bot can also have more guided interactions where it provides the users choices or actions. The conversation can use simple text strings or more complex rich cards that contain text, images, and action buttons. And, you can add natural language interactions, which let your users interact with your bots in a natural and expressive way.

Prerequisites:

Download Visual Studio 2019 Preview ++
Download the Bot Framework V4 Emulator for your platform from the GitHub releases page.

Create New Project:

Let's start with creating a new Bot application using Visual Studio 2019. Go to Windows >> Visual Studio 2019.


Before create a new project, Install the Bot Builder template from Tools >Extensions and Updates and search Bot Build V4 SDK > click on Install


Create new bot application project or open the recent project, as like below


Provide project name and location in the following screen and click on create


After click on create button, the solutions will create with Core, Empty and echo bot. You can select the required project version and select another project and delete


Empty Project :

A good template if you are familiar with Bot Framework v4, and simple want a basic skeleton project. Also a good option if you want to take sample code from the documentation and paste it into a minimal bot in order to learn.

Core Project :

Our most advanced template, the Core Bot template provides 6 core features every bot is likely to have. This template covers the core features of a Conversational-AI bot using LUIS. See the Core Bot Features table below for more details.

Echo Project :

A good template if you want a little more than "Hello World!", but not much more. This template handles the very basics of sending messages to a bot, and having the bot process the messages by repeating them back to the user. This template produces a bot that simply "echos" back to the user anything the user says to the bot.

Run the application:

Run the app by clicking on the IIS Express button in Visual Studio (with the green play icon).

Check the port that your web application, if it is not running on port 3978 you'll need to update the Bot configuration. In order to update this setting, go to Visual Studio Project and open the EchoBot.bot file. Update the endpoint setting to match the port that your app is using.


Edit OnTurnAsync method:

Open EchoBotBot.cs and add the required namespace and modify the OnTurnAsync method, replace the content of the else statement with the following code snippet

public async Task OnTurnAsync(ITurnContext turnContext, CancellationToken cancellationToken = default(CancellationToken))
{
// Handle Message activity type, which is the main activity type for shown within a conversational interface
// Message activities may contain text, speech, interactive cards, and binary or unknown attachments.
// see https://aka.ms/about-bot-activity-message to learn more about the message and other activity types
if (turnContext.Activity.Type == ActivityTypes.Message)
{
// Get the conversation state from the turn context.
var state = await _accessors.CounterState.GetAsync(turnContext, () => new CounterState());
// Bump the turn count for this conversation.
state.TurnCount++;
// Set the property using the accessor.
await _accessors.CounterState.SetAsync(turnContext, state);
// Save the new turn count into the conversation state.
await _accessors.ConversationState.SaveChangesAsync(turnContext);
// Echo back to the user whatever they typed.
var responseMessage = $"Turn {state.TurnCount}: You sent '{turnContext.Activity.Text}'\n";
await turnContext.SendActivityAsync(responseMessage);
}
else
{
await turnContext.SendActivityAsync($"{turnContext.Activity.Type} event detected");
}
}

Test Bot Applications:

Open the Bot Framework Emulator from the Start Menu and Click Open Bot and select the file EchoBot.bot from project. Previously we had to provide the bot endpoint to the emulator but now it can read all the configuration from a .bot file.


Summary

In this article, your learned how to create a Bot application using Visual Studio 2019. If you have any questions/ feedback/ issues, please write in the comment box.


Introduction:

Visual Studio 2019 streamlines your experience so you can get right down to focused work. Microsoft announced Visual studio 2019 will launch on April 2, 2019 with many attractive features. Initially preview version not supported Bot template. Microsoft released update Bot Template with VS 2019 support on Feb 13, in this article, we will learn how to create a bot by using Visual Studio 2019 with Microsoft Bot Framework template, and will be testing it with the Bot Emulator version 4.2.1.

The Bot Framework enables you to build bots that support different types of interactions with users. You can design conversations in your bot to be free. Your bot can also have more guided interactions where it provides the users choices or actions. The conversation can use simple text strings or more complex rich cards that contain text, images, and action buttons. And, you can add natural language interactions, which let your users interact with your bots in a natural and expressive way.

Prerequisites:

Download Visual Studio 2019 Preview ++
Download the Bot Framework V4 Emulator for your platform from the GitHub releases page.

Create New Project:

Let's start with creating a new Bot application using Visual Studio 2019. Go to Windows >> Visual Studio 2019.


Before create a new project, Install the Bot Builder template from Tools >Extensions and Updates and search Bot Build V4 SDK > click on Install


Create new bot application project or open the recent project, as like below


Provide project name and location in the following screen and click on create


After click on create button, the solutions will create with Core, Empty and echo bot. You can select the required project version and select another project and delete


Empty Project :

A good template if you are familiar with Bot Framework v4, and simple want a basic skeleton project. Also a good option if you want to take sample code from the documentation and paste it into a minimal bot in order to learn.

Core Project :

Our most advanced template, the Core Bot template provides 6 core features every bot is likely to have. This template covers the core features of a Conversational-AI bot using LUIS. See the Core Bot Features table below for more details.

Echo Project :

A good template if you want a little more than "Hello World!", but not much more. This template handles the very basics of sending messages to a bot, and having the bot process the messages by repeating them back to the user. This template produces a bot that simply "echos" back to the user anything the user says to the bot.

Run the application:

Run the app by clicking on the IIS Express button in Visual Studio (with the green play icon).

Check the port that your web application, if it is not running on port 3978 you'll need to update the Bot configuration. In order to update this setting, go to Visual Studio Project and open the EchoBot.bot file. Update the endpoint setting to match the port that your app is using.


Edit OnTurnAsync method:

Open EchoBotBot.cs and add the required namespace and modify the OnTurnAsync method, replace the content of the else statement with the following code snippet

public async Task OnTurnAsync(ITurnContext turnContext, CancellationToken cancellationToken = default(CancellationToken))
{
// Handle Message activity type, which is the main activity type for shown within a conversational interface
// Message activities may contain text, speech, interactive cards, and binary or unknown attachments.
// see https://aka.ms/about-bot-activity-message to learn more about the message and other activity types
if (turnContext.Activity.Type == ActivityTypes.Message)
{
// Get the conversation state from the turn context.
var state = await _accessors.CounterState.GetAsync(turnContext, () => new CounterState());
// Bump the turn count for this conversation.
state.TurnCount++;
// Set the property using the accessor.
await _accessors.CounterState.SetAsync(turnContext, state);
// Save the new turn count into the conversation state.
await _accessors.ConversationState.SaveChangesAsync(turnContext);
// Echo back to the user whatever they typed.
var responseMessage = $"Turn {state.TurnCount}: You sent '{turnContext.Activity.Text}'\n";
await turnContext.SendActivityAsync(responseMessage);
}
else
{
await turnContext.SendActivityAsync($"{turnContext.Activity.Type} event detected");
}
}

Test Bot Applications:

Open the Bot Framework Emulator from the Start Menu and Click Open Bot and select the file EchoBot.bot from project. Previously we had to provide the bot endpoint to the emulator but now it can read all the configuration from a .bot file.


Summary

In this article, your learned how to create a Bot application using Visual Studio 2019. If you have any questions/ feedback/ issues, please write in the comment box.


Introduction:

The Azure AD is the identity provider, responsible for verifying the identity of users and applications and providing security tokens upon successful authentication of those users and applications.in this article I have explained about create Azure AD authentication and integrate into bot application using AuthBot library.


The Bot show very simple dialog with openUrl button and this button launches the web browser for validate user credential and AD will response the message with authentication code, you can copy same code and reply back to the bot, bot will validation and response the welcome message.

You can follow below given steps one by one and you will get to see an interesting demo at end of article.

Azure AD App registration:

I will show the steps given below for the azure application creation, user creation and permission configuration. While implementing bot application, We need Client ID, tenant, return URL, so here I will show how to get all the configuration information from the steps given below.

Step 1: 

Login to Microsoft Azure portal and choose Azure Active Directory from the sidebar.

Step 2:

If you have not created AZURE Active directory, try to create new AD creation for tenant url or Select or add tenant url from Domain names sections


Step 3:

 Select Application Registration and Provide the details given below, name for the application , application type must be Web app/API, enter your application redirect URL and click on Create.


Step 4: 

We need to give the permission to access the application from Bot, so grand the permission. Select newly created Application > select Required Permission > Click Grand permission.

Step 5: 

create new user from users and groups sections (optional)

Step 6: 

Create client secret key from Application. Select Application > Select keys > add new / copy client secret key .


Step 4: 

You can copy tenant, client ID and Client Secret and you can follow below steps for create and implement AD authentication in Bot

Create New Bot Application:

Let's create a new bot application using Visual Studio 2017. Open Visual Studio > Select File > Create New Project (Ctrl + Shift +N) > Select Bot application.


The Bot application template gets created with all the components and all required NuGet references installed in the solutions.


Install AuthBot Nuget Package:

The AuthBot provide Azure Active Directory authentication library for implement Azure AD login in Bot.

Right click on Solution, select Manage NuGet Package for Solution > Search “ AuthBot” > select Project and install the package.


You can follow given below steps for integrate AD authentication

Step 1: 

Select Web.config file and add Mode,resourceID,Endpointurl ,Tenant,clientID,clientSecret and redirect url appsettings property and replace Azure AD details as per below
<appSettings>
<!-- update these with your BotId, Microsoft App Id and your Microsoft App Password-->
<add key="BotId" value="YourBotId" />
<add key="MicrosoftAppId" value="" />
<add key="MicrosoftAppPassword" value="" />
<!-- AAD Auth v1 settings -->
<add key="ActiveDirectory.Mode" value="v1" />
<add key="ActiveDirectory.ResourceId" value="https://graph.windows.net/" />
<add key="ActiveDirectory.EndpointUrl" value="https://login.microsoftonline.com" />
<add key="ActiveDirectory.Tenant" value="dxdemos.net" />
<add key="ActiveDirectory.ClientId" value="2d3b5788-05a5-486d-b2a4-2772a4511396" />
<add key="ActiveDirectory.ClientSecret" value="wU3oFBJ1gjWcB8Lo/fMaaCwg7ygg8Y9zBJlUq+0yBN0=" />
<add key="ActiveDirectory.RedirectUrl" value="http://localhost:3979/api/OAuthCallback" />
</appSettings>

Step 2: 

Select Global.asax.cs file and call all the bot app setting property and assign to AuthBot model class, like below
 
using System.Configuration;
using System.Web.Http;
namespace DevAuthBot
{
public class WebApiApplication : System.Web.HttpApplication
{
protected void Application_Start()
{
GlobalConfiguration.Configure(WebApiConfig.Register);
AuthBot.Models.AuthSettings.Mode = ConfigurationManager.AppSettings["ActiveDirectory.Mode"];
AuthBot.Models.AuthSettings.EndpointUrl = ConfigurationManager.AppSettings["ActiveDirectory.EndpointUrl"];
AuthBot.Models.AuthSettings.Tenant = ConfigurationManager.AppSettings["ActiveDirectory.Tenant"];
AuthBot.Models.AuthSettings.RedirectUrl = ConfigurationManager.AppSettings["ActiveDirectory.RedirectUrl"];
AuthBot.Models.AuthSettings.ClientId = ConfigurationManager.AppSettings["ActiveDirectory.ClientId"];
AuthBot.Models.AuthSettings.ClientSecret = ConfigurationManager.AppSettings["ActiveDirectory.ClientSecret"];
}
}
}

Step 3: 

You can create a new AzureADDialog class to show the default login and logout UI Design dialog. Rightclick on Project, select Add New Item, create a class that is marked with the [Serializable] attribute (so the dialog can be serialized to state), and implement the IDialog interface.
using AuthBot;
using AuthBot.Dialogs;
using Microsoft.Bot.Builder.Dialogs;
using Microsoft.Bot.Connector;
using System;
using System.Configuration;
using System.Threading;
using System.Threading.Tasks;
namespace DevAuthBot.Dialogs
{
[Serializable]
public class AzureADDialog : IDialog<string>
{

Step 4 :

IDialog interface has only StartAsync() method. StartAsync() is called when the dialog becomes active. The method passes the IDialogContext object, used to manage the conversation.

public async Task StartAsync(IDialogContext context)
{
context.Wait(MessageReceivedAsync);
}

Step 5: 

Create a MessageReceivedAsync method and write the following code for the login and logout default dialog and create a ResumeAfterAuth for after the user login, bot will reply the user name and email id details.
/// <summary>
/// Login and Logout
/// </summary>
/// <param name="context"></param>
/// <param name="item"></param>
/// <returns></returns>

public virtual async Task MessageReceivedAsync(IDialogContext context, IAwaitable<IMessageActivity> item)
{
var message = await item;
//endpoint v1
if (string.IsNullOrEmpty(await context.GetAccessToken(ConfigurationManager.AppSettings["ActiveDirectory.ResourceId"])))
{
//Navigate to website for Login
await context.Forward(new AzureAuthDialog(ConfigurationManager.AppSettings["ActiveDirectory.ResourceId"]), this.ResumeAfterAuth, message, CancellationToken.None);
}
else
{
//Logout
await context.Logout();
context.Wait(MessageReceivedAsync);
}
}
/// <summary>
/// ResumeAfterAuth
/// </summary>
/// <param name="context"></param>
/// <param name="result"></param>
/// <returns></returns>

private async Task ResumeAfterAuth(IDialogContext context, IAwaitable<string> result)
{
//AD resposnse message
var message = await result;
await context.PostAsync(message);
context.Wait(MessageReceivedAsync);
}

After the user enters the first message, our bot will reply and ask to login to the AD. Then, it waits for Authentication code and bot will reply the user details as a response like below.


Run Bot Application

The emulator is a desktop application that lets us test and debug our bot on localhost. Now, you can click on "Run the application" in Visual studio and execute in the browser


  • Test Application on Bot Emulator
  • You can follow the below steps to test your bot application.
  • Open Bot Emulator.
  • Copy the above localhost url and paste it in emulator e.g. - http://localHost:3979
  • You can append the /api/messages in the above url; e.g. - http://localHost:3979/api/messages.
  • You won't need to specify Microsoft App ID and Microsoft App Password for localhost testing, so click on "Connect".


Related Article:

I have explained about Bot framework Installation, deployment and implementation in the below article

Summary

In this article, you learned how to create a Bot Azure AD login authentication and Logout using AuthBot. If you have any questions/feedback/ issues, please write in the comment box.


Introduction:

Microsoft Academic is a free public search engine for academic publications and literature developed by Microsoft Research. In this library have 375 million entities ,170 million of academic papers. You can now create an account, log in, and create a public profile by claiming the publications you have authored. Claiming your publications will help improve search accuracy, and will showcase your work to the world.

The service replaces the earlier Microsoft research project, Live search academic, libra and Microsoft Academic search.


The Academic Knowledge API offers information retrieval from the underlying database using REST service endpoints for advanced research purposes.

Integrating Microsoft Academic knowledge(MAK) API into different application, we need to create to subscription id. In this article, I will show, how to generate MAK API key in azure.

Setup Academic Knowledge API:

You can follow the below steps for creating an Academic knowledge API account in the Azure Portal.

Step 1

Sign in to the Azure portal.

Step 2

Click + NEW and select / Search “Academic knowledge API” and read about the API and click on "Create".


Step 3:

Provide the API name, pricing, location, resource group and click on create.


Name - Microsoft recommends a descriptive name for API, for example - <common name><APIName>Account.

Subscription - Select the available Azure subscriptions.
Location - Select the service locations.
Pricing tier - You can choose your pricing tier. F0 is free service and S0 is paid service. Based on your usage, you can choose the pricing tier
Select the Resource group > confirm the Microsoft notice and click on "Create" again for creating the account.

Step 4:

Wait for few seconds, and you will get notification after completion. If Cognitive Services account is successfully deployed, click the notification to view the account information. You can see and copy the Endpoint URL in the Overview section.


Step 5:

You can also copy keys in the Keys section to start making API calls in your Xamarin or other applications.


Summary

In this article, you learned about how to Create a Microsoft Academic Knowledge Cognitive Services APIs account in the Azure Portal. If you have any questions/ feedback/ issues, please write in the comment box.

Featured Post

AI Evolution Explained: GenAI vs LLMs vs AI Agents vs Agentic AI vs Intelligent AI

Artificial Intelligence (AI) is one of the most exciting technologies in our world today. But the terms that come with it like GenAI, LLMs, ...

MSDEVBUILD - English Channel

MSDEVBUILD - Tamil Channel

Popular Posts