Microsoft is hosting its Future Decoded summit in Mumbai and Bengaluru on February 24 and 25, 2020 respectively, and Microsoft CEO Satya Nadella will keynote the event.

On 25 February 2020 Microsoft CEO Satya Nadella will deliver the keynote at Future Decoded, Tech Summit and share his vision for the future of technology and how Indian organizations can lead in an era of digital transformation. The keynote will be live streamed, and we invite you to participate by viewing it online. To receive the viewing link- Click here


Register to listen to Microsoft CEO Satya Nadella at Future Decoded 2020


Future Decoded Bengaluru Tech Summit - Offline View 

Did you catch Future Decoded Bengaluru Tech Summit live? If you missed it, do not fret.Let play here. #FutureDecoded


The Bot Framework Composer is a fantastic tool for creating/developing Microsoft bots, as it gives you the ability to sketch out and compose the whole simple and complex Bot applications within a visual interface instead of writing actual code. Composer to create the bot solution’s code and run it immediately to test it in the emulator and deploy it to Azure using the CLI. Bot developers should check out the Composer awesome tool, as this will make your Bot development even easier in terms of building smart and engaging bots with ease.

A conversation between a bot and a user often involves asking the user, for information and parsing the user's response. Bot should track the context of a conversation, so that it can manage the behavior and remember answers to previous questions. Bot Framework composer has provided different question format, in this article we are going to see how we can use the Text, Number and Datetime input from users and How we can retrieve state information from Bot state.


Prerequisites

  • Read my previous article to build and setup the bot framework Composer development environment.
  • Read, How to create Multiple Dynamic Greeting message using Bot Framework ComposerCreate New Bot Application
On the Bot Framework Composer homepage, click on New. Select Create from scratch. Click on Next. Give your bot a name. Once created, you should be able to see the following screen


Asking Questions to user

Bot Framework Composer makes it easier to collect information to the user and composer provided feature for validation and a variety of data types as follows
  1. Text Input
  2. Number Input
  3. Confirmation
  4. Multiple Choice
  5. File or attachment
  6. Date or time
  7. OAuth Login


In this article, You are going to learn more about Text, Number and Date/Time Input format and how bot can ask questions to the users. 

Composer Input Control Property – Bot Ask

  • Ask question Input dialog has 3 category options - Bot Asks, User Input and other.
  • Prompt Property -Create your custom message for Bot will send a message to the user .
  • Max turn Count – Maximum number of re- prompt attempts to collect information from user
  • Default Value - Expression to examine on each turn of the conversation as possible value to the property.
  • Allow interruptions - A boolean expression that determines whether the parent should be allowed to interrupt the input.


User Input

User Input tab options have “Property to Fill”. It’s a Property to store collected information. Input will be skipped if the property has value (unless 'Always prompt' is true). Example(user.name), user.name property can access anywhere you want to display or store. While displaying you need to use @{user.name} format.


Bot Text Input Question

The Greeting conversation activity screen, you can click on the “+” button and select the Ask question options and click on Text input .

Step 1: Add “Bot Asks” prompt of text in the text box, which you Bot required to ask questions to the user and the type of value will allow only as text .

Step 2: If you want to save user input and display somewhere else or store into the database, you can select “user Input” section and add the variable property as - user.name.

Bot Number Input Format

Bot can ask users to enter any number value using number input. To prompt a user for a number, click the + button in your screen, mouse over Ask a Question and Select the Number input.
In this following example 
  • Bot asking users to enter the no of years’ experience and provided max turn count as 1 and provided default value as 2.
  • Suppose users enter any text or any invalid character at one time, Bot will take as default value as 2.
  • In user Input options Bot will save the value “user.exp” property, it will be helpful for retrive somewhere else.


Bot Date Time Input Format

Bot Date Time Input format control which is returned as a Timex.
  • You can add the “Bot Ask” question to the Prompt text box
  • Create Property for store the datetime value, here property as “user.date”.
  • after asking for a date, the bot returns a Timex into “user.date” like below
[{

"value": "2020-02-01",

"timex": "2020-02-01"

}]

Because it's a json array with one item. So you can access the components like user.date[0].timex (or) user.date[0].value

Confirmation Message

We have asked 3 different questions to the user; now let us show confirmation message to the user with whichever user responded to the bot. You can compose messages like below 


Hello @{user.name} , You have @{user.exp} years’ experience and please join our company on @{user.date[0].value}


Test Bot Application

Next, click on “Test in Emulator” after that browser will ask you permission to open the bot emulator, once you confirmed the message, Bot emulator will open and automatically navigate to your Bot service. You can start responding to the message to the bot.

Summary

You have successfully created and run the “Ask Question bot” using Bot framework composer. I hope you have enjoyed learning. If you have any questions/feedback/issues, please write them in the comment box.
The Bot Application runs inside an application in different channel like Cortana, Skype, web chat, Facebook, Message, etc. Users can interact with bots by sending them messages, commands, and inline requests. Microsoft has announced Line App new channel added into the Azure portal.

LINE is a new communication app which allows you to make FREE voice calls and send FREE messages whenever and wherever you are. Line is available in different device iPhone, Android, Windows Phone, BlackBerry, and Nokia and even your PC and LINE is a popular messaging app with hundreds of millions of users in India, Japan, Taiwan, Thailand, Indonesia, and other countries. You can follow the below steps for Create FAQ Bot and enable your bot in the Line new channel.


Create FAQ Bot Application

You can refer to my previews article to create and build a Xamarin FAQ Bot using Azure Bot Service and deploy it into Azure. I am not using any coding for developing the Bot Application, you can follow the provided steps in the article to create and deploy FAQ Bot.

Microsoft Bot Application deploy to Line App using Azure Bot


Line Developer Portal 

We can implement a Bot Application to the Line apps. You can create a Line developer account or select an existing provider name. Create a new Line Developer App on the Page and generate an Channel Secret and Channel access token for integrating the Bot to the Line ap. You can start login or create account in the following screen.
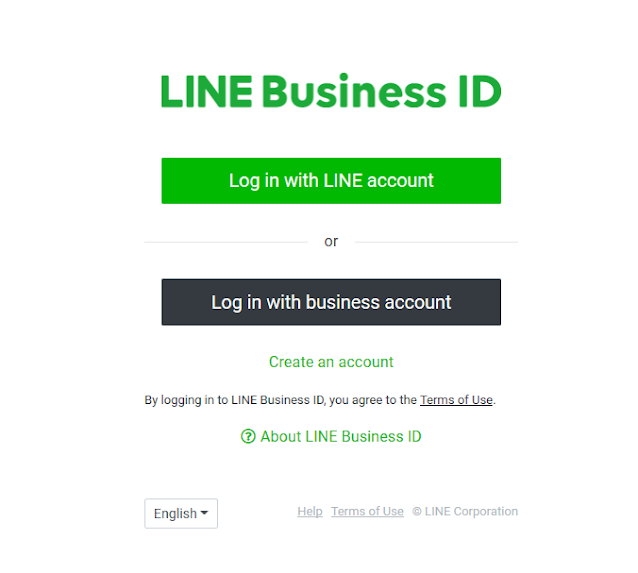
Microsoft Bot Application deploy to Line App using Azure Bot

Create Provider

After login, start creating a provider name for your bot or if you already have the provider, select the provider name and do the setup. The provider name is individual owner or company, it’s not app name. Next Click on confirm, if you want change in the future, edit options always enable. Microsoft Bot Application deploy to Line App using Azure Bot
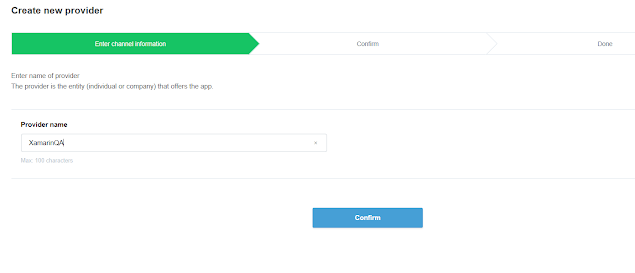
Line Messaging API channel 

Create a new Line App on the developer portal and generate a Channel Secret and Channel access token integrating the Bot to the page messenger. You can click on “Message API Create Channel” from the following screen.
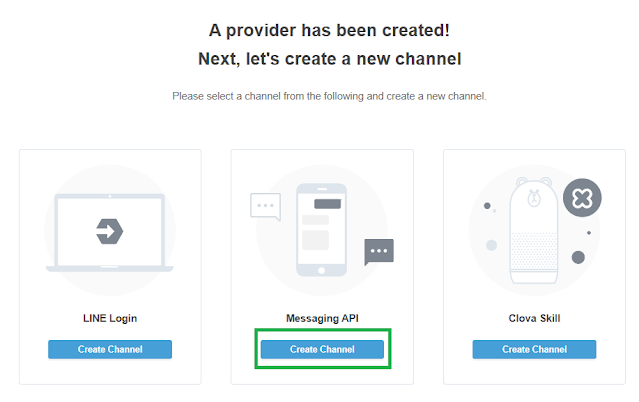
Microsoft Bot Application deploy to Line App using Azure Bot


Create New Channel 

The following creates new channel screen provide valid your app icon.
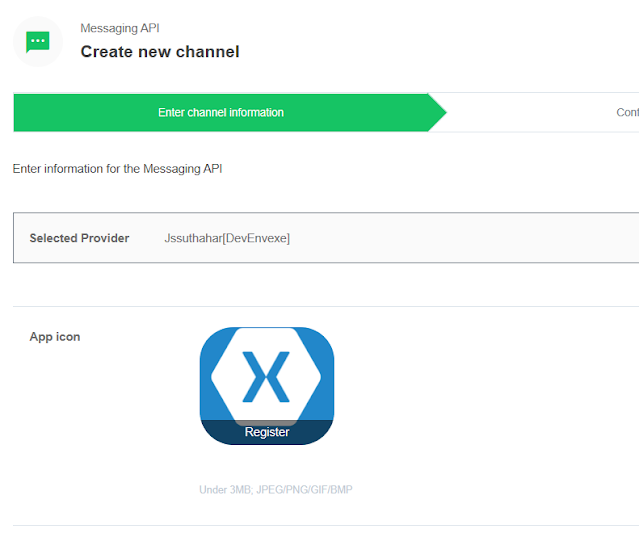
Microsoft Bot Application deploy to Line App using Azure Bot
You can Fill out the required fields and confirm your channel settings. You can find the two developer options is available.

Developer trial - A trial plan which lets you create a bot that can send push messages and have up to 50 friends.

Free - A plan which lets you create a bot with an unlimited number of friends.The Push message cannot be sent with this plan.
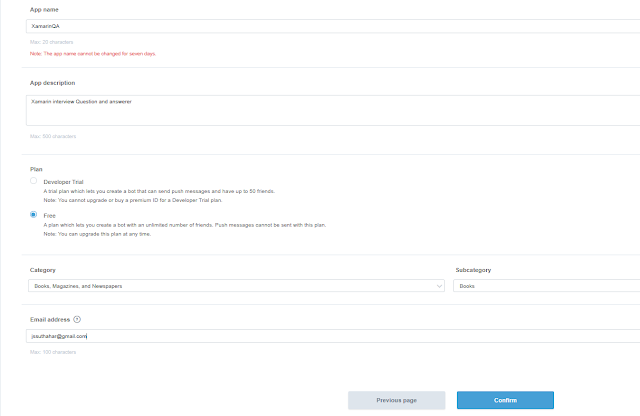
Microsoft Bot Application deploy to Line App using Azure Bot

Once you've confirmed your channel settings, you'll be navigating to a following screen, which list all the apps.

Microsoft Bot Application deploy to Line App using Azure BotClick on the channel you created to access your channel settings, and scroll down to find the Basic information > Channel secret.

You can Save following somewhere for a moment for update in to Azure portal.

Channel Secret – Copy the secret code, if not available, click on Issue

Channel access Token - Scroll further to Messaging settings. There, you will see a Channel access token field, with a click on issue button forget your access token. 

Webhook URL - Webhook URL copy from Azure Portal and Update in the Line app developer portal
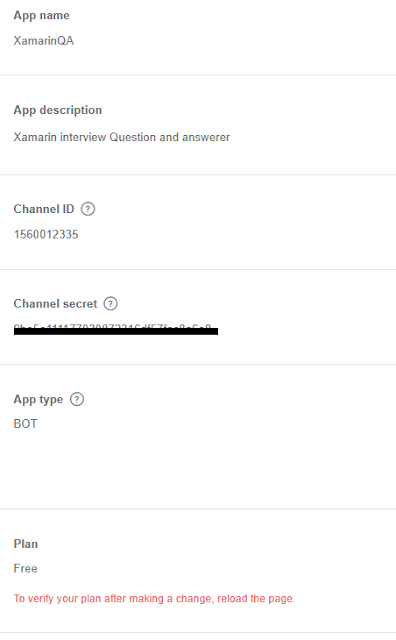
Microsoft Bot Application deploy to Line App using Azure Bot

Connect New LINE Channel 

Login to Azure portal > Select the “All Resources” > Select your Bot Application > Select Channels property > Find and Select New Line icon. Let us start to configure the “Line “Channel and follow the below steps, at the end of this article you will be able to deploy the Bot into the Line apps.
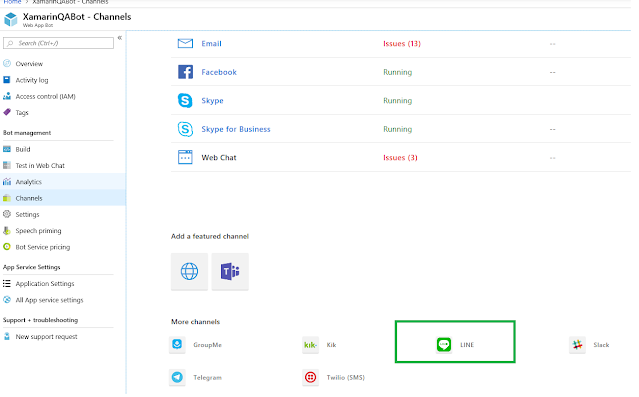
Microsoft Bot Application deploy to Line App using Azure Bot


The Azure Line configuration channel will generate the following Webhook URL and past/update the channel secret and access token and click Save button. You can copy following custom webhook URL and Return to the Line Developer portal and update the webhook URL
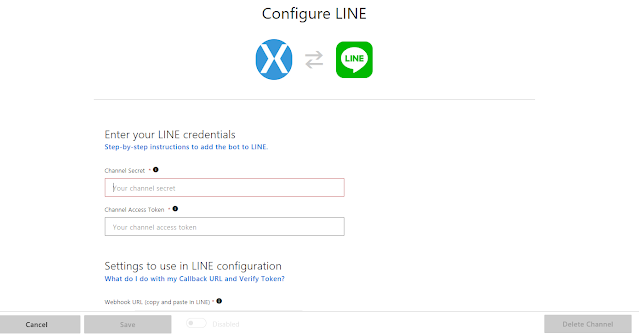
Microsoft Bot Application deploy to Line App using Azure Bot

Test Your Bot 

Once you have completed all the above steps, your bot will be successfully configured to communicate with users on LINE and is ready to test.

LINE developer console - Navigate to the settings page and you will see, a QR code of your bot.

Mobile LINE app - go to the right most navigation tab with three dots [...] and tap on the QR code icon.

Microsoft Bot Application deploy to Line App using Azure Bot

Live Demo 

Xamarin Developer Interview questions and answers Bot is ready to use in Line app. Xamarin FAQ Bot will be ready with 7000+ more Xamarin QnA’s. Now you can start open your Line App and > click on three dot line > Scan the following QR Code to add Xamarin QA bot as a friend. 
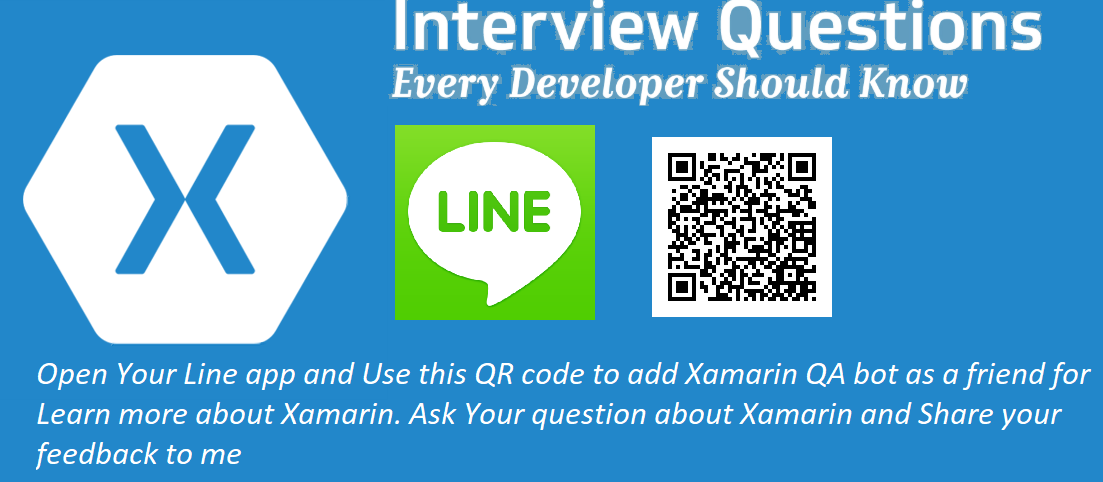
Microsoft Bot Application deploy to Line App using Azure Bot

Summary 

In this article, you have learned how to integrate a bot application into Line App via Azure Microsoft AI. In case your bot is not responding to any of your messages at all, navigate to your bot in Azure portal, and choose Test in Web Chat. If you have any questions/ feedback/ issues, please write in the comment box.
The Bot Framework Composer is a fantastic tool for creating/developing Microsoft bots, as it gives you the ability to sketch out and compose the whole simple and complex Bot applications within a visual interface instead of writing actual code. Composer to create the bot solution’s code and run it immediately to test it in the emulator and deploy it to Azure using the CLI. Bot developers should check out Composer awesome tool, as this will make your Bot development even easier in terms of building smart and engaging bots with ease. Read my previous article to build and setup the bot framework Composer development environment.

The primary goal when creating any bot is to engage your user in a meaningful conversation. One of the best ways to achieve this goal is to ensure that from the moment a user first connects, they understand your bot’s main purpose and capabilities, the reason your bot was created. In this article you will learn more about How you create initial and create greeting messages using bot framework composer.

Send welcome message to users using Bot Framework Composer

Create New Bot Application

In Bot Framework Composer Editor provide different feature for Create a new bot project, You can choice
  1. Create new bot Project from scratch
  2. List of Bot Template
  3. Select very Recent Project
  4. Collection of Recent Project 
Bot Project template contains all the code that's necessary to create the bot, you won't actually need to write any additional code for simple startup. Let we select to create a new bot from scratch with a composer.

Send welcome message to users using Bot Framework Composer

Provide Bot name, Location and description for create Bot application

Send welcome message to users using Bot Framework Composer

Bot Framework Composer Editor 

Step 1: On the right-hand side of the page, select “Greeting”.

Step 2:
Click on “+” Icon and select “Send a response”.

Step 3: Provide a message “what your bot will say for greeting “.

Step 4: Message always starts with “-“.

Response message includes one or more variations of text that must be used for composition and expansion. One of the variations provided will be picked at random. Here is an example of a simple template that includes 2 variations.

Bot Framework Composer Editor

Build Bot Application 

We have added a Greeting message and started building the bot application using the StartBot /Restart Bot button. After building success, you can click on “Test in Emulator “. 

Build Bot Application

Test in Bot Emulator 


Next, Click on “Test in Emulator” after that browser will ask you permission to open the bot emulator, once you confirmed the message, Bot emulator will open and automatically navigate to your Bot service. You can start clicking on “restart conversation”, the welcome message will display randomly.
Send welcome message to users using Bot Framework Composer


Summary 

You have successfully created and run the first bot with a greeting message using Bot framework composer. I hope you have enjoyed learning. If you have any questions/feedback/issues, please write them in the comment box.
You weren't able to attend the Microsoft Ignite or any of the world tour events. Microsoft Shared AI presentations, demo, Video, learning paths and more as a full github repo. It's amazing content that gets started by Microsoft .


Offline Ignite Learning Paths - Developers Guide to Microsoft AI, Machine Learning, DevOps to Data Science


Microsoft Legal Notices Notice saying, The content of this repository is available for you so you can reproduce any demo or learn how to present any session of the Learning Path presented at Microsoft Ignite and during the Microsoft Ignite The Tour, in your local field office, a community user group, or even as a lunch-and-learn event for your company.


Offline Ignite Learning Paths - Developers Guide to Microsoft AI, Machine Learning, DevOps to Data Science
Bot Framework Composer is a fantastic tool for creating/developing Microsoft bots, as it gives you the ability to sketch out and compose the whole simple and complex Bot applications within a visual interface instead of writing actual code. Composer to create the bot solution’s code and run it immediately to test it in the emulator and deploy it to Azure using the CLI. Bot developers should definitely check out this really awesome tool as this will be making your Bot development even easier in terms of building smart and engaging bots with ease. You want to learn more, just read this article for understanding and setup Bot Framework composer.

Bot Framework Composer: Setup and Build a bot

Setup Bot Framework Composer 

The Microsoft Bot Framework Composer is a Microsoft open source GitHub project, you can clone the source code and start contributing to the development as well. It’s a web-based application, you can download and run the web application in a local machine.Bot Framework Composer: Setup and Build a bot

Run Bot Composer web application

You can wait some time for cloning the source code, after cloning the repo open a command prompt and navigate to the Bot Framework Composer folder and run the following commands to start the web application.

Step 1: Build and Run the Composer application yarn software is required. Yarn is a package manager for code. It allows you to use and share code with other developers from around the world.
Bot Framework Composer: Setup and Build a bot
Step 2: Node JS is required for setup the application, download and install the Node JS application.

Bot Framework Composer

Step 3: Build and test application required Dot net core SDK, Install Dotnet core 2.2++

Bot Framework Composer: Setup and Build a bot


Step 4: Download and install Bot emulator for test the application
Bot Framework Composer
Step 5: You can successfully install and all required software, let us start build and test the composer. Open Command prompt and switch to “Composer” folder using cd <folder path>/Composer

learn Bot Framework Composer


Step 6: Install all the dependencies using “yarn install “ in command prompt

learn Bot Framework Composer

Step 7: creating and optimized production build extensions and library using “yarn build “ in command prompt.

learn Bot Framework Composer


Step 8: Start the client and server using “yarn startall” in command prompt.

learn Bot Framework Composer

Step 9: Bot framework Composer hosted successfully, open a browser and navigate to the address(http://localhost:3000) after the message composer runs successfully.

learn Bot Framework Composer


Create New Bot Composer Project

 You can create a new project or Microsoft provided example template with best practices and supporting components. Let us continue and select an existing composer template for demo. learn Bot Framework Composer
Step 1: Click on New or Select Example template and provide the Solutions Location, name and project description and start doing the Visual design.

learn Bot Framework Composer

Step 2: Start look, the visual design and no need to design for now and next article will explain very detail to How to manage and design and modify visual design

learn Bot Framework Composer


Step 3: Click on “Start Bot”, it will take some time to build the solutions

learn Bot Framework Composer

Step 4: You're now ready to start and test your bot. You will then see the Test in Emulator button show up. Click Test in Emulator and Bot Framework Emulator should start.

Bot Framework Composer: Setup and Build a bot

learn Bot Framework Composer


Debug Bot Framework Composer Build issue 


You can easily resolve your build problem, if you are getting error “You intended to execute a .NET Core program, but dotnet-bin/Debug/netcoreapp2.1/BotProject.dll does not exist. * You intended to run a global tool, but a dotnet-prefixed executable with this name could not be found on the PATH.”, the output solution not able to compile.

Go the location of your generated bot (The one you set when creating a new bot, defaults to User Documents > Composer). 

Open command prompt “Run dotnet” build in your bot directory and see the errors.
If you have a visual studio, you can ignore step 2 and Open your project in Visual Studio.
The issue may be ranges of sources for the build not to run. Wrongly configured Nuget sources, misaligned package version, just check and resolve yourself.
Once the build succeeds, launching the bot via Composer again.
You intended to execute a .NET Core program, but dotnet-bin/Debug/netcoreapp2.1/BotProject.dll does not exist

Summary 

You have successfully done the setup and build a bot application in Bot framework composer. I hope you have enjoyed learning. If you have any questions/feedback/issues, please write them in the comment box.

Featured Post

Improving C# Performance by Using AsSpan and Avoiding Substring

During development and everyday use, Substring is often the go-to choice for string manipulation. However, there are cases where Substring c...

MSDEVBUILD - English Channel

MSDEVBUILD - Tamil Channel

Popular Posts