As a Mobile Developer, when we start a new project, we always search and speak about application architecture. One of the most common choices in Xamarin
.Forms is MVVM, this is due to the small amount of work to implement it, if we use
ReactiveUI, we can additionally write applications in a reactive manner. It’s a time to check reactive UI how we can implement in
Xamairn Forms project.
Reactive Extensions have been around for many years, and is available to most development environments. In this post, we are specifically going to look at Rx in terms of .NET development in Xamarin Forms.
Rx is just a library for composing asynchronous, and event-based code with
observables, and configuring it via LINQ. You can use LINQ to define criteria of when you want to perform an action,
on the event. Rx can do more, but we will only look at the very basics in this post.
ReactiveUI allows you to combine the MVVM pattern with Reactive Programming using such features, as WhenAnyValue, ReactiveCommand, ObservableAsPropertyHelper, Binding and
WhenActivated.

Create New Xamarin.Forms Application
In order to learn the ReactiveUI, let’s start creating a new Xamarin
.Forms project using Visual Studio 2019 or VS for Mac. When using Visual Studio 2019 on a Windows machine, you will need to pair the
mac machine
for run and build the iOS platform.
Open Visual Studio 2019 >>Create a New Project or select "Open Recent Application" and the available templates will appear on a Windows like below. Select Xamarin
.Form app and click on “Next”

ReactiveUI Nuget Package
To implement
ReactiveUI in our applications we will need to install the library.
Step 1: Right click on
Project and Click on Manage NuGet Packages for Solution option.
Step 2: Search for “
ReactiveUI.XamForms”.
Step 3: Install it for all of our projects with each platform.

Create ViewModel
ReactiveUI syntax for read-write properties
is to notify Observers that a property has changed.
Otherwise we would not be able to know when it was changed.
In cases when we don't need to provide for two-way binding between the View and the ViewModel, we can use one of many ReactiveUI Helpers, to notify Observers of a changing read-only value in the ViewModel.
RaiseAndSetIfChanged fully implements a Setter for a read-write property on a ReactiveObject, using CallerMemberName to raise the notification and the ref to the backing field to set the property.
ReactiveCommand is a Reactive Extensions and asynchronous aware implementation of the ICommand interface. ICommand is often used in the MVVM design pattern to allow the View to trigger business logic defined in the ViewModel
Let
we create following property and command in the following ViewModel
using System;
using System.Threading.Tasks;
using ReactiveUI;
using System.Reactive;
using System.Text.RegularExpressions;
using System.Collections.Generic;
using System.Reactive.Linq;
namespace ReactiveUIXamarin.ViewModel
{
public class MainPageViewModel: ReactiveObject
{
private string _result;
public string Result
{
get => _result;
set => this.RaiseAndSetIfChanged(ref _result, value);
}
private string _username;
public string UserName
{
get => _username;
set => this.RaiseAndSetIfChanged(ref _username, value);
}
private string _password;
public string Password
{
get => _password;
set => this.RaiseAndSetIfChanged(ref _password, value);
}
private string _address;
public string Address
{
get => _address;
set => this.RaiseAndSetIfChanged(ref _address, value);
}
private string _phone;
public string Phone
{
get => _phone;
set => this.RaiseAndSetIfChanged(ref _phone, value);
}
public ReactiveCommand<Unit, Unit> RegisterCommand { get; }
public MainPageViewModel()
{
RegisterCommand = ReactiveCommand
.CreateFromObservable(ExecuteRegisterCommand);
}
private IObservable<Unit> ExecuteRegisterCommand()
{
Result = "Hello" + UserName + " Registration Success";
return Observable.Return(Unit.Default);
}
}
}
Create UI View:
ReactiveUI allows you to create views using two different approaches. The recommended approach
is using type-
safe ReactiveUI bindings that can save you from memory leaks and runtime errors. The second approach is using XAML markup bindings.
The following sample UI created by
recommended approach using type-safe
ReactiveUI .
<
rxui:ReactiveContentPage
x:Class="ReactiveUIXamarin
.MainPage"
x:TypeArguments="
vm:MainPageViewModel"
xmlns:vm="clr-namespace
:ReactiveUIXamarin
.ViewModel
;assembly=ReactiveUIXamarin"
xmlns:rxui="clr-namespace
:ReactiveUI.XamForms;assembly=
ReactiveUI.XamForms"
xmlns:x="http://schemas.microsoft.com/winfx/2009/xaml"
xmlns:ios="clr-namespace
:Xamarin
.Forms
.PlatformConfiguration.iOSSpecific;assembly=Xamarin
.Forms
.Core"
xmlns="http://xamarin.com/schemas/2014/forms"
ios:Page
.UseSafeArea="true">
<
StackLayout>
<Entry x
:Name="Username" Placeholder="Username"/>
<Entry x
:Name="Password" Placeholder="Password" />
<Entry x
:Name="Address" Placeholder="Address" />
<Entry x
:Name="Phone" Placeholder="Phone Number" />
<Button x
:Name="Register" Text="Register" TextColor="White" BackgroundColor="Gray" />
<Label x
:Name="Result" />
</
StackLayout>
</
rxui:ReactiveContentPage>
ContentPage should inherit from ReactiveContentPage<TViewModel> and we are going to use ReactiveUI Binding to bind our ViewModel to our View.
Reactive binding is a cross platform way of
consistently binding properties on your ViewModel to
controls on your View.
The ReactiveUI binding has a few advantages over the XAML based binding. The first advantage is that property name changes will generate a compile error rather than runtime errors.
One important think needs to
follows while Binding, always dispose bindings via
WhenActivated, or else the bindings leak memory.
using ReactiveUI;
using System;
using System
.Collections
.Generic;
using System
.ComponentModel;
using System
.Linq;
using System
.Text;
using System
.Threading
.Tasks;
using Xamarin
.Forms;
using ReactiveUIXamarin
.ViewModel;
using ReactiveUI
.XamForms;
using System
.Reactive
.Disposables;
namespace ReactiveUIXamarin
{
public partial class MainPage
: ReactiveContentPage<MainPageViewModel>
{
public MainPage
()
{
InitializeComponent
();
ViewModel = new MainPageViewModel
();
// Setup the bindings.
// Note: We have to use
WhenActivated here, since we need to dispose the
//
bindings on XAML-based platforms, or else the bindings leak memory.
this.WhenActivated(disposable =>
{
this.Bind(ViewModel, x => x.UserName, x => x.Username.Text)
.DisposeWith(disposable);
this.Bind(ViewModel, x => x.Password, x => x.Password.Text)
.DisposeWith(disposable);
this.Bind(ViewModel, x => x.Address, x => x.Address.Text)
.DisposeWith(disposable);
this.Bind(ViewModel, x => x.Phone, x => x.Phone.Text)
.DisposeWith(disposable);
this.BindCommand(ViewModel, x => x.RegisterCommand, x => x.Register)
.DisposeWith(disposable);
this.Bind(ViewModel, x => x.Result, x => x.Result.Text)
.DisposeWith(disposable);
});
}
}
}
Output:
You can download the source code from
github repository. When you run the application
in an iPhone device, you will get the following output and click on Register, it will show the confirmation message like below screen.
Summary
This article has demonstrated and covers a little bit of what you can do when you combine the power of Reactiveui in Xamarin
.Forms. I hope this article will help you to get started with awesome Framework.
Storyboards feature first introduced in iOS 5 that save time building user interfaces for iOS mobile apps. Storyboards allow you to prototype and design multiple view controller views within one file. Before Storyboards you had to use XIB files and you could only use one XIB file per view (UITableViewCell, UITableView or other supported UIView types).
A Storyboard is the visual representation of all the screens in an application. It contains a sequence of scenes, with each scene representing a View Controller and its Views. These views may contain objects and controls that will allow your user to interact with your application.
The storyboard is a collection of views and controls (or subviews) is known as a Content View Hierarchy. Scenes are connected by segue objects, which represent a transition between view controllers. This is normally achieved by creating a segue between an object in the initial view, and the connecting view. The relationships on the design surface.
The following image shows what a storyboard looks like, and it’s similar to the storyboard you’ll build the Storyboard in the end of the article.

Create New Xamarin.iOS Application In order to learn the storyboard, let’s start creating a new Xamarin.iOSproject using Visual Studio 2019 or VS for Mac. When using Visual Studio 2019 on a Windows machine, you will need to pair the Mac machine.
Open Visual Studio 2019 >>Create New Project or select "
Open Recent Application" and the available templates will appear on a Windows like below. Select Xamarin.iOS app and click on “Next”

Create a Empty iPhone/iPad Single View Storyboard Application

The content of a storyboard is stored as an XML file. Storyboard files are compiled into binary files known as nibs. At runtime, these nibs are initialized and instantiated to create new views. After selection of single view application, solutions template will generate as below

Main StoryBoard: Open Main.storyboard where you can find single view controller. Add one more view controller and update the view controllers as shown below.

View Controller Segue: Let us now connect both the view controllers. Segue is used in iOS development to represent a transition between scenes. To create a segue, hold down the Ctrl key and click-drag from one scene to another. As we drag our mouse, a blue connector appears and select as Show/ Push as image below

Change View Properties: Add Controls into the view controller and Select the properties, Change the styles as per your needs

Output: When we run the application in an iPhone device, we'll get the following output and click on button, it will navigate to new screen.

Summary:
This article has demonstrated how to create a iOS Storyboards using Xamairn iOS. I hope this article will help you. Please leave your feedback/query using the comments box, and if you like this article, please share it with your friends.
 Enable GingerCannot connect to Ginger Check your internet connection
or reload the browserDisable in this text fieldEditEdit in GingerEdit in Ginger
Google announced all Android app should support 64-bit architectures from Aug 1, 2019. 64-bit CPUs deliver faster, richer experiences for your users. Google Play will continue to support 32-bit apps for now, but as of August 1, 2019 all new apps and updates that include native code must have 64-bit versions as well as 32-bit versions when publishing to Google Play. This ruling applies to apps written in native, Xamarin or apps with links to third-party native libraries.
Android application supports four ABIs that can be selected when building mobile app. You can Select which ABIs your application supports in the project android options properties, if no ABI is specified, “armeabi-v71” is used in release build and As of Xamarin.Android 9.2, armeabi is no longer supported.
armeabi-v7a – ARM-based CPUs with hardware floating-point operations and multiple CPU (SMP) devices.
arm64-v8a – CPUs based on the 64-bit ARMv8 architecture.
x86 – CPUs that support the x86 (or IA-32) instruction set.
x86_64 – CPUs that support the 64-bit x86 .
You can follow the below steps for select 64-bit android application in the Visual studio and Visual studio mac.
Visual Studio in Windows machine:
Step 1: You can open Visual Studio in the windows machine, right-click on android project and select Properties.
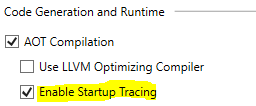
Step 2: Select the Android Options tab and Click the Advanced button and, check the architectures that you want to support.
Visual Studio Mac:
You can open Visual Studio mac in the mac machine and open/ create new project Android project.
Step 1: Right-click on Android project under the Solution Explorer and select Properties.
Step 2: Under the Android Options page check the Packaging properties section and Click the Advanced button and select the architectures that you want to support:
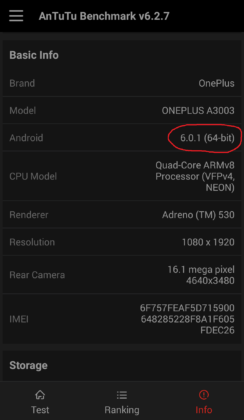
How to check if your device is 32-bit or 64-bit?
You can also check if your phone is 64-bit in android using the app Antutu Benchmark. While this is a benchmarking app, you can just use it to view your device information. Open Antutu Benchmark and click on “info”.
Summary:
The android applications already support 64-bit, no need to do anything, If you haven’t yet, you can change the as per the above steps as soon as possible. I hope this article will help you. Please leave your feedback/query using the comments box, and if you like this article, please share it with your friends.