Introduction:
The Bot Framework enables you to build bots that support different types of interactions with users. You can design conversations in your bot to be freeform. Your bot can also have more guided interactions where it provides the user choices or actions. The conversation can use simple text strings or more complex rich cards that contain text, images, and action buttons. And you can add natural language interactions, which let your users interact with your bots in a natural and expressive way.
In this article, we can create a bot by using the Visual studio 2017 with Bot template and testing it with the Bot Emulator.
Download Visual Studio 2017 from https://www.visualstudio.com/downloads/.
Install Visual Studio 2017:
Download Visual Studio 2017 from the following URL given below.Download Visual Studio 2017 from https://www.visualstudio.com/downloads/.
Refer Visual Studio 2017 system requirement from https://www.visualstudio.com/en-us/productinfo/vs2017-system-requirements-vs.

The Bot Builder SDK for .NET currently supports Only on Windows. Visual Studio for Mac is not supported.
Note:
You can build bots for free with Visual Studio 2017 Community.The Bot Builder SDK for .NET currently supports Only on Windows. Visual Studio for Mac is not supported.
Bot Application template:
Download the Bot Application template from the following url http://aka.ms/bf-bc-vstemplate and install the template by saving the .zip file to your Visual Studio 2017 project templates directory.
The Visual Studio 2017 project templates directory is typically located following url
%USERPROFILE%\Documents\Visual Studio 2017\Templates\ProjectTemplates\Visual C#\

%USERPROFILE%\Documents\Visual Studio 2017\Templates\ProjectTemplates\Visual C#\
Create New Project:
Let's start with creating a new Bot application in Visual Studio 2017.
Click on Windows Key > Select Visual Studio 2017.
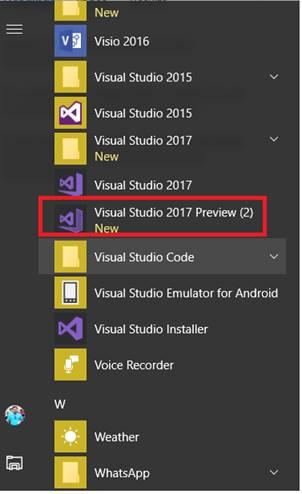
Now, open VS and create new project with c# project, select the Bot applications template as per below

The Bot application was created with all of the components and installed all required Nuget reference

The Bot application was created with all of the components and installed all required Nuget reference
Update Bot Builder Nuget Package:
Verify your application Microsoft.Bot.Builder nuget package was installed under reference .if not , refer follow below steps
Right-click on the Bot project(DevEnvExeBot) and select Manage NuGet Packages.In the Browse tab, type "Microsoft.Bot.Builder" and click on Search
Locate the Microsoft.Bot.Builder package in the list of search results, and click the Update button for that package or Uninstall and Install the package .

You can find messagereceiveAsync method from Dialogs / RootDialog.cs file.
In this method activity.Text will return user text input so you can reply message based input text .
private async Task MessageReceivedAsync(IDialogContext context, IAwaitable
{
var activity = await result as Activity;
// calculate something for us to return
int length = (activity.Text ?? string.Empty).Length;
// return our reply to the user
//test
if (activity.Text.Contains("technology"))
{
await context.PostAsync("Refer C# corner website for tecnology http://www.c-sharpcorner.com/");
}
else if (activity.Text.Contains("morning"))
{
await context.PostAsync("Hello !! Good Morning , Have a nice Day");
}
//test
else if (activity.Text.Contains("night"))
{
await context.PostAsync(" Good night and Sweetest Dreams with Bot Application ");
}
else if (activity.Text.Contains("date"))
{
await context.PostAsync(DateTime.Now.ToString());
}
else
{
await context.PostAsync($"You sent {activity.Text} which was {length} characters");
}
context.Wait(MessageReceivedAsync);
}

Update Code:
The Default application added simple conde snipper, no need to change anything. if you want to test your custom message, you can change like below.You can find messagereceiveAsync method from Dialogs / RootDialog.cs file.
In this method activity.Text will return user text input so you can reply message based input text .
private async Task MessageReceivedAsync(IDialogContext context, IAwaitable
{
var activity = await result as Activity;
// calculate something for us to return
int length = (activity.Text ?? string.Empty).Length;
// return our reply to the user
//test
if (activity.Text.Contains("technology"))
{
await context.PostAsync("Refer C# corner website for tecnology http://www.c-sharpcorner.com/");
}
else if (activity.Text.Contains("morning"))
{
await context.PostAsync("Hello !! Good Morning , Have a nice Day");
}
//test
else if (activity.Text.Contains("night"))
{
await context.PostAsync(" Good night and Sweetest Dreams with Bot Application ");
}
else if (activity.Text.Contains("date"))
{
await context.PostAsync(DateTime.Now.ToString());
}
else
{
await context.PostAsync($"You sent {activity.Text} which was {length} characters");
}
context.Wait(MessageReceivedAsync);
}
Install bot Emulator:
You will need to download and install the emulator for testing bot application .You can download bot emulator from https://docs.microsoft.com/en-us/bot-framework/debug-bots-emulator .Run Bot Application:
The emulator is a desktop application that lets you test and debug your bot on localhost or remotely. Now, you can click on run the application in any browserTest Application on Bot Emulator:
- You can follow below steps for test bot application
- Open Bot Emulator
- Copy above localhost url and past it from emulator eg: http://localHost:3979
- You can append the /api/message from above localhost url eg: http://localHost:3979/api/messages.
- You won't need to specify Microsoft App ID and Microsoft App Password for localhost testing so click on Connect


Download
You can download the complete source code from MSDN sample.
No comments: