Introduction:
Azure Functions is a solution for easily running small pieces of code in the cloud. We can create, execute, and test our custom logic function without creating a VM or web applications and also without needing to install any software or infrastructure to run the function.In this article, you will learn about create, test, debug and deploy azure functions using Visual Studio 2017. Azure Functions tools are available as part of the Azure development workload in Visual Studio 2017 version 15.3, or a later version.
Prerequisites:
Download and Install Visual 2017 version 15.3 .If you already Installed Visual Studio 2017, Update Visual Studio from Extensions and updates
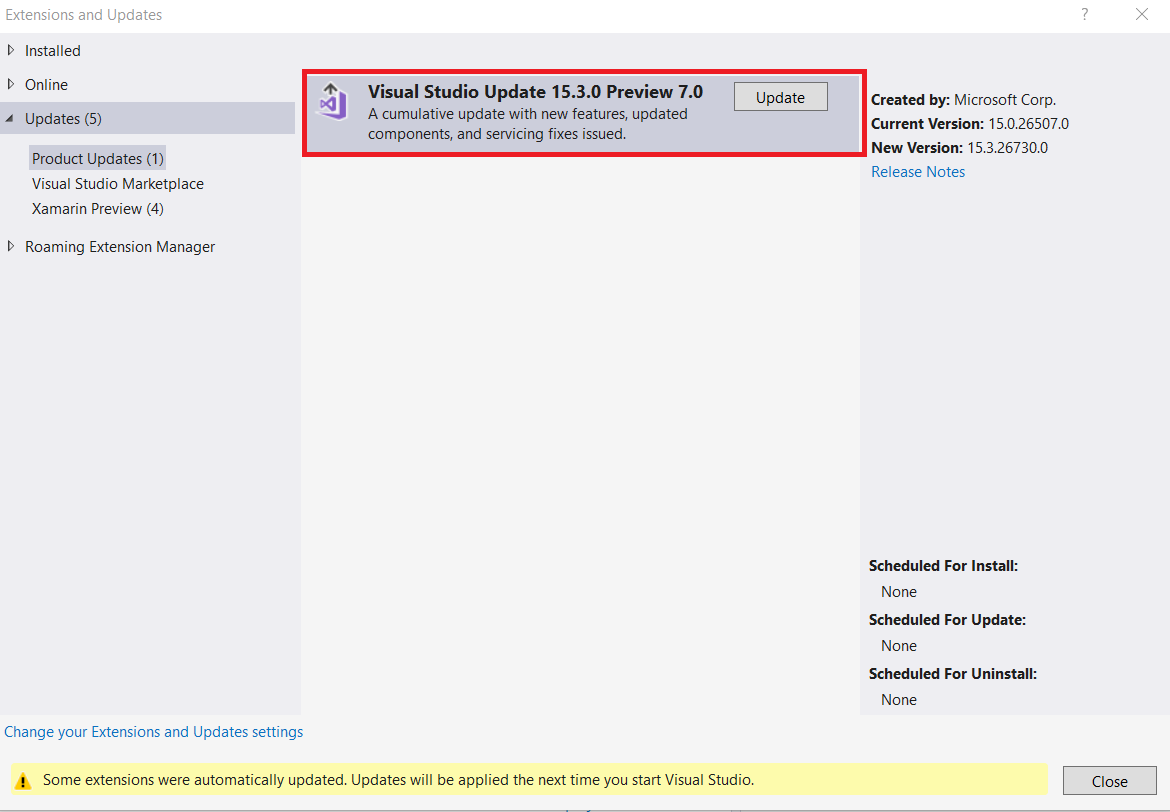
Open Visual Studio 2017 > Tools > Extensions and Updates > Select product Updates under the Products category and select Visual studio update 15.3 preview 7.0 version and click on update
Step 1:
Create Azure Functions Project in Visual Studio 2017
Open Visual Studio 2017 Preview 15.3 > Select File >click on New Project (Ctrl +Shift +N) > Select on Visual C# >Click on Cloud > select Azure Functions, type a Name for your project, and click on OK
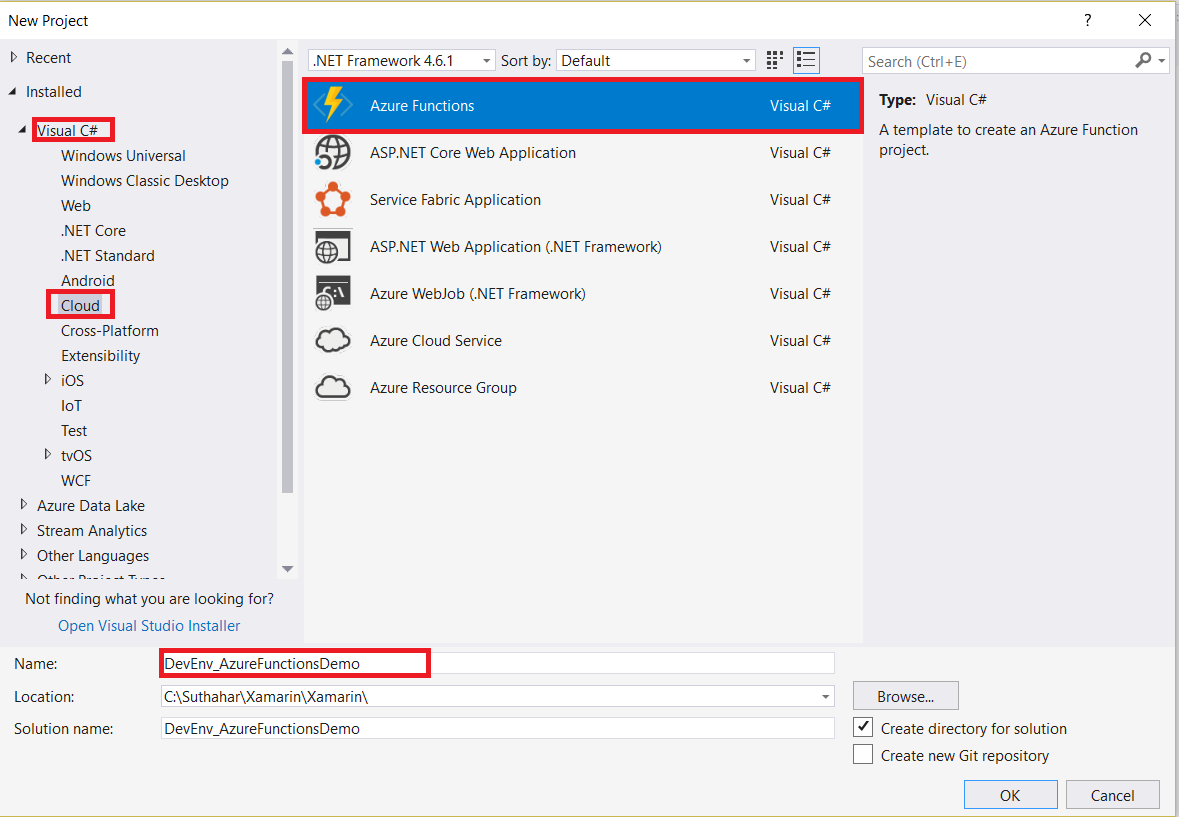
Open Visual Studio 2017 Preview 15.3 > Select File >click on New Project (Ctrl +Shift +N) > Select on Visual C# >Click on Cloud > select Azure Functions, type a Name for your project, and click on OK
Step 2:
Create New Function
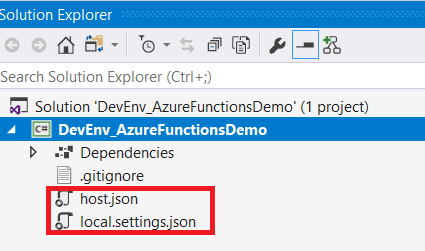
Azure Functions Solution will generate like below with host.json and locl.settings.json file .
In Solution Explorer, right-click on your Azure function project and select Add > New Item. Select Azure Function and click Add.

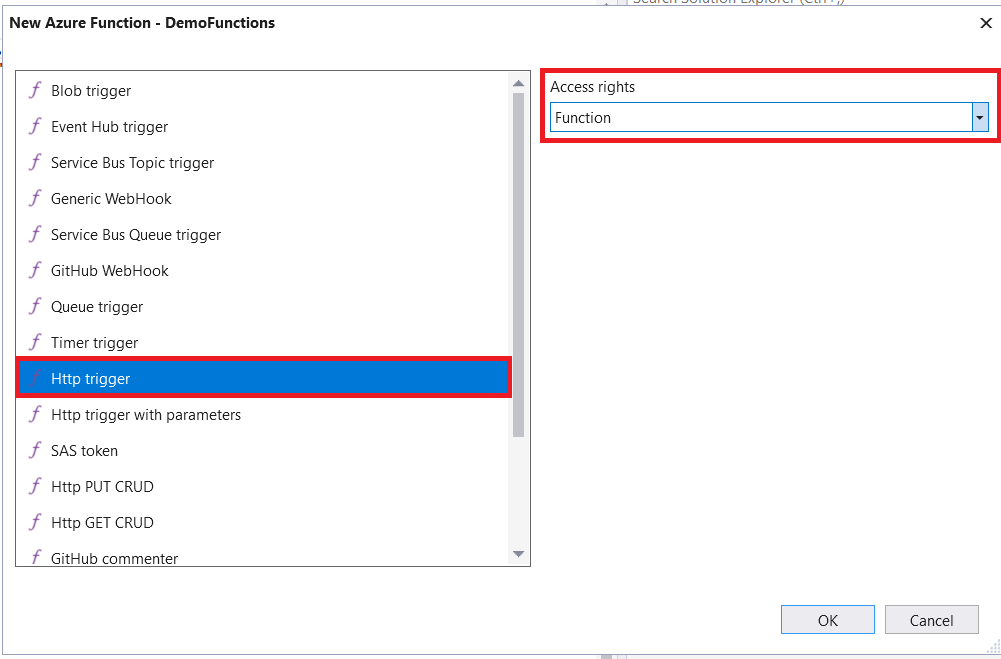
Select HttpTrigger as Azure Function type, select Functions for Access Rights, and click Create. The function created is accessed by an HTTP request from any client.
After click on Ok, will generates a new class with a Static Run method, that is attributed with [FunctionName] attribute. The [FunctionName] attribute indicates that the method is the entry for an Azure Function
using System.Linq;
using System.Net;
using System. Net.Http;
using System.Threading.Tasks;
using Microsoft.Azure.WebJobs;
using Microsoft.Azure.WebJobs.Extensions.Http;
using Microsoft.Azure.WebJobs.Host;
namespace DevEnv_AzureFunctionsDemo
{
public static class DemoFunctions
{
[FunctionName("DemoFunctions")]
public static async Task<HttpResponseMessage> Run([HttpTrigger(AuthorizationLevel.Function, "get", "post", Route = null)]HttpRequestMessage req, TraceWriter log)
{
log.Info("C# HTTP trigger function processed a request.");
// parse query parameter
string name = req.GetQueryNameValuePairs()
.FirstOrDefault(q => string.Compare(q.Key, "name", true) == 0)
.Value;
// Get request body
dynamic data = await req.Content.ReadAsAsync<object>();
// Set name to query string or body data
name = name ?? data?.name;
return name == null
? req.CreateResponse(HttpStatusCode.BadRequest, "Please pass a name on the query string or in the request body")
: req.CreateResponse(HttpStatusCode.OK, "Hello " + name + "Welcome C# Corner ");
}
}
}
Azure Functions Solution will generate like below with host.json and locl.settings.json file .
In Solution Explorer, right-click on your Azure function project and select Add > New Item. Select Azure Function and click Add.
Select HttpTrigger as Azure Function type, select Functions for Access Rights, and click Create. The function created is accessed by an HTTP request from any client.
After click on Ok, will generates a new class with a Static Run method, that is attributed with [FunctionName] attribute. The [FunctionName] attribute indicates that the method is the entry for an Azure Function
using System.Linq;
using System.Threading.Tasks;
using Microsoft.Azure.WebJobs;
using Microsoft.Azure.WebJobs.Extensions.Http;
using Microsoft.Azure.WebJobs.Host;
namespace DevEnv_AzureFunctionsDemo
{
public static class DemoFunctions
{
[FunctionName("DemoFunctions")]
public static async Task<HttpResponseMessage> Run([HttpTrigger(AuthorizationLevel.Function, "get", "post", Route = null)]HttpRequestMessage req, TraceWriter log)
{
log.Info("C# HTTP trigger function processed a request.");
// parse query parameter
string name = req.GetQueryNameValuePairs()
.FirstOrDefault(q => string.Compare(q.Key, "name", true) == 0)
.Value;
// Get request body
dynamic data = await req.Content.ReadAsAsync<object>();
// Set name to query string or body data
name = name ?? data?.name;
return name == null
? req.CreateResponse(HttpStatusCode.BadRequest, "Please pass a name on the query string or in the request body")
: req.CreateResponse(HttpStatusCode.OK, "Hello " + name + "Welcome C# Corner ");
}
}
}
Step 3:
Azure Functions Test:
You can Press F5 for run, test and debug your azure function, if prompted, accept the request from Visual Studio to download and install Azure Functions Core (CLI) tools. You may also need to enable a firewall exception so that the tools can handle HTTP requests.Copy the Azure function local deploy url on runtime output window
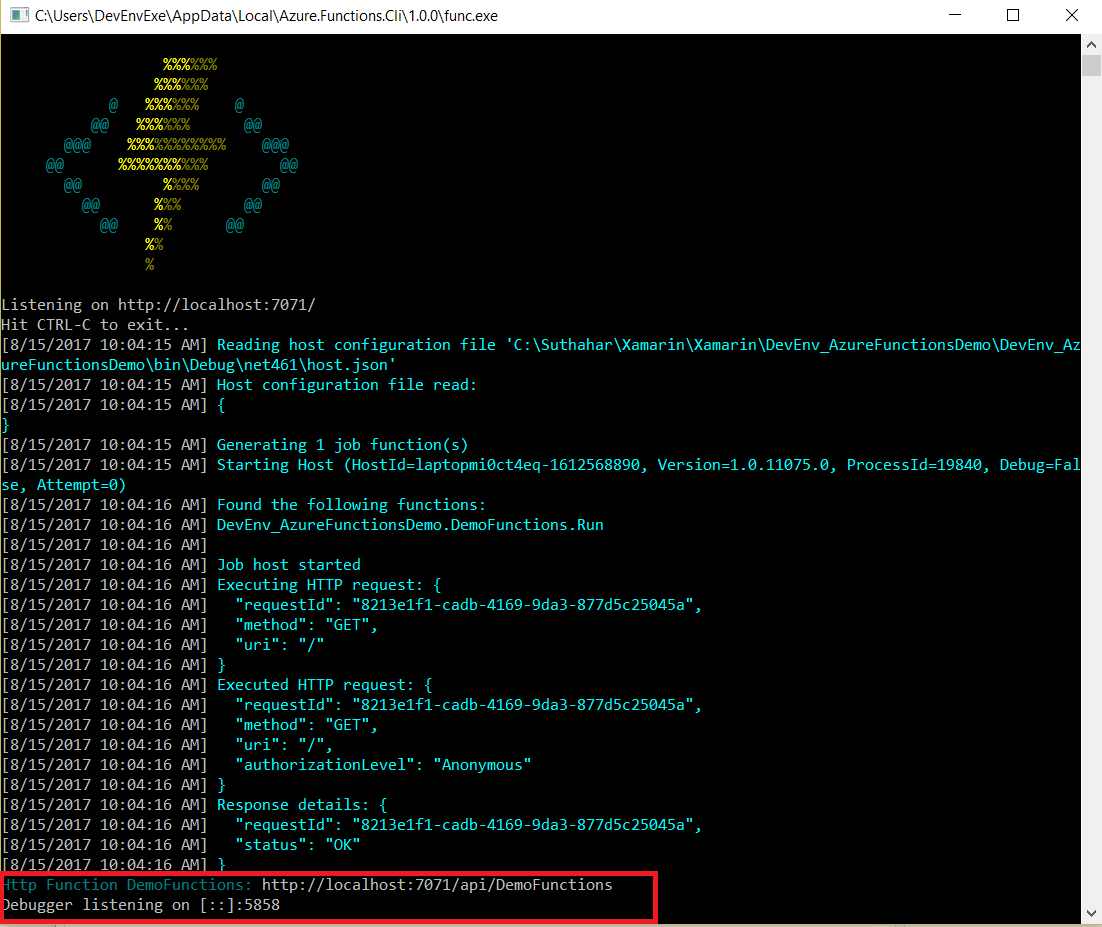
Append the name parameter to the query string. Use an actual name for the <Enter a name here> placeholder.
https://<Local Host url> /api/<Your Function Name>? name=<Enter a name here>
Paste the URL into your browser, and you should get a response similar to the following.

If you are Function locally working as expected means, you can initiate to publish the project to Azure.
Paste the URL into your browser, and you should get a response similar to the following.
If you are Function locally working as expected means, you can initiate to publish the project to Azure.
Step 4:
Publish Project to Azure:
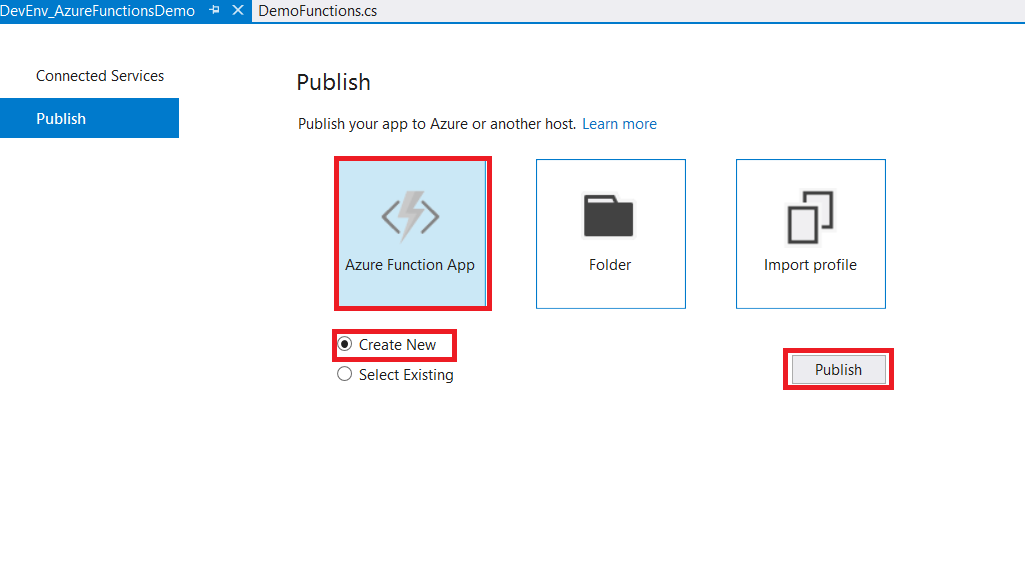
If you don't have an Azure subscription, create a free account before start deploy azure function.In Solution Explorer, right-click the project and select Publish. Choose Create New and then click on Publish.
If you haven't already connected Visual Studio to your Azure account, click Add an Account and Provide the login details and connect
In the Create App Service dialog, provide Hosting settings as specified below
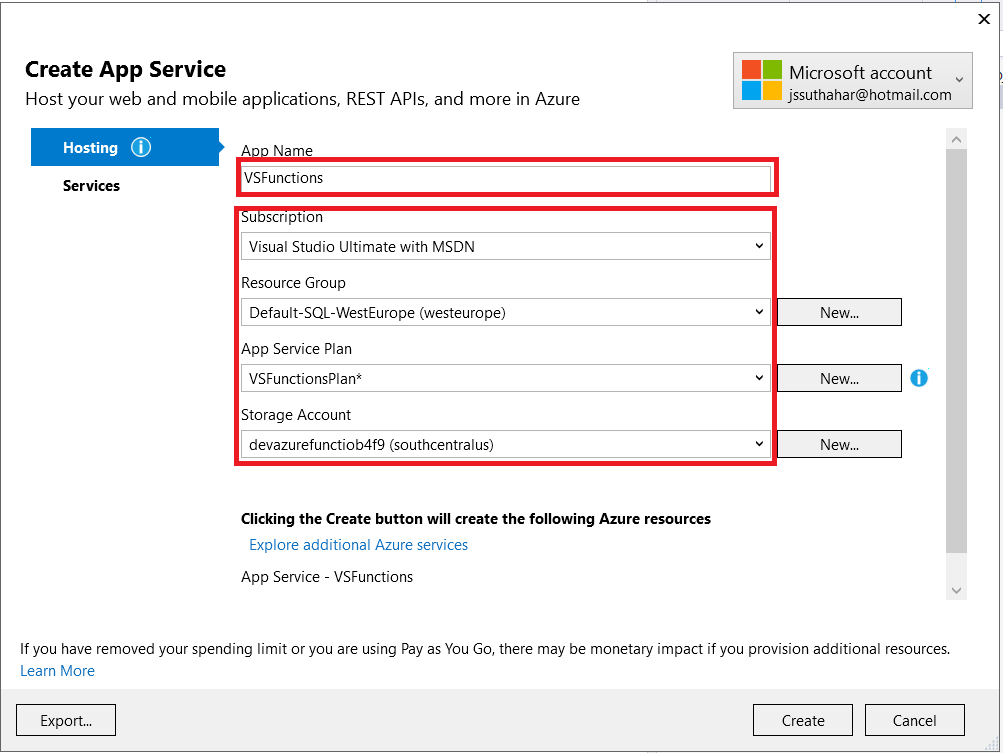
Click Create to create a function app in Azure with these settings. After the provisioning is complete, make a note of the Site URL value, which is the address of your function app in Azure.
 Copy the base URL of the function app from the Publish profile page. Replace the localhost:port of the URL you used when testing the function locally with the new base URL. As before, make sure to append the query string with &name=<yourname> to this URL and execute the request.
 Download Source Code :

Related Article:
- Getting Started With Azure Functions Using Azure Free Trial Account
- How to Create and Test Azure Functions Using Azure Portal
Summary:
In this article, you learned about Azure Functions and how to create, test, publish Azure Functions using visual studio 2017.If you have any questions/ feedback/ issues, please write in the comment box.
No comments: